
How to Change Location On Facebook Dating for your Nokia 150 (2023) | Dr.fone
How to Change Location On Facebook Dating for your Nokia 150 (2023)
Facebook is a social media platform that puts many things at your disposal. Thanks to Facebook, you can get some entertainment, shop, or even search for your soulmate through Facebook dating. Unfortunately, if you choose to try out the latter, one thing needs to be done. You need to change your Facebook dating location to interact with people outside your local area. In this way, you can have the chance to match more people from other regions.
Interestingly, you also enjoy other additional features such as online buying, marketing, and entertainment simultaneously. This article teaches you how to change your location on Facebook dating. Read on to find out.

Part 1: Change Location On Facebook Dating in an Official Way
As far as Facebook Dating is concerned, you can change your location quickly to start seeing profiles from people outside your local area. You most likely think that it is a challenging task. On the contrary, changing location on Facebook dating is a breeze. The following steps summarize how to change your dating location on Facebook dating.
- Go to the “Facebook Dating” application.
- Navigate to the “Profile” option and then select “Edit.”
- Choose “Dating Location.”
- Go ahead and select the “Update Dating Location” choice.
- Last but not least, don’t forget to “Save” these changes.


Part 2: Fake Location to Match More Friends
Here is another option, significantly if you can’t change your Facebook dating location. Dr.Fone - Virtual Location becomes your better option. You can change the Facebook Dating location and the location that other platforms such as Wizards Unite, Jurassic World, Ingress Prime, Minecraft Earth, and Pokémon GO.
Dr.Fone - Virtual Location
1-Click Location Changer for both iOS and Android
- You can also fake location on social media platforms, including Snapchat, WhatsApp, Instagram, and Twitter.
- The same case applies when using dating applications such as Grindr, Hinge, Bumble, and Tinder to expand your network since you can meet more people.
- There is also the issue of real-time tracking. People, especially friends and loved ones, use the many applications that facilitate tracking. Fake your location by Dr.Fone on Gaode Map, Google Map, Lite360, and Find My iPhone to avoid this nightmare.
3981454 people have downloaded it
 safe & secure
Part 3: How to Turn Facebook Location Services On and Off
How do I change my location on Facebook dating? That question is no longer a mystery. Alternatively, you can choose to turn Facebook Location services on or off. If you decide to go down that route, follow this guide.
For iOS
- Find the “Settings” application on your Nokia 150 (2023)’s home screen.
- Select “Privacy.”
- Go to “Location Services.”
 Power Tools add-on for Google Sheets, 12-month subscription

- Toggle the corresponding button on or off depending on the current situation demands.
For Android
Android users can also turn the Facebook Location services on or off. The procedure is as follows:
- Find the “Settings” application on your Nokia 150 (2023)’s home screen.
- Go to “Apps.”
- Select “Facebook.”
- Tap on “Permissions.”
- Click on “Locations.”
- Turn the Locations off by choosing “Don’t Allow.”

Part 4: FAQs About Facebook Dating

1.Can my friends see if I use Facebook Dating?
It is one of the many advantages of using Facebook dating. It will ensure that no one, even your friends can see your Facebook dating profile. This hiding of the dating profile is automatic. So, don’t expect your friends who are using Facebook dating to notice that you are using the platform. In the same vein, don’t expect to see your friends who are using Facebook Dating.
2. What happens when you like someone on Facebook Dating?
If you notice a profile that matches what you are looking for, Facebook Dating requires you to do something about it. You can choose to begin a conversation by either tapping the person’s photo or hitting the love icon. Let’s elaborate on how you do either of the two.
Sending a Like
- Upon opening your Facebook application, go to the hamburger menu.
- From the choices displayed, select the “Dating” Option.
- Tap the love icon to send the like.
Starting a conversation
- Upon opening your Facebook application, go to the hamburger menu.
- From the choices displayed, select the “Dating” Option.
- Tap the photo, write a message you deem fit, and send it.
It is important to note that what happens after that solely depends on the other party. If you send them a like, they have to send a like back for a conversation to commence. But, equally important, the other person has to reply to your message for you to start a conversation.
3. How do you know if someone is on Facebook Dating?
One must admit that knowing whether someone is on Facebook Dating can be quite hard. After all, the feature automatically hides its users’ profiles. The simplest way of finding out is to rely on luck. Go ahead and join Facebook Dating and then wait for Facebook Dating to suggest that person. There are high chances of waiting long before knowing whether someone is on Facebook Dating. If they change their Facebook dating location, there is a possibility of never knowing.
That said and done, there are other more specific ways of identifying if that person is using Facebook Dating. If you can access their phone, grab it and check Facebook notifications. If you notice the likes of someone who liked you or has a crush on you, then that’s a Facebook Dating user. If the person doesn’t mind answering, go straight to the point and ask them. Other alternatives include spying on their phones and using online tools.
4.Can someone see once you read a message sent via Facebook Dating?
Unfortunately, Facebook Dating doesn’t support read receipts. Your option is to keep waiting for the response until they respond or hope to forget about it altogether. For someone genuinely interested, the wait can be pretty frustrating. It could mean that the other parties are genuinely busy or not interested. If the case is the latter, the other party will most likely see the message and ignore it. Please tell him whether they have yet to see your message or chose not to respond.
 Easy GIF Animator is a powerful animated GIF editor and the top tool for creating animated pictures, banners, buttons and GIF videos. You get extensive animation editing features, animation effects, unmatched image quality and optimization for the web. No other GIF animation software matches our features and ease of use, that’s why Easy GIF Animator is so popular.
5. How anonymous is a Facebook Dating profile?
Seeing someone’s Facebook Dating profile can be a daunting task. Despite that being the case, anonymity is something you can’t expect from this platform. If someone gets lucky and sees your dating profile, recognizing you are pretty high. After all, your profile displays the name you use on Facebook.
Conclusion
It is an excellent way of meeting new friends who live outside your residence area. In addition to that, you can also use Dr.Fone - Virtual Location to fake your location when using other social media platforms, games, and dating sites. It ensures that no one can easily track you, which is ideal for your safety and privacy. If you can’t change your Facebook dating location, you can always turn Facebook location services off. Last but not least, it puts at your disposal the answers to frequently asked questions on Facebook Dating. So, don’t let your location determine the features and services you get to use, especially the restricted ones.
safe & secure
Simple and Effective Ways to Change Your Country on YouTube App Of your Nokia 150 (2023)
YouTube is easily the most popular video-sharing and media platform today. It’s where you can find free popular and trending videos across the globe to stream to your heart’s content. However, you’ll notice that some videos are blocked in some countries for several reasons, including copyright claims, legal requests, or licensing rights.
If you want to bypass these restrictions, simply read below to learn the simplest and most effective ways to change your location on YouTube. You’ll be able to access content that is otherwise restricted in your country by following our handy guide in no time.
 Project Manager - Asset Browser for 3Ds Max
Part 1: How to Change Location Settings on YouTube?
You can change your YouTube location settings if you want to make some videos available in your country. We’ll show you how to change your YouTube region, whether you’re on a computer, Android, iPhone, or iPad, by following these simple steps below.
Method 1: Change Your Location on YouTube from Computer
Here are the steps to change location on YouTube while using a computer.
Step 1: Click your Profile Picture.
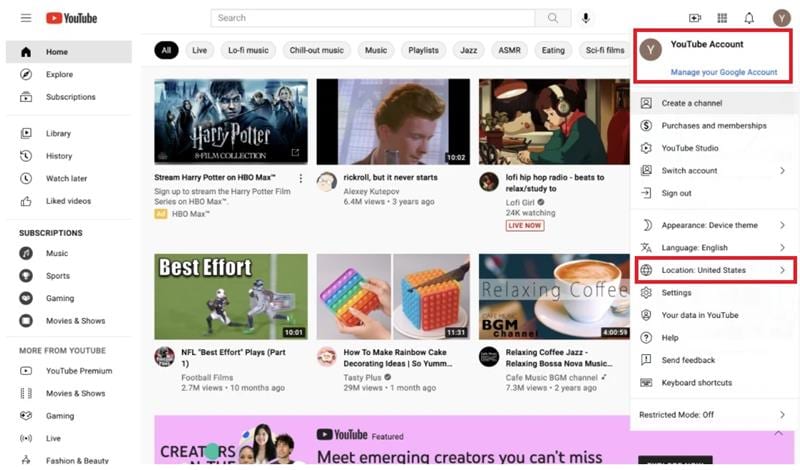
Step 2: Click Location.
Step 3: Choose the location you’d like to use.
Method 2: Change Your Location on YouTube from Android
Here’s how to change your country on YouTube if you’re on Android.
Step 1: Open YouTube on your Nokia 150 (2023).
Step 2: Tap your Profile Picture and choose Settings > General > Location.

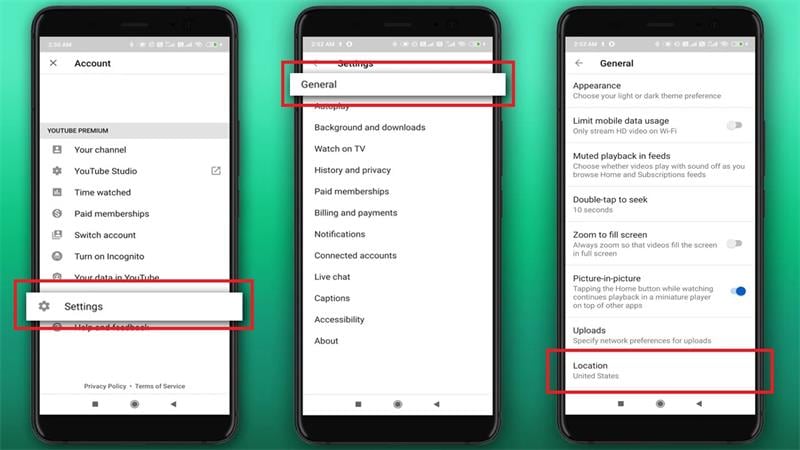
Step 3: Choose your desired country from the list of available options.
 PaperScan Professional: PaperScan Scanner Software is a powerful TWAIN & WIA scanning application centered on one idea: making document acquisition an unparalleled easy task for anyone.
Method 3: Change Your Location on YouTube from iPhone and iPad
Lastly, if you’re using an iPhone or an iPad, simply follow the steps below to change your location on YouTube.
Step 1: Tap your Profile Picture.
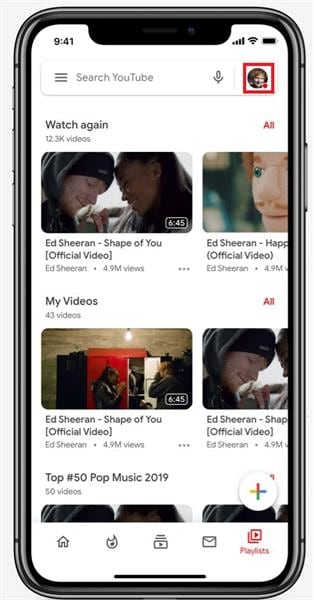
Step 2: Tap Settings > General > Location.
Step 3: Select your desired country.
Part 2: How to Change Your Country to Watch Blocked YouTube Videos?
There are generally no issues when watching YouTube videos anywhere you are. The only instance to have problems accessing YouTube is when you are in a country where the platform is blocked, such as in North Korea or China. Even then, some contents are still geo-restricted unless you’re in the right region.
In this part, we’re listing five different methods to access YouTube’s full library so you can stream all you want.
 Software Update Pro - Check and update software installed on your computer.
Method 1: Change Your Home Area on YouTube Manually
Here are the steps to manually manage your home area on YouTube to change your location.
Step 1: Sign up for YouTube TV and open the YouTube TV application.
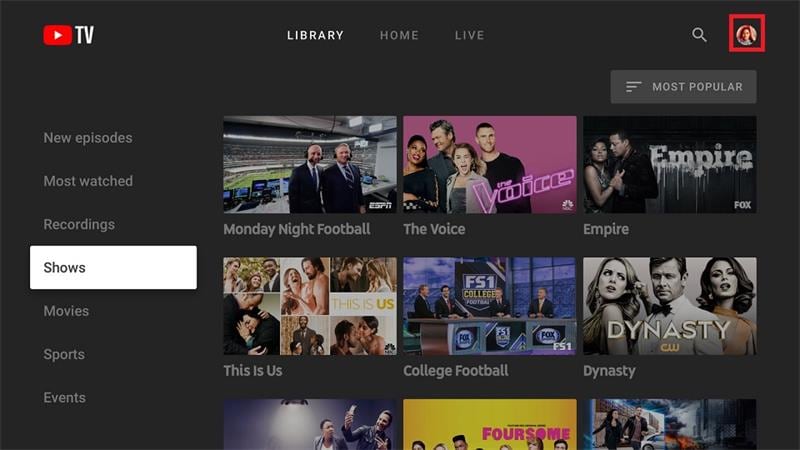
Step 2: Click your Profile Picture and click Location > Home Area.
Step 3: Update your home area.
Note
You can only change your location twice a year. You should also use YouTube at least once every three months in your country to ensure YouTube TV provides the correct local networks.
Method 2: Change Location on YouTube Using a VPN
The simplest and most effective way to unblock restricted content on YouTube is by using a VPN. In this example, we’ll be using NordVPN to change your location on YouTube using a VPN. Here are the steps.
Step 1: Download and install NordVPN. Sign in or create an account.
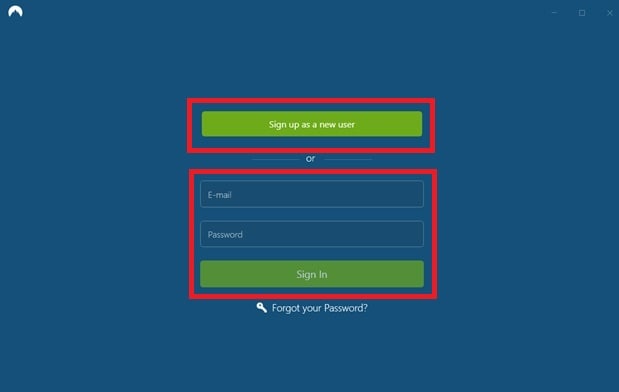
Step 2: Use Quick Connect or connect to a specific country by clicking on the pin on the map. You can click on Search here as well to find a specific server in the country of your choosing. There’s also a list of countries at the left sidebar so you can choose a server manually.

Step 3: Open YouTube and browse previously blocked content.
The Best VPNs for YouTube
Aside from NordVPN, there are other VPNs you can try to access content on YouTube, including ExpressVPN, CyberGhost, and Surfshark.
NordVPN utilizes up to 5,200 servers in 60 countries, with some servers optimized for ultra-fast streaming. It’s one of the fastest VPNs available today, where you can unblock geo-restricted content wherever you are, with a no-logs policy for unbreakable encryption.
Like NordVPN, ExpressVPN optimizes speed for downloading and streaming. It uses more than 3,000 servers in more than 90 countries to provide cutting-edge connectivity, which includes 256-bit AES encryption for perfect anonymity.
CyberGhost has over 7,000 servers in more than 80 countries to unblock geo-restricted content across YouTube, Netflix, Amazon Prime, and more. CyberGhost doesn’t keep logs of your activities as well, ensuring your activity is safe.
Lastly, Surfshark is another reliable VPN to unblock restricted content on YouTube and other platforms. It uses up to 3,200 servers in 65 countries to provide a high-speed and low-latency connection at all times. Surfshark has a no-logs policy like the three VPNs on the list, making your online activity safe and anonymous.
Here’s a handy table to compare the best VPNs available today in terms of ratings, number of servers, supported devices, prices, and more.
| NordVPN | ExpressVPN | CyberGhost | Surfshark | |
|---|---|---|---|---|
| Number of Servers | 5,200 Servers | 3,000 Servers | 7,000 Servers | 3,200 Servers |
| Streaming Reliability | Excellent | Good | Good | Excellent |
| Streaming Services | YouTube | |||
| Netflix | ||||
| HBO Go | ||||
| Amazon Prime | ||||
| SkyGo | ||||
| BBC iPlayer | ||||
| Etc. | YouTube | |||
| Netflix | ||||
| HBO Go | ||||
| Amazon Prime | ||||
| SkyGo | ||||
| BBC iPlayer | ||||
| Etc. | YouTube | |||
| Netflix | ||||
| Amazon Prime | ||||
| BBC iPlayer | YouTube | |||
| Netflix | ||||
| HBO Go | ||||
| Amazon Prime | ||||
| SkyGo | ||||
| BBC iPlayer | ||||
| Etc. | ||||
| Supported Devices | Windows, macOS, iOS, Android, Linux, Smart TVs, Routers | Windows, macOS, iOS, Android, Linux | Windows, macOS, Linux (command line), iOS, Android | Windows, macOS, iOS, Android, Linux |
| Average Speeds | 100+ MBPS | 100+ MBPS | 100+ MBPS | 100+ MBPS |
| 24/7 Support | Yes - with live chat | Yes - with live chat | Yes, but email only: [email protected] | Yes, but email only: [email protected] |
| Free Trial | None - but with a 30-day money-back guarantee | None - but with a 30-day money-back guarantee | 24-Hour free trial | 7-day free trial for Android, iOS, and macOS only |
| Prices | $11.99 - 1 Month | |||
| $59.88 - 1 Year | ||||
| $95.76 - 2 Years | $12.95 - 1 Month | |||
| $59.95 - 6 Months | ||||
| $99.95 - 1 Year | $12.99 - 1 Month | |||
| $41.94 - 6 Months | ||||
| $56.94 - 2 Years + 4 months free | $12.95 - 1 Month | |||
| $47.88 - 1 Year | ||||
| $59.76 - 2 Years |
 HD Video Converter Factory Pro
Method 3: Change Your Country on YouTube Using a Proxy Server
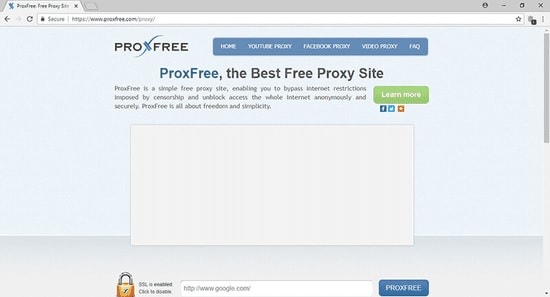
Using a Proxy to mask your location on the internet allows you to change your country on YouTube to access blocked content. In this example, we’ll use ProxFree YouTube Proxy to view locked YouTube content. Here are the steps to change your country on YouTube using a Proxy Server.
Step 1: Go to ProxFree YouTube Proxy .
Step 2: On the Server Location dialogue box, choose a country in the available options on the dialogue box.
Step 3: Enter the URL of the specific video you want to see unblocked and click PROXFREE to open YouTube in the proxy’s tab.
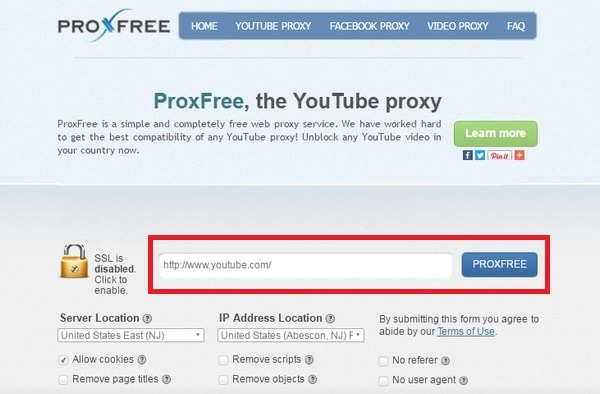
Note: You can also use YouTube’s search bar once YouTube’s tab is open on your proxy to search YouTube videos as usual.
Method 4: Change Your Country on YouTube Using a SmartDNS
Using SmartDNS to bypass YouTube geo-restrictions is useful for viewing blocked content in your country. This is because SmartDNS changes the Nokia 150 (2023) device’s virtual location by editing its DNS address. Here are the steps to change your country on YouTube using SmartDNS.
Step 1: Find and select a DNS Server address from different DNS providers online. In this example, we’ll be using SurfShark .
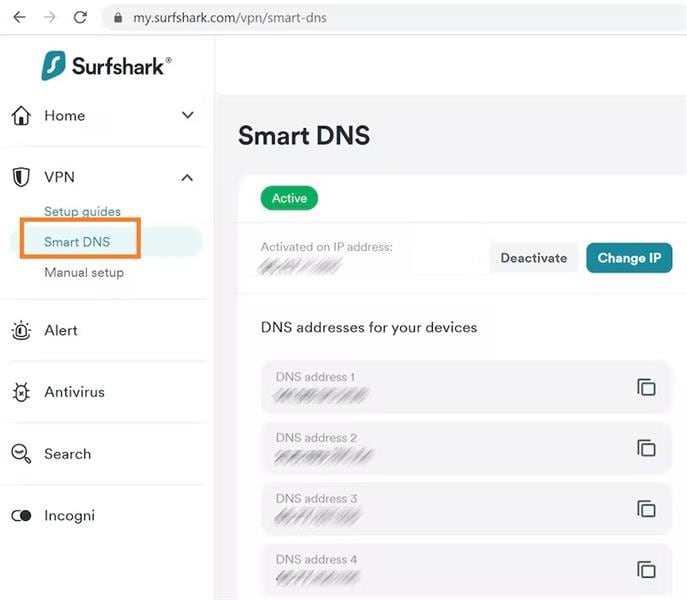
Step 2: Login or create an account. Click Smart DNS > Activate Smart DNS. Take note of the DNS address available to input on your computer’s Network Settings.
Step 3: Open Network Settings on your computer and find DNS Settings.
Step 4: Input your DNS Server address and click Ok once done. The DNS address should activate once you reconnect to the internet.
Note****_:_ Your IP address changes every 24 hours, which your ISP does. You’ll have to update your DNS address when it happens.
Method 5: Other Ways to Bypass YouTube’s Regional Filter
The easiest way to bypass YouTube’s regional filter is simply by downloading YouTube videos outright. Many websites are available online that allow you to download YouTube clips for free. In the step-by-step guide below, we’ll be using iTubeGo to download YouTube videos for viewing at a later time.
Step 1: Download and install iTubeGo . Launch the application on your computer.
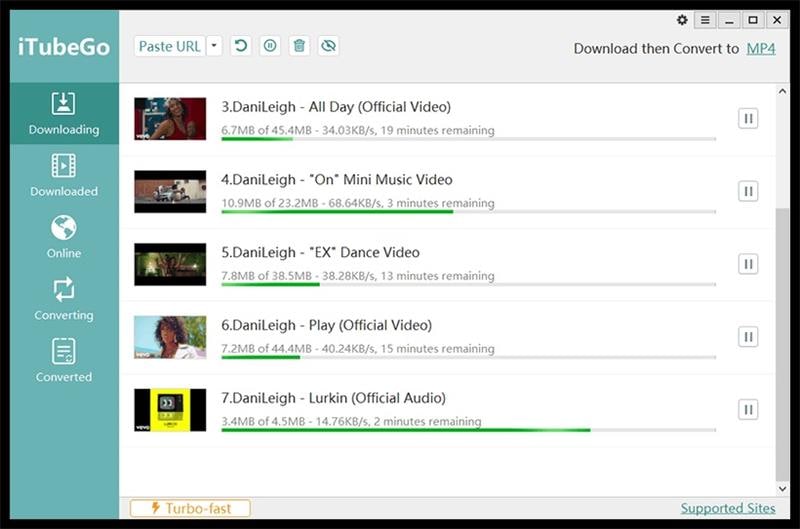
Step 2: Click Paste URL and paste the YouTube video’s URL on the dialogue box.
Step 3: Click Download to save the YouTube clip on your computer.
Here are the pros and cons of using each method to unblock geo-restricted content on YouTube.
| Pros & Cons | Manually on YouTube TV | Using VPNs | Using Proxy Servers | Using SmartDNS | Offline Downloads |
|---|---|---|---|---|---|
| Pros | You can easily change locations without downloading other applications. | Change countries on-the-fly to access even more content. | Some Proxy Servers don’t require downloading applications to use. | Unblocks geo-restricted content, much like VPNs. | You can always watch videos at a later time once downloaded. |
| Cons | You’re only allowed to change twice a month. | VPNs aren’t free, and you have to pay for a subscription. | Setting up Proxy Servers requires a little bit of technical know-how. | DNS is prone to manipulation by hackers. | You need to download a dedicated program to save YouTube videos. |
 Glary Utilities PRO - Premium all-in-one utility to clean, speed up, maintain and protect your PC
Part 3: Why Do Regions Block YouTube Content?
Although all YouTube videos are hosted on the same platform, a lot of them are geo-restricted to specific countries for various reasons. Many YouTubers sometimes lock their content in certain countries/regions due to licensing rights. YouTube may also block specific content to countries/regions to comply with local laws.
Conclusion
There are multiple ways to change your country on YouTube to access content that is otherwise unavailable in your location. You can change your country in settings on the YouTube app or use other methods, including using VPNs, SmartDNS, or Proxy Servers, to name a few. If all else fails, you can download an application that lets you save YouTube videos for offline viewing at a later time.


Why Your WhatsApp Live Location is Not Updating and How to Fix on your Nokia 150 (2023)
WhatsApp is a free messaging app owned by Meta, initially Facebook. Currently, this platform boasts over two billion active users, even outshining Messenger and WeChat. One of WhatsApp is popular is letting users share their live Location with individuals and group chats. However, sometimes you may experience the annoying WhatsApp location not updating issue. Luckily, this article has a solution to this problem. Let’s learn! We’ll also address how to share my Location on the WhatsApp issue.
First and foremost, let’s discuss some of the reasons why your WhatsApp live location is not updating on Android or iPhone. Below are some of them:
- Reason 1: Weak internet connection
You should be conversant with the idea that WhatsApp can’t function without the internet. In other words, you can’t send or receive messages and calls without a strong internet. And the same applies to updating your live Location.
- Reason 2: Disabled location feature
Here’s another reason why WhatsApp live Location is not updating on iPhone or Android. While signing up, WhatsApp will request to access your phone’s GPS location. Therefore, disabling this feature by mistake can prevent WhatsApp from updating your Location.
- Reason 3: Inappropriate time and date
Although uncommon with modern phones, this can be another reason for a wrong live location on WhatsApp. Therefore, connect your phone to the internet to update your date and time. You might also want to restart your phone and see if it works.
Part 2. How to Fix WhatsApp Live Location Not Updating Problem?
Now that you already know why WhatsApp’s Live Location isn’t updating, it’s time to check out the solutions. Let’s go!
1. Restart internet connection
Sometimes, it only takes a simple phone restart to get things back on track. Another thing, you can enable and disable “flight mode” to restart your data connection. Of course, this will also sort out any bugs in your WhatsApp app.
2. Update the app and phone
When last did you update your system and apps? It is very easy! You should constantly update your apps and phone system to enjoy better performance and security.
3. Enable location service
You can also check if your location service is enabled on iPhone or Android settings. On iPhone, click Settings > Privacy > Location Service. It’s even easier on Android. Swipe down your screen, long-press the GPS button, and enable the Location toggle.
4. Reset location service on iPhone/Android
iPhone users can try to reset the Location & Service settings. To do that, open Settings > General > Reset > Reset Location & Privacy. And for Android users, please try to take the refer the steps below to follow:
- Swipe down from the top of the screen
- Tap the Location icon;
- If you can’t find the Location icon, please go to settings, or tap the “Edit” icon to go on;
- Turn Google Location Accuracy on or off**.**
If all else fails, then it’s probably time to get handy. Uninstall your WhatsApp app and then get a newer version on Play Store or App Store. But often, this won’t be necessary after updating the app.
Part 3: [WhatsApp Tip] Fake WhatsApp Live Location with Unreal Accuracy
There have been multiple security concerns about WhatsApp before. But while the jury is still out, do yourself a favor and protect your live Location from spyware and other users. Also, you might want to spoof WhatsApp location for business purposes and prank friends.
That said, learning to fake Location on WhatsApp is super simple with Wondershare Dr.Fone . With this GPS app, you can teleport your WhatsApp live location to anywhere in the world. And to make your new Location more believable, this program lets you simulate movements by foot, scooter, or car. It works with all iPhone/Android versions and other social media apps like Instagram, Facebook, Telegram, and Twitter.
You can check out this video for further instruction.

 safe & secure
Below is how to spoof WhatsApp live location with Dr.Fone:
Step 1. Open the Virtual Location tool.

Install and launch Dr.Fone on PC and connect your phone to PC with a USB firewire. Then, tap the Virtual Location button on the home page and click Get Started on the pop-up window.
Step 2. Connect your phone to Dr.Fone.

To connect your phone to this all-in-one software, first, enable “transfer files” instead of “charging” on your phone. Then, enable USB debugging under the settings tab. On Android, just click Settings >Additional Settings > Developer options > USB debugging.
Step 3. Choose a new WhatsApp live location to share.

After USB debugging is on, tap Next and enter the new location on the search field at the top-left corner. Now choose the area and tap Move Here. And there is that! Interestingly, you can choose a movement route and customize the speed.

 DEX 3 RE is Easy-To-Use DJ Mixing Software for MAC and Windows Designed for Today’s Versatile DJ.
Mix from your own library of music, iTunes or use the Pulselocker subsciprtion service for in-app access to over 44 million songs. Use with over 85 supported DJ controllers or mix with a keyboard and mouse.
DEX 3 RE is everything you need without the clutter - the perfect 2-deck mixing software solution for mobile DJs or hard-core hobbiests.
PCDJ DEX 3 RE (DJ Software for Win & MAC - Product Activation For 3 Machines)
Part 4. How to Send Live Location on WhatsApp?
In 2017, WhatsApp rolled out a brand-new feature that allows users to send their live location to family and friends. This location can come in handy if you want to meet up somewhere or let your friends and family know you’re safe and secure. And lest I forget, you can also use it to prank your friends.
Note, however, that WhatsApp only allows you to share your real-time location for 8 hours, 1 hour, or 15 minutes. In other words, this gives you control over how long users can see you on the map. Moreover, this information can’t be shared with anyone once you stop sharing.
So without wasting time, here’s how to send live Location on WhatsApp for Android or iPhone:
Step 1. Enable the GPS service on your phone by clicking the GPS button on the control panel.
Step 2. Open WhatsApp and tap the group chat or individual chat with which you want to share the Location.
Step 3. Now click the Attach button on the text field and click Location.


Step 3. From there, allow WhatsApp access to your device’s location and then press the Share Live Location button.

Step 3. Last but not least, set the duration your contact will view your Location, add a comment, and tap the Send button. That’s it!
Note: As you can see, WhatsApp relies on your GPS location to share your actual location. So, use Wondershare Dr.Fone to change your device’s location and then share it on WhatsApp.
Part 5: How to Fix Common WhatsApp Issues on Android & iPhone
Wondershare Dr.Fone is the perfect tool to handle all your WhatsApp issues. Below are some common issues it can help you with:
1. Lost Messages
Sometimes you might accidentally or intentionally delete WhatsApp chats or messages. Fortunately, Dr.Fone can help you dig out and recover those messages with a simple click. Just launch the Data Recovery tool , connect your phone to the software, and Dr.Fone will scan for all lost and current messages.
2. Transfer WhatsApp data
Thanks to the fast-paced mobile technology, it’s inevitable to migrate to a new phone. But you’ll have to sacrifice all your WhatsApp data. Luckily, Dr.Fone allows you to backup, restore, and transfer all WhatsApp data .
3. Backup WhatsApp Business chats
Having a WhatsApp Business account is vital if you’re an online marketer. Here, you can create a business profile and enjoy quick replies, automatic messaging, accurate statistics, and so on. So, to avoid losing your invoices and other business chats, use Dr.Fone to back up and transfer your WhatsApp Business chats to a new phone.

WPS Office Premium ( File Recovery, Photo Scanning, Convert PDF)–Yearly
Final Words
See, there’s nothing complex about the WhatsApp live location not updating issue. Just edit and restart the app or check your location settings if it’s enabled. And, of course, use Dr.Fone - Virtual Location to share a fake location on WhatsApp and perform other WhatsApp tasks like backing up and transferring data. Thank me later!
safe & secure
- Title: How to Change Location On Facebook Dating for your Nokia 150 (2023) | Dr.fone
- Author: Abigail
- Created at : 2024-07-24 17:57:27
- Updated at : 2024-07-25 17:57:27
- Link: https://location-social.techidaily.com/how-to-change-location-on-facebook-dating-for-your-nokia-150-2023-drfone-by-drfone-virtual-android/
- License: This work is licensed under CC BY-NC-SA 4.0.