
How to Change Poco X5 Location on Skout | Dr.fone
How to Change Poco X5 Location on Skout
When it comes to dating application or website, Skout has made its appearance in this regard a long way back. The app was founded in 2007 and offers a platform to help you get connected with the people. You can use Skout either on your Poco X5 or an iOS device. The main function of the app is that it takes help of your device’s global positioning system (GPS) and lets you find the users in a specific radius where you are.
Since it is a location-based app, many times you might have questioned like “how can I change my location on Skout”. If yes, this article is what just you need. We will assist you how to change location on Skout on Android as well as iOS devices. Scroll down and get to know more!
Part 1: 2 Solutions to Change Skout Location on iOS
1.1 Change Skout Location on iOS using a GPS Simulator
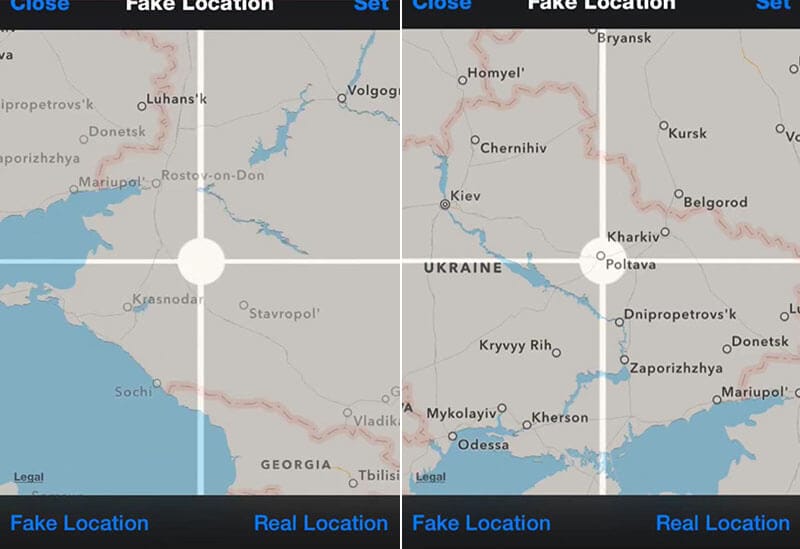
When you are an iPhone user, the best way to change Skout location is using dr.fone – Virtual Location (iOS) . This tool performs way better than any other in the market when you want to change iOS location. With the help of this, you can easily teleport anywhere across the world. Moreover, you can fake routes and show moving from various places. It is completely safe to use and a user-friendly one. Here is how you can do Skout location change on PC using this tool.
Step 1: Get the Software
From the original website of dr.fone – Virtual Location (iOS), download it on your computer and then install it. When you do the installation process completely, you are required to launch the program. After launching, choose “Virtual Location” tab from the first page.

Step 2: Plug iPhone to PC
Take your iOS device and get the original lightening cord as well. Make a secure connection between the computer and the iPhone using it. When it gets detected by the program, click on “Get Started” button.

Step 3: Activate Teleport Mode
You will see a map window now. Here, what you firstly need to do is to find the actual location of yours. If you can’t find the accurate location, go to the icon at the lower right part which is “Center On” icon. This will bring the accurate location.

Now, from the three icons available at the upper right side of the page, click on the 3rd one. This will enable the “Teleport Mode”. Once done, enter the name of the place in the field given and hit on “Go”.

Step 4: Spoof Location
The program will no longer take time and easily understand the location. It will display a pop-up from where you need to click on the “Move Here” button. The location will be successfully changed now. You can now see the changed or spoofed location on your Poco X5 easily.

Dr.Fone - Virtual Location
1-Click Location Changer for both iOS and Android
- Teleport from one location to another across the world from the comfort of your home.
- With just a few selections on your computer, you can make members of your circle believe you’re anywhere you want.
- Stimulate and imitate movement and set the speed and stops you take along the way.
- Compatible with both iOS and Android systems.
- Work with location-based apps, like Pokemon Go , Snapchat , Instagram , Facebook , etc.
3981454 people have downloaded it
1.2 Change Skout Location on iOS using Cydia
Another way to get the Skout location changed is through Cydia. Cydia is basically a platform that allows you to install the applications that are not validated by Apple. However, you will need to jailbreak your device in order to go ahead.
Limitations:
- As we have mentioned above, one of the biggest disadvantages of using this way is that you will have to get your device jailbroken. And no doubt the other limitations will also be related to this.
- While using this method, your device may end up getting bricked. So, be sure if you really wish to use this method.
- Lastly, the method can make your device vulnerable to malware and other malicious apps.
If you are still comfortable using Cydia to change Skout location, let us move on the steps.
Step by Step Guide on how to change location on Skout app
Step 1: Open CYdia in the first place and search for “FakeLocation”.
Step 2: Tap on “Modify” and get back to the Homescreen.

Step 3: Look for the FakeLocation app icon now and tap on it. Once you open it, tap on “Choose my fake location.

Step 4: Use the map to adjust at the location you want to spoof.
Step 5: Now, you are done. Just open Skout and enjoy the new location.

Part 2: Change Skout Location on Android with a Spoofer App
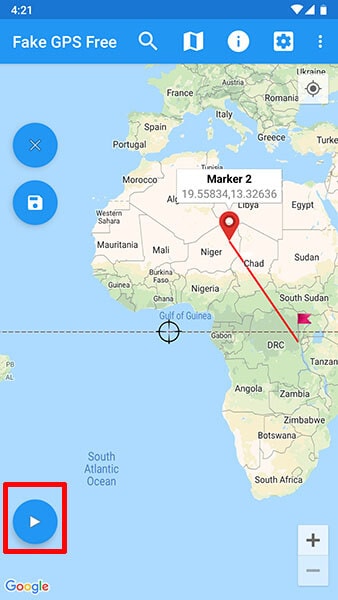
If you are an Android user and wondering how to change your location on Skout, all you need is a spoofer app. You can get a lot of options from Play Store. However, one of the popular apps that can be relied upon is Fake GPS GO Location Spoofer Free. This app doesn’t require rooting if your device is having Android version 6 and more. You can easily create routes with this app. Let us know how this works.
Step by Step Guide to change Skout location via FakeGPS Go
Step 1: Before you get the app installed it is important to turn on the developer options firstly. And to do this, all you need is to go to the “Settings” in your device and tap on “About Phone”.
Step 2: You will see a “Software Info” option. Tap on it and scroll to the build number. Tap on it 7 times and you will see the developer options getting enabled on your device.
Step 3: As we are using Android, you need to head to the Google Play Store and look for the app on it. Now, install and then open it to proceed.
Step 4: While the app is launched, tap on the “ENABLE” option located at the bottom.

Step 5: Now, you will be directed to the Developer options page. Here, choose “Select mock location app” and tap on “FakeGPS Free” subsequently.

Step 6: Now, get back to the Fake GPS app and the look for the route that you want to spoof. Press on the Play button and you are good to go. Your location will be changed on Skout.
Limitations:
- No matter spoofing is fun, but you need to be a little careful. In case it gets detected by the company, your account may get banned as this is against the policy of any app.
- The process of using the spoofer app to change Skout location can seem to be difficult and complex.
- Some apps require you to root your device in order to let you proceed with spoofing properly.
- When you spoof your location with the app too frequently, this may make your profile under suspicious activity monitoring.
Part 3: Use Tinder instead
Tinder has its own popularity among today’s generation and it has revolutionized the way of dating. If you are interested in faking location on a dating app, using Tinder will be our next suggestion. Unlike Skout, Tinder offers it own Tinder + feature in order to assist you in changing the location of your device. The condition is to subscribe the plan for Tinder +.
However, when you use Tinder +, you may feel it to be an expensive deal. On the other hand Skout is free to sign up. You need to be having a Facebook account in order to join Tinder whereas Skout doesn’t want any such requirement. Moreover, on Skout, you can have the meet tab with which you are allowed to see the photos of people and know the age.
Here are the detailed steps on how you can change location.
Step 1: Launch the Tinder in your Poco X5 as the first step. Upon launching it successfully, go to your profile icon and tap on it. You will find it at the top of the screen.
Step 2: Look for the “Settings” option now and then choose “Get Tinder Plus” or “Tinder Gold”. You can now subscribe a plan and then Tinder + will be yours.
Step 3: Now, again open the Tinder app followed by tapping on the profile icon.
Step 4: Choose “Settings” and hit on “Swiping in” option. Next, tap on “Add a new location” and then you know what to do.

How to Change/Add Location Filters on Snapchat For your Poco X5
Snapchat is an Android/iOS messaging app developed in 2011. Currently, this app is home to 350+ users who share photos, videos, audio, texts, emojis, GIFs, and documents. But one of the most exciting Snapchat features is allowing users to share locations, whether fake or real. For instance, you might want to protect your privacy or simply prank your friends with a new location. So, whichever the reason, we’ll show you how to add a location filter on Snapchat effortlessly. You’ll also know how to add a fake location filter on Snapchat. Let’s learn!
Part 1: What are Location Filters on Snapchat?
If you’re an avid Snapchatter, you must have heard of “Snapchat Location Filters” before. So, what exactly is this? A Snapchat location filter or geofilter is simply a creative and interactive way to add a location to your posts. In a nutshell, Snapchat users can search and add a location filter to their videos or photo before posting on the platform. Just think of it as a Snapchat location tag.
Having said that, Snapchat is famous for its myriad of filters, including geofilters. So, before sharing a post, you can choose an overlay design describing your location. Just remember that some places can have more filter options than others. So, keep reading to know how to get a location filter on Snapchat.
Part 2: How to enable/disable and share Location Filters on Snapchat posts?
First and foremost, creating a Snapchat location filter on Android or iPhone is super-duper easy. However, to share your location on Snapchat posts, you must activate this setting within the app. Also, enable the location service on your smartphone. On Android, open Settings > Location, whereas on iPhone, click Settings > Privacy > Location Services.
Here’s how to enable or disable the Location Filter settings:
Step 1. Fire up Snapchat on your Poco X5 or Android phone and tap your Profile icon.
Step 2. Then, press the Settings button and find and press the Additional Services option.

Step 3. Lastly, tap Manage and then enable the Filters to toggle, and that’s it!
Now that this setting is enabled on Snapchat, you can add your location filter effect. Follow me:
Step 1. Open Snapchat and take a video or a photo.
Step 2. Next, swipe the screen to the left until you find the location effect. Remember, Snapchat uses your actual GPS location.
Step 3. You can also tag a location on Snapchat by clicking the Sticker icon on the right rail. Then, tap the Location button and then choose your GPS location. Interestingly, you can spoof a location with this feature.

Step 4. Finally, customize your video further and then click Send To. Your selected location filter will be added to your Snapchat post.

Part 3: How to Change or Add a Fake Location on Snapchat Filters?
The thing is that Snapchat uses your phone’s GPS or Wi-Fi connection to determine your actual location and add it to the location filter. Therefore, it’s virtually impossible to spoof Snapchat’s location unless you’re using a VPN service.
Fortunately, you don’t need those overpriced VPNs if you can get Dr.Fone . This smartphone utility program allows you to change your Snapchat location to anywhere in the world with a simple mouse click on your PC. In addition, you can simulate Snapchat location movements to make it look more realistic. And apart from Snapchat, you can spoof location on WhatsApp, Viber, Facebook, Facebook Messenger, Instagram, etc.
So, without dilly-dallying much, here’s how to fake a Snapchat location tag with Dr.Fone:
Dr.Fone - Virtual Location
1-Click Location Changer for both iOS and Android
- Teleport GPS location to anywhere with one click.
- Simulate GPS movement along a route as you draw.
- Joystick to simulate GPS movement flexibly.
- Compatible with both iOS and Android systems.
- Work with location-based apps, like Pokemon Go , Snapchat , Instagram , Facebook , etc.
3981454 people have downloaded it
Here is the complete guide for you to refer to while you use the Dr.Fone - Virtual Location.
Step 1. First, grab a USB cable and connect your smartphone to the PC. Remember to enable “Transfer Files” on your phone.
Step 2. Next, install and run Dr.Fone on your computer. Then, tap the Virtual Location button on the home window, and tap Get Started.
Step 3. Now allow USB debugging on your Poco X5 before clicking Next on Dr.Fone. Don’t know how to do that? Open Settings > Additional Settings > Developer options > USB debugging. Also, choose Dr.Fone as the mock location app.

Step 4. The Virtual Location map will launch immediately. Enter the GPS coordinates or location address on the field in the top-left corner and select the new location. If satisfied, press Move Here.

Step 5. Finally, open your Snapchat app, create a photo, and choose the location filter with your new location. It’s that simple!
Part 4: FAQs about Snapchat
Q1: What is Ghost Mode on Snapchat?
Snapchat comes with an inbuilt Snap Map introduced in 2017. Besides sharing Snaps by the Our Story feature, Snap Maps lets other Snapchatters see your real-time location using Bitmojis. That said, Ghost Mode makes you invisible on the Snap Map. In other words, no one can know where you are. Cool!
Q2: What are the differences between Ghost Mode and disabling Location Filters?
The Ghost Mode makes you invisible for a specific duration or until you disable it. To use this feature, you don’t have to turn off the location feature on your smartphone. On the other hand, you just need to disable the Location Filters settings on Snapchat to turn off sharing your location tag on posts.
Q3: How accurate is the Snapchat map?
Very accurate! Snapchat uses your GPS coordinates to determine your actual location on the map. However, this map gives a location based on where you were last seen when you logged into the app. So, if you stay for a long without opening the app, it won’t update your location. But if you log in and your location service is enabled, this app will auto-update it.
Q4: How does Snapchat Get Information on Your Location?
While installing the Snapchat app and creating an account, the app will practically ask you to allow it to access your location. The app will use your phone’s GPS coordinates to determine your actual location. Also, your Wi-Fi connection will tell Snapchat exactly where you are.
Q5: How to find someone in Ghost Mode on Snapchat?
Sometimes you might want to urgently find a friend on Snapchat when you are in Ghost Mode. To do that, deactivate Ghost Mode on Snapchat by clicking Profile > Settings > See My Location and disabling Ghost Mode. Now open the Snap Map, and you’ll see your location with a red Bitmoji. You’ll also see your nearby friends with enabled Snapchat locations on the map. If you can’t find them, tap the Search icon, choose or enter their name, and see them on the map or send a text.
Wrap it Up
Now you have a complete idea of what the Snapchat location filter is. In short, it is simply a creative way to share your Snapchat location tag on a post. But because you can’t spoof your location on Snapchat, I recommend using Dr.Fone - Virtual Location to teleport your Snapchat location to anywhere in the world. This tool also works with other social media apps like Facebook, WhatsApp, and Telegram. Enjoy!
How to Fake Snapchat Location without Jailbreak On Poco X5
Snapchat users are very fond of using custom filters when sharing content on the app. It is a great way to ensure that your images and videos are only viewed by the people that you target. However, a new feature called Geo-filters has brought a lot of mixed feelings amongst Snachatters.
The filter is location-based, which makes any content that you share to be seen by people who are within your geographic fence.
Imagine that you are standing at the Niagara Falls and want to share with people who are in Europe; you will not be able to do this and this is why the filters are problematic to people in the Snapchat community.
Thankfully, there are ways in which you can spoof our device, allowing you to access Geofilters anywhere in the world. Today, you learn several ways in which you can achieve this objective with ease.
Part 1: Benefits that faking Snapchat brings to us
Snapchat comes with a lot of filters, both sponsored and crowdsourced, which you can use to interact with different people. When Geofilters was introduced, it meant that you could only access filters that were designed for specific locations.
Sponsored filters generally tend to target people in certain areas, and this can limit how you disseminate your content on Snapchat.
The main benefit that you get from faking Snapchat is getting access to these filters without even moving an inch.
When you spoof your device, Snapchat thinks that you are actually in the area that you have spoofed to. This virtual location will then allow you to access the filters that are available in that area.
Part 2: A free but complicated way to fake Snapchat location no jailbreak
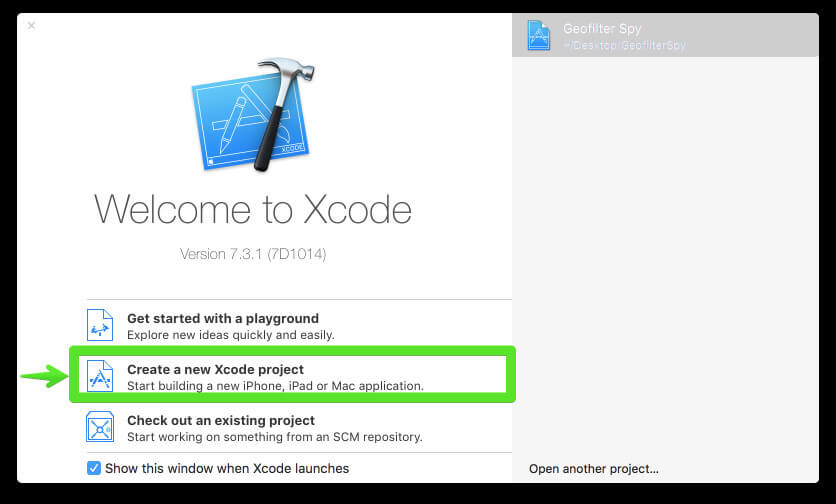
One of the best ways to fake Snapchat without jailbreak is to use XCode. This is an app on your Poco X5 that allows you to tweak certain aspects of the apps that you have on your device, including Snapchat.
Get XCode on your device and then launch it. Start by using the locations that are found to setup XCode. You can download XCode from Apple App Store. You will need your Apple ID and password to use XCode.

Here are the steps that you have to follow:
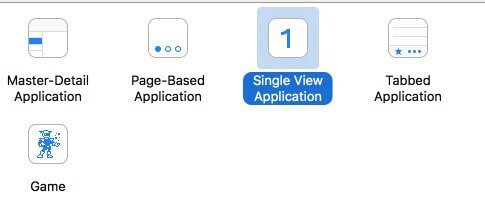
Step 1: Start by creating a basic single-view application
Launch XCode and then create a new project
Then choose the option marked “Single View iOS application.
Now customize the project options and give it any name that you desire.

Now proceed and customize the Organization Name and the Identifier. The identifier works like a reverse domain name so you can use anything you desire.
Proceed and select swift as your preferred language and then click on “iPhone” as your device so the app will be small.
Any other options below this should be left in their default states.
Now go ahead and save the project to a location on your computer. Since the version control does not apply in this case, make sure that you uncheck the option before you save the app.

Step 2: transfer and run the created app on your iOS device
People who do not have the latest version of XCode will run into the error shown below.
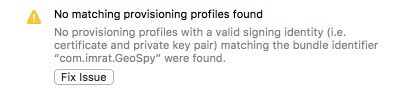
IMPORTANT: do NOT click on “Fix Issue” until you do the following tasks:
- Access the preferences on your XCode
- Choose the accounts tab
- Click on the add (+) icon at the bottom left side of your screen
- Now choose “Add Apple ID”.
- Type in your Apple ID and password
You should now have an accounts screen similar to the one shown in the image below.
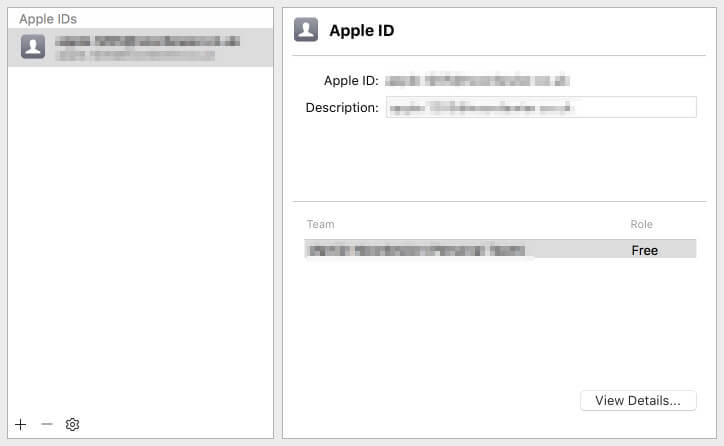
Now close the window and click on the “team” dropdown menu. You may now select the Apple ID that you just created.
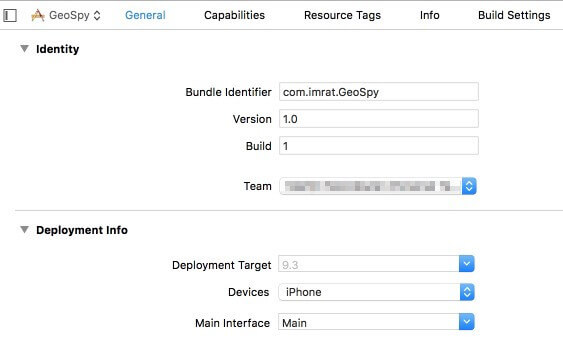
Now you can go ahead and click on the “Fix Issue” button.
Now the error will be resolved and you should have a screen that is similar to the image below.
You may now run the app that you created before on your iOS device.
Use an original USB cable to connect the iOS device to your computer.
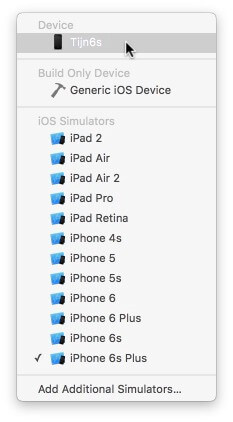
Towards the top right-hand corner of your screen, click on the button that is displaying your project name and then click on the iOS device.

Now your iOS device will be showing at the top. Select it and proceed.
Hit the “Play” icon that is found at the top left side of your screen.
Wait for the process to be complete. You might as well get a cup of coffee as this can take quite a while.

When the process is complete, XCode will install the app on your iOS device. You will get the following error if your device has not been unlocked; unlocking the iOS device will put off the error message.
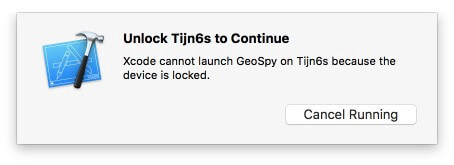
Now you should be viewing a blank screen on your iOS device. Do not worry; your device has not been ruined. This is the app that you have just created and installed. Pressing the “Home” button will dismiss the blank screen.
Step 3: It’s time to spoof your location
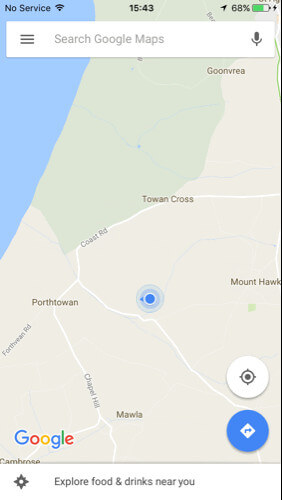
Go to Google Maps or iOS maps which will now show your current location.
Go to XCode and then choose “Simulate Location” from the “Debug” menu and then select a different location to test.
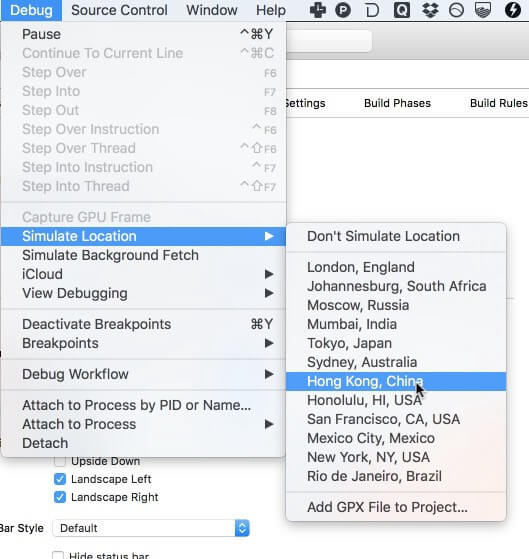
If you have done all that you need to do, then the location of your iOS device should instantly jump to the location that you have chosen.
Now you can proceed and see if you have access to Geo-filters in the new location.
Step 4: Spy Geo-Filters on Snapchat
Now you can launch Snapchat and then access the filters in the area that you have teleported to. Remember that you can move from one location to the next on XCode without having to close Snapchat. Just cancel the current snap after changing the location and create a new snap to see the filters in the new location. If this fails to respond, then go back to Google maps or iOS map app and then ensure that you are in the desired location. Once you have done so, close Snapchat and restart it again, and you will be in the new location once more.
Part 3: A paid but easy way to fake Snapchat location without jailbreak
You can also fake your Snapchat GPS location using a premium app such as iTools. This is a popular application, used to spoof many other apps that require geo-location data to work. Another point to note is that the latest iPhone models cannot be jailbroken. The iOS version today is very secure and you cannot tweak it like before.
Thankfully, you can use a premium, not free, iTools to change your virtual location without jailbreaking the Poco X5 device. You can get iTools on a trial basis, but after the period expires, you will have to pay $30.95 to continue using it.
Step 1: Download and install iTools on your computer and then launch it. Connect your iOS device to your computer using the original USB cable that came with the Poco X5 device.
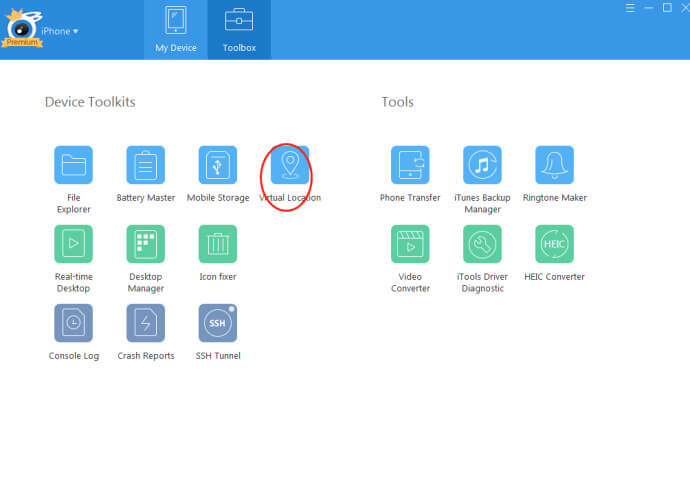
Step 2: Go to the iTools panel and click on “toolbox”.
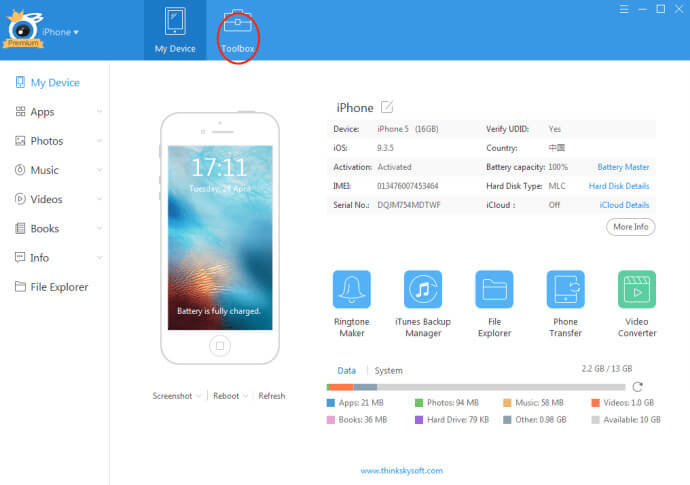
Step 3: Select the Virtual Location button within the Toolbox Panel
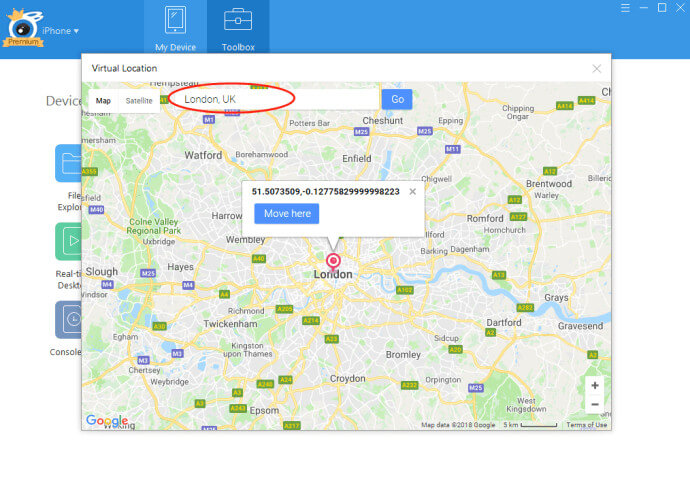
Step 4: Type in the location that you want to teleport to and then click on ‘Move Here”.
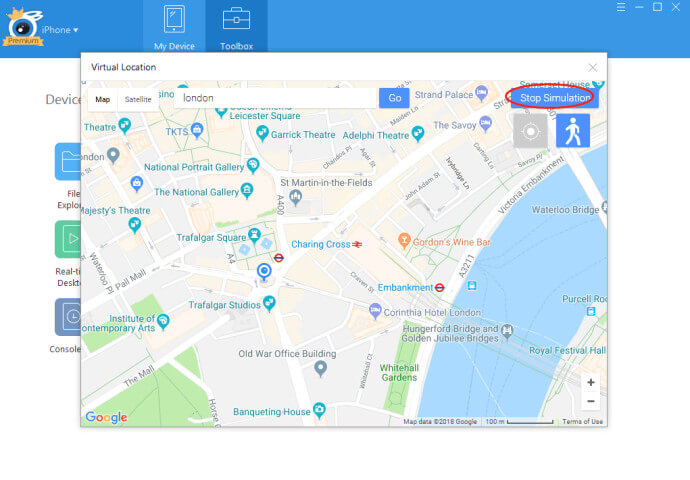
Step 5: Now open your Snapchat and you will be able to access the filters found in the location that you typed in.
Once you are finished with this spoofed location, you can simply select “Stop Simulation” in iTools. This is a premium tool, but very simple to use. It is the best tool to use, especially if you are having a device with the latest iOS version.
Part 4: A brief comparison of XCode vs. iTools to fake Snapchat GPS location
From the steps used in both methods, it is very clear that iTools is the best app to use to fake your Snapchat GPS location for several reasons. Here are some of them:
- Ease of use - Using XCode to fake your Snapchat GPS location is a long and complicated process, whereas using iTools is simple and clean.
- Price – Although XCode is free while iTools is not, the benefits of using iTools surpass the cost. This makes it less-costly when it comes to performance and convenience.
- Security – XCode may not be very secure, especially when it comes to avoiding detection by Snapchat. You may have to keep going back to XCode, and changing the location, switching off Snapchat, and restating it again. However, when using iTools, your location is fixed until you stop the simulation.
- Versatility – XCode cannot be used on the latest iOS devices without posing problems, while iTools is a simple and effective tool for all iOS versions.
In conclusion
When you want to spoof Snapchat to access Geo-Filters in any part of the world, you can use the complicated XCode or pay a fee and use the simpler iTools. There are various benefits that you gain from teleporting using these tools, with Geo-Filters access being the biggest benefit. If you want to use Snapchat all over the world without moving out of your home, then these are the ways that you can go about it.
Also read:
- [New] In 2024, Ultimate PC & Windows Edition List of TikTok Edits Tools
- [Updated] 2024 Approved Direct Engagement Syncing Instagram with Facebook
- [Updated] Blur the Boundaries Techniques to Mask Faces in Photos
- [Updated] In 2024, Streamlining Your PS3 Recorded Experiences
- 2024 Approved The Young Entrepreneur’ Writes His Own Financial Story
- Effective Solutions for Overcoming Windows 11/10 Troubleshooting Challenges and Errors
- In 2024, Edit and Send Fake Location on Telegram For your Infinix Smart 8 HD in 3 Ways | Dr.fone
- In 2024, How to Change Location On Facebook Dating for your Itel A60s | Dr.fone
- In 2024, How to Fake Snapchat Location on Infinix Hot 40i | Dr.fone
- In 2024, How to Hide/Fake Snapchat Location on Your Tecno Spark 20C | Dr.fone
- In 2024, How to Send and Fake Live Location on Facebook Messenger Of your Infinix Hot 40 | Dr.fone
- In 2024, Proven Ways in How To Hide Location on Life360 For Google Pixel 7a | Dr.fone
- In 2024, Ranking the Premier Online Church Service Providers
- In 2024, Simple and Effective Ways to Change Your Country on YouTube App Of your Vivo Y17s | Dr.fone
- Remediation Steps for Windows Sandbox's Hypervisor Not Found
- Top Budget-Friendly Windows Laptops: In-Depth Comparison of Acer, Dell, and Other Brands
- Title: How to Change Poco X5 Location on Skout | Dr.fone
- Author: Abigail
- Created at : 2025-02-15 10:33:07
- Updated at : 2025-02-18 14:30:33
- Link: https://location-social.techidaily.com/how-to-change-poco-x5-location-on-skout-drfone-by-drfone-virtual-android/
- License: This work is licensed under CC BY-NC-SA 4.0.