
How to Change/Add Location Filters on Snapchat For your Vivo T2 Pro 5G | Dr.fone
How to Change/Add Location Filters on Snapchat For your Vivo T2 Pro 5G
Snapchat is an Android/iOS messaging app developed in 2011. Currently, this app is home to 350+ users who share photos, videos, audio, texts, emojis, GIFs, and documents. But one of the most exciting Snapchat features is allowing users to share locations, whether fake or real. For instance, you might want to protect your privacy or simply prank your friends with a new location. So, whichever the reason, we’ll show you how to add a location filter on Snapchat effortlessly. You’ll also know how to add a fake location filter on Snapchat. Let’s learn!
Part 1: What are Location Filters on Snapchat?
If you’re an avid Snapchatter, you must have heard of “Snapchat Location Filters” before. So, what exactly is this? A Snapchat location filter or geofilter is simply a creative and interactive way to add a location to your posts. In a nutshell, Snapchat users can search and add a location filter to their videos or photo before posting on the platform. Just think of it as a Snapchat location tag.
Having said that, Snapchat is famous for its myriad of filters, including geofilters. So, before sharing a post, you can choose an overlay design describing your location. Just remember that some places can have more filter options than others. So, keep reading to know how to get a location filter on Snapchat.
Part 2: How to enable/disable and share Location Filters on Snapchat posts?
First and foremost, creating a Snapchat location filter on Android or iPhone is super-duper easy. However, to share your location on Snapchat posts, you must activate this setting within the app. Also, enable the location service on your smartphone. On Android, open Settings > Location, whereas on iPhone, click Settings > Privacy > Location Services.
Here’s how to enable or disable the Location Filter settings:
Step 1. Fire up Snapchat on your Vivo T2 Pro 5G or Android phone and tap your Profile icon.
Step 2. Then, press the Settings button and find and press the Additional Services option.


Step 3. Lastly, tap Manage and then enable the Filters to toggle, and that’s it!
Now that this setting is enabled on Snapchat, you can add your location filter effect. Follow me:
Step 1. Open Snapchat and take a video or a photo.
Step 2. Next, swipe the screen to the left until you find the location effect. Remember, Snapchat uses your actual GPS location.
Step 3. You can also tag a location on Snapchat by clicking the Sticker icon on the right rail. Then, tap the Location button and then choose your GPS location. Interestingly, you can spoof a location with this feature.

Step 4. Finally, customize your video further and then click Send To. Your selected location filter will be added to your Snapchat post.

Part 3: How to Change or Add a Fake Location on Snapchat Filters?
The thing is that Snapchat uses your phone’s GPS or Wi-Fi connection to determine your actual location and add it to the location filter. Therefore, it’s virtually impossible to spoof Snapchat’s location unless you’re using a VPN service.
Fortunately, you don’t need those overpriced VPNs if you can get Dr.Fone . This smartphone utility program allows you to change your Snapchat location to anywhere in the world with a simple mouse click on your PC. In addition, you can simulate Snapchat location movements to make it look more realistic. And apart from Snapchat, you can spoof location on WhatsApp, Viber, Facebook, Facebook Messenger, Instagram, etc.
So, without dilly-dallying much, here’s how to fake a Snapchat location tag with Dr.Fone:
Dr.Fone - Virtual Location
1-Click Location Changer for both iOS and Android
- Teleport GPS location to anywhere with one click.
- Simulate GPS movement along a route as you draw.
- Joystick to simulate GPS movement flexibly.
- Compatible with both iOS and Android systems.
- Work with location-based apps, like Pokemon Go , Snapchat , Instagram , Facebook , etc.
3981454 people have downloaded it
Here is the complete guide for you to refer to while you use the Dr.Fone - Virtual Location.
Step 1. First, grab a USB cable and connect your smartphone to the PC. Remember to enable “Transfer Files” on your phone.
Step 2. Next, install and run Dr.Fone on your computer. Then, tap the Virtual Location button on the home window, and tap Get Started.
 WonderFox DVD Ripper Pro
Step 3. Now allow USB debugging on your Vivo T2 Pro 5G before clicking Next on Dr.Fone. Don’t know how to do that? Open Settings > Additional Settings > Developer options > USB debugging. Also, choose Dr.Fone as the mock location app.

Step 4. The Virtual Location map will launch immediately. Enter the GPS coordinates or location address on the field in the top-left corner and select the new location. If satisfied, press Move Here.

Step 5. Finally, open your Snapchat app, create a photo, and choose the location filter with your new location. It’s that simple!
Part 4: FAQs about Snapchat
Q1: What is Ghost Mode on Snapchat?
Snapchat comes with an inbuilt Snap Map introduced in 2017. Besides sharing Snaps by the Our Story feature, Snap Maps lets other Snapchatters see your real-time location using Bitmojis. That said, Ghost Mode makes you invisible on the Snap Map. In other words, no one can know where you are. Cool!
Q2: What are the differences between Ghost Mode and disabling Location Filters?
The Ghost Mode makes you invisible for a specific duration or until you disable it. To use this feature, you don’t have to turn off the location feature on your smartphone. On the other hand, you just need to disable the Location Filters settings on Snapchat to turn off sharing your location tag on posts.
 PCDJ Karaoki is the complete professional karaoke software designed for KJs and karaoke venues. Karaoki includes an advanced automatic singer rotation list with singer history, key control, news ticker, next singers screen, a song book exporter and printer, a jukebox background music player and many other features designed so you can host karaoke shows faster and easier!
Q3: How accurate is the Snapchat map?
Very accurate! Snapchat uses your GPS coordinates to determine your actual location on the map. However, this map gives a location based on where you were last seen when you logged into the app. So, if you stay for a long without opening the app, it won’t update your location. But if you log in and your location service is enabled, this app will auto-update it.

Q4: How does Snapchat Get Information on Your Location?
While installing the Snapchat app and creating an account, the app will practically ask you to allow it to access your location. The app will use your phone’s GPS coordinates to determine your actual location. Also, your Wi-Fi connection will tell Snapchat exactly where you are.

Q5: How to find someone in Ghost Mode on Snapchat?
Sometimes you might want to urgently find a friend on Snapchat when you are in Ghost Mode. To do that, deactivate Ghost Mode on Snapchat by clicking Profile > Settings > See My Location and disabling Ghost Mode. Now open the Snap Map, and you’ll see your location with a red Bitmoji. You’ll also see your nearby friends with enabled Snapchat locations on the map. If you can’t find them, tap the Search icon, choose or enter their name, and see them on the map or send a text.
Wrap it Up
Now you have a complete idea of what the Snapchat location filter is. In short, it is simply a creative way to share your Snapchat location tag on a post. But because you can’t spoof your location on Snapchat, I recommend using Dr.Fone - Virtual Location to teleport your Snapchat location to anywhere in the world. This tool also works with other social media apps like Facebook, WhatsApp, and Telegram. Enjoy!

Change Location on Yik Yak For your Vivo T2 Pro 5G to Enjoy More Fun
Yik Yak has to be one of the most controversial social media applications. First launched in 2013, Yik Yak went into haze in 2017 after receiving harsh criticism due to its poor privacy policies. However, after four years of complete shutdown, Yik Yak was relaunched in 2021 with improved security features and functionality.
Ever since its relaunch in August last year, many users on Yik Yak have been looking for ways to change their location to meet people in other cities/states. So keep reading if you’ve been trying to find solutions to swap locations in Yik Yak. In today’s guide, we will share the best ways to change the Yik Yak location and connect with people from different corners of the world.
Part 1: What you should know about Yik Yak
If you are not familiar with Yik Yak, here’s what you need to know. Yik Yak is a one-of-a-kind social media platform designed to help users connect with people through text-based posts. In addition, users can anonymously post content and interact with other users in the same location.
Yik Yak also has a dedicated “Peek” feature that allows users to explore what people are talking about a particular topic in different locations. Even though Yik Yak has limited features compared to other social media apps like Instagram and Snapchat, Yik Yak still has its fair share of a fan base. People love Yik Yak for its anonymity and enjoy meeting new like-minded people.
Now, users look for ways to change location on Yik Yak to meet people from different areas. By default, users can only see posts from their current location, and after a while, their feed starts to look pretty repetitive. But, by changing their places, they can expand their radar and find new posts from the desired locations.
Part 2: How to Change Location On Yik Yak
So, what are the different ways to change location on Yik Yak? Since Yik Yak uses your phone’s GPS sensors to detect the current location, you’ll have to manipulate the GPS signals to get the job done. To do this, you can use different methods such as:
1. Using the peek feature to view other local Yik Yak groups or communities
As we mentioned earlier, Peek is the built-in feature of Yik Yak that allows users to find out what people are saying about a particular topic in different locations.
However, this feature has a few limitations. First, even though you’ll be able to explore posts from other locations, you won’t be able to react to them. A user can only respond to posts in his particular area. So, “Peek” would only be a suitable solution for exploring posts from other locations, but not changing the Yik Yak location itself.
2. Use Dr.Fone - Virtual Location to fake GPS location
If you are looking for an effective way to change your location in Yik Yak, we recommend using a professional GPS simulator like Dr.Fone - Virtual Location. It’s a cross-platform geo spoofing tool with a built-in teleport mode. With the “Teleport Mode” feature, you’ll be able to change your location to anywhere in the world with a single click.
It means you’ll be able to publish your own Yik Yak posts from different locations and react to someone else’s posts without interruptions. Apart from Yik Yak, you can also use a tool like Dr.Fone - Virtual Location to manipulate GPS signals in other location-based apps like Pokemon Go or Tinder. It’s a great way to meet people from other cities on dating apps, as any geo-restrictions won’t bind you.
Dr.Fone - Virtual Location
1-Click Location Changer for both iOS and Android
- Teleport your current location to anywhere in the world with a single click.
- Fake location on dating and social apps to meet more friends.
- Spoof location on location tracking apps to protect your privacy.
- Compatible with both iOS and Android systems.
- Work with location-based apps, like Pokemon Go , Snapchat , Instagram , Facebook , etc.
3981454 people have downloaded it
So, here’s the step-by-step process for changing location on Yik Yak using Dr.Fone - Virtual Location.
Step 1: Install and launch Dr.Fone - Virtual Location on your computer. Double-click on its icon to launch the applications and click the “Virtual Location” option.
Step 2: Now, tap “Get Started” to proceed further.

Step 3: You’ll be asked to choose your device type on the next screen. Based on which smartphone you’re using, either select Android or iOS and click “Next” to proceed further.
Step 4: A map with your current location will appear on your screen. Select the “Teleport Mode” icon at the top-right corner and search for a specific location using the search bar.

Step 5: Select the desired location and the pointer will automatically move to the selected location. Finally, tap on the “Move Here” button to set it as the current location for your device.
So, that’s how you can change location on Yik Yak using Dr.Fone - Virtual Location on both Android and iOS. Once your location is changed, you’ll be able to see posts from other areas on Yik Yak and react to them.
Part 3: FAQs about Yik Yak
Before concluding this guide, we would like to address a few frequently asked questions about Yik Yak. These are a few common queries across many platforms, including Quora and Reddit.
1. How do you get banned from Yik Yak?
Since its relaunch, Yik Yak’s community guidelines have improved drastically. Now, users have the liberty to downvote any post that they find offensive (in any manner). A post that receives more than 5 downvotes will automatically get removed from the platform, and the account will go under the review stage by the in-house Yik Yak team. The team can then decide whether to block the account or not.
2. Does VPN work with Yik Yak?
Yes, a VPN can be used with Yik Yak. However, it’s not possible to change GPS location with a VPN. For people who don’t know, a VPN only changes the IP address of your system and doesn’t change the actual GPS location. So if you want to change your GPS location, you’ll have to use a dedicated GPS spoofing tool like Dr.Fone - Virtual Location.
3. Can you delete a yak?
Yes, you can quickly delete any Yak you want on Yik Yak. Yaks are text posts that users publish on the platform. So, as the owner of their posts, they have the power to delete a particular Yak as well. To delete a Yak, all you have to do is tap the “three dots” next to a Yak, click on “More Options,” and then tap the “Delete” button to complete the process.

Conclusion
Whether you use Yik Yak for fun or have gotten addicted to its anonymity, changing your GPS location on the platform will allow you to expand your social circle and meet strangers from other parts of the world. However, there’s no direct way to change location on Yik Yak. You’ll have to use geo spoofing software such as Dr.Fone - Virtual Location to do the job. The teleport mode feature will make it quite convenient to manipulate your GPS location and access new posts on Yik Yak.
 safe & secure

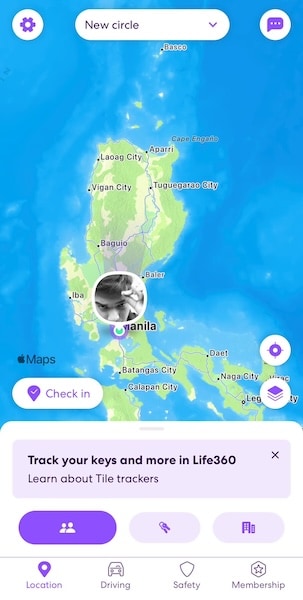
How To Pause Life360 Location Sharing For Vivo T2 Pro 5G
Life360 has become a household name in location-sharing apps, renowned for its ability to connect family and friends seamlessly across Android and iOS platforms. This app enhances safety and fosters a sense of closeness among its users.
However, there are moments when you might crave a bit of privacy or a break from constant connectivity. Whether for a surprise, personal space, or a digital detox, the need to discreetly pause Life360 arises. This article delves into the nuances of how to pause Life360. It will also provide insightful tips on how to do it without alerting others.
 ZoneAlarm Extreme Security NextGen
Part 1: What Is Life360 and How To Pause Life360 From the App
Life360 is not just an app; it’s a digital lifeline connecting people with their loved ones. It’s primarily designed for family and close friends. By offering real-time location sharing, it ensures that members of your “Circle” (a group within the app) know where you are at any given moment. This feature is handy for parents monitoring their children’s whereabouts or friends coordinating meet-ups.
 LYRX is an easy-to-use karaoke software with the professional features karaoke hosts need to perform with precision. LYRX is karaoke show hosting software that supports all standard karaoke file types as well as HD video formats, and it’s truly fun to use.
The Purpose of Life360
At its core, Life360 is about safety and connectivity. The app includes features like location history, driving reports, and even crash detection, making it a versatile tool for modern families. It provides several benefits, like:
- Safety assurance. Knowing the whereabouts of your loved ones, especially in emergencies, can be invaluable.
- Convenience. Planning gatherings or ensuring a family member has arrived safely at a destination becomes more manageable.
- Emergency response. The app can alert users to potential emergencies involving Circle members.
Reasons of Pausing Life360
However, there are instances where learning how to pause Life360 becomes necessary:
- Battery health. Constant GPS tracking can drain your phone’s battery significantly. Temporarily pausing the app can help conserve battery life.
- Privacy. Sometimes, you might want some privacy about your location. Thus, some people would like to pause their Life360 location sharing.
Methods To Pause Life360 From the App
Now, the question is, can you pause your location on Life360? Pausing Life360 can be done for a specific circle or the entire app. This section will show you some general steps to pause your location for the app. You can do it only for a specific circle or the whole app. Here’s how you can do those.
Pausing Location for a Specific Circle
Open Life360 and go to the main screen. Select the Circle you want to pause. Then, tap on Settings (usually represented by a gear icon) in the upper-right corner. Look for an option like Location Sharing and toggle it off. This action pauses your location sharing only for the selected Circle.
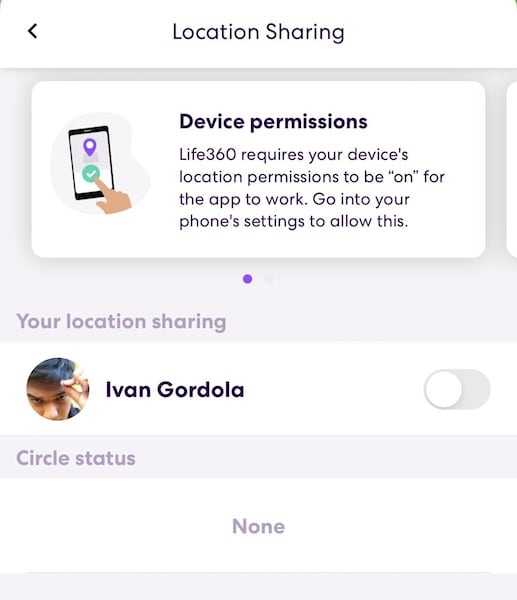
Pausing the Whole App
Regarding this method, pausing the location sharing for all your circles usually involves going through your phone’s S ettings and disabling location services for Life360. If you don’t want to do that, you can turn off location sharing for all your circles through the steps provided above.
By understanding and utilizing these features wisely, you can maintain your connection with your loved ones while managing your digital boundaries and battery health effectively. Remember, the aim is to balance connectivity with personal needs.
Part 2: How To Pause Life360 From Settings
Life360 offers flexibility within its app and through your device’s settings. Understanding how to use these options can provide additional control over location sharing. Explore the various ways how to pause Life360 outside the app itself.
Pause Life360 From Android Settings
First, navigate to your Vivo T2 Pro 5G’s Settings. Then, look for the section listing all installed apps. This is usually named as “Apps.” Locate Life360 on the list of apps and open it. You should be able to see a Force Stop button at the bottom of the screen.
By selecting Force Stop, you temporarily halt the app’s function without uninstalling it. This operation stops location sharing until you open the app again.
Pause Life360 From iOS Settings
To pause the Life360 location on iOS, you’ll have to open the Settings app on your iOS device. Browse through your apps and select Life360. Alternatively, you can use the search bar and type “Life360”. Once in the app’s menu, change location services to While Using the App. Thus, it will not share your location unless you open the app.

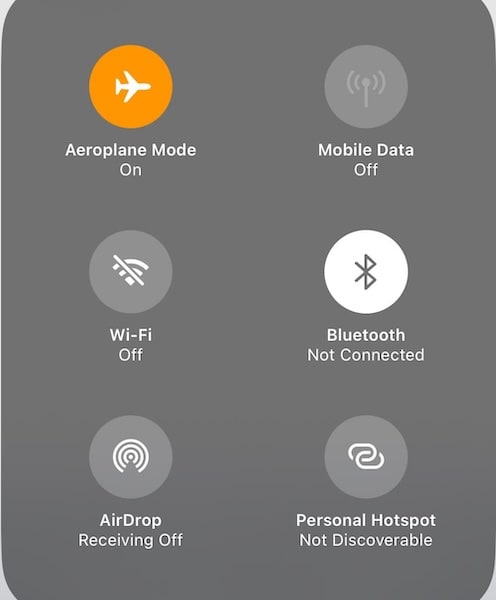
Pause by Using Airplane Mode
This can be done from the quick settings panel on both Android and iOS devices. Turning on Airplane Mode disables all wireless connections, including cellular data and GPS, effectively pausing Life360. The great thing is that Life360 will only show your last known location to your circles. It will not say that “location services are off,” unlike the first two methods.

Pause by Uninstalling
Removing the app from your device will stop it from sharing your location. The beauty of this method is that it won’t automatically notify your circles or remove you from them. However, some members might notice that your location updates are unavailable.
Each method serves a different purpose and offers varying levels of discretion. Whether conserving battery, seeking privacy, or temporarily disconnecting, these methods provide a way to pause Life360 location without drawing unwanted attention. Remember, communicating with your Circle members about your need for privacy to maintain trust is always a good idea.
Part 3: How To Pause Life360 With a Virtual Location Spoofer
Sometimes, pausing your location sharing on Life360 may raise questions or concerns among your circle members, particularly if they are close family or friends. If you’re planning a surprise or need private time without arousing suspicion, a virtual location spoofer can be handy. This method will teach you how to pause your location on Life360 without them knowing.
Wondershare’s Dr.Fone toolkit is more than just a data recovery solution. Among its various features, the Virtual Location changer is particularly useful for those looking to spoof their location. This feature allows you to simulate being in a specific location without actually being there. It’s a clever way to maintain privacy or plan a surprise without giving away your real whereabouts.
How To Use Dr.Fone To Spoof Your Location on Life360
To learn how to pause location on Life360 without them knowing using Dr.Fone, follow the steps below:
- Step 1: Download and install the Dr.Fone on your device. Connect your phone to your PC to begin the process. After launching the software, access Virtual Location from the Toolbox interface. Then, click Get Started to continue.
- Step 2: After launching the function, you’ll notice the One-Stop Route function at the top-right section. This feature is crucial for setting up your virtual movement.


- Step 3: To define how your virtual location behaves, you can decide how often the app simulates a Round trip or Loop trip. Once you’ve set parameters like Speed, click Move Here to start the simulation.

Note: TheRound trip and Loop trip are particularly useful for creating the impression of movement in a specific area. Parameters can make your virtual movement more believable.
 Forex Robotron Gold Package
Conclusion
This article explored various methods of pausing location sharing on Life360. Life360 is essential for many who share their locations with friends and family. The options are diverse, from simple app-based methods to more advanced settings adjustments and even a virtual location spoofer like Dr.Fone.
While it’s always recommended to maintain open communication with your Circle about pausing location sharing, there are times when privacy or surprise plans necessitate discretion. For those moments, Dr.Fone - Virtual Location emerges as a reliable solution for location spoofing and other phone management needs. Remember, using these tools responsibly is key to maintaining trust in your relationships.
- Title: How to Change/Add Location Filters on Snapchat For your Vivo T2 Pro 5G | Dr.fone
- Author: Abigail
- Created at : 2024-07-24 19:54:18
- Updated at : 2024-07-25 19:54:18
- Link: https://location-social.techidaily.com/how-to-changeadd-location-filters-on-snapchat-for-your-vivo-t2-pro-5g-drfone-by-drfone-virtual-android/
- License: This work is licensed under CC BY-NC-SA 4.0.