
How to Change/Fake Your Oppo Reno 10 Pro 5G Location on Viber | Dr.fone
How to Change/Fake Your Oppo Reno 10 Pro 5G Location on Viber
Viber is one of the most commonly used messenger apps. It allows you to send short messages like texts, videos, images, audio, and documents. Viber also has another exciting feature that will enable you to share your location. But sometimes, you might want to change location on Viber to prank your friends or for security purposes. So, read on to learn how to fake location on Viber with some simple solutions.
 Power Tools add-on for Google Sheets, Lifetime subscription
Part 1: What is the My Location feature on Viber?
If you’ve used WhatsApp’s location feature before, you’ll know what Viber’s “My Location” is all about. With this feature, you can share your live location for whatever reasons you may have. For example, you may want to share your live location with your kids or vice-versa. Or, you might simply want to share a fake location on Viber with your nosy friends.
But as good as it sounds, this live location feature is enabled by default on your Oppo Reno 10 Pro 5G/Android browser. Therefore, you can send a location on Viber without knowing. This can be advantageous to stalkers or even cause misunderstanding in your relationship. What’s worse, it shares your actual location with every text you send. But fret not because this post will help you disable or enable My Location on Viber according to your needs.
Part 2: How to disable or enable My Location on Viber?
So, without wasting too much time, let’s find out the steps to disable/enable Viber location-sharing feature. It’s straightforward.
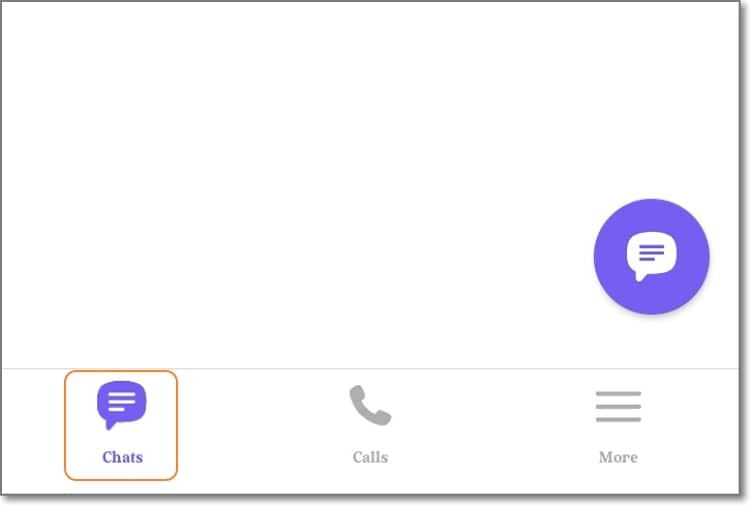
Step 1. Fire up your Viber app on mobile or PC and tap the Chats button. Here, proceed to open a chat that you want to enable/disable location sharing.

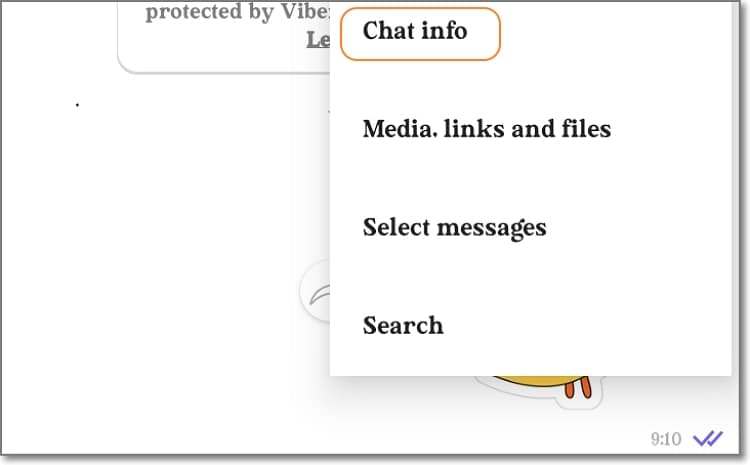
Step 2. Next, tap the Ellipsis (three dots) icon at the top-right corner of the screen and choose Chat Info. Alternatively, simply swipe the screen to the left.
Step 3. On the Chat Info window, simply enable or disable the Attach location always toggle. It’s done!
 Screensaver Factory, Create stunning professional screensavers within minutes. Create screensavers for yourself, for marketing or unlimited royalty-free commercial distribution. Make screensavers from images, video and swf flash, add background music and smooth sprite and transition effects. Screensaver Factory is very easy to use, and it enables you to make self-installing screensaver files and CDs for easy setup and distribution. Screensaver Factory is the most advanced software of its kind.
Pro tip: You might be wondering how to share your actual Viber location with a chat or group. Again, this is very straightforward. Simply open the conversation and tap the three dots on the text field. Then, click the Share Location button and choose your location on the Google map. Lastly, tap Send location to share the Viber location with your selected contact.

Part 3: Can I send a fake location on Viber, and How?
So, is it possible to Viber’s fake location? Unfortunately, Viber doesn’t allow users to share a different place from the real one. That’s because the app asks to automatically access your actual location data using Wi-Fi or GPS while signing up. Therefore, based on the permission you set yourself, the answer is NO.
But nothing is impossible in the tech world. You can easily instruct Viber to share a different location using a third-party app or service like Dr.Fone - Virtual Location . With this professional GPS tool, you teleport your Viber location to anywhere in the world with a simple mouse click.
It’s compatible with Android/iOS devices and boasts a simple-to-understand map. Interestingly, you can walk or drive to your new location and even stop between destinations to make it more believable. It’s nothing complex!
You can check out the this video for further instruction.
Key features of Dr.Fone - Virtual Location:
- Compatible with all Android and iOS versions.
- Teleport Viber location to anywhere in the world.
- Walk or drive to your new Viber location.
- Simulate Viber movements with custom speed.
- Works with Pokemon Go , Facebook, Instagram , Snapchat , Viber, etc.
Steps to change Viber location with Dr.Fone:
Step 1. Launch Dr.Fone Virtual Location.
 ZoneAlarm Extreme Security NextGen

Install and run Wondershare Dr.Fone on your Windows/Mac computer, and then tap the Virtual Location tab on the Home page.
Step 2. Connect your phone to Dr.Fone with a USB cable.
Connect your smartphone to your PC using a USB wire and tap Get Started on the new Dr.Fone pop-up window. Remember to enable the “File Transfer” option on your smartphone instead of “Charging.”
Step 3. Link your phone to Dr.Fone via USB debugging

Press the Next button to begin connecting your phone to Dr.Fone. If the connection fails, enable USB debugging on your phone by following the on-screen instructions. On Android phones, tap Settings > Additional settings > Developer options > USB debugging. In addition, set Dr.Fone as the mock location app on your phone.
Step 4. Enter the GPS coordinates or location address.

If the connection is successful, the Virtual Location map will launch automatically on Dr.Fone. Now enter the coordinates or address in the location field at the top-left corner. After finding the exact location that you want, simply tap Move Here before sharing your new location on Viber. That is easy, right?


Dr.Fone - Virtual Location
1-Click Location Changer for both iOS and Android
- Teleport from one location to another across the world from the comfort of your home.
- With just a few selections on your computer, you can make members of your circle believe you’re anywhere you want.
- Stimulate and imitate movement and set the speed and stops you take along the way.
- Compatible with both iOS and Android systems.
- Work with location-based apps, like Pokemon Go , Snapchat , Instagram , Facebook , etc.
3981454 people have downloaded it

Part 4: Why send fake location on Viber?
Now that you know how to spoof location on Viber. Let’s discuss some reasons to spoof location on this messaging app. Below are some common ones:
- Protect your privacy
Many people don’t want other online users to have a clue of their actual whereabouts. If you’re one of them, use a third-party tool to spoof your Viber location on your Oppo Reno 10 Pro 5G or Android.
- Prank your friends
Do you want to show your friends that you’re in London or New York when you’re in some remote village/town somewhere in reality? Yes, that sounds cool!
- Improve sales
If you’re a digital marketer, you might want to convince your potential clients that the goods are from a specific region or city close to them. Believe it or not, this can lead to more sales closures.
Wrap it Up
You can share your live location on Viber just like you would on Facebook, WhatsApp, and other social media apps. But because most of these apps don’t allow you to share fake locations, I recommend Dr.Fone - Virtual Location change your area to anywhere in the world. Give it a try!
How to Change/Add Location Filters on Snapchat For your Oppo Reno 10 Pro 5G
Snapchat is an Android/iOS messaging app developed in 2011. Currently, this app is home to 350+ users who share photos, videos, audio, texts, emojis, GIFs, and documents. But one of the most exciting Snapchat features is allowing users to share locations, whether fake or real. For instance, you might want to protect your privacy or simply prank your friends with a new location. So, whichever the reason, we’ll show you how to add a location filter on Snapchat effortlessly. You’ll also know how to add a fake location filter on Snapchat. Let’s learn!
Part 1: What are Location Filters on Snapchat?
If you’re an avid Snapchatter, you must have heard of “Snapchat Location Filters” before. So, what exactly is this? A Snapchat location filter or geofilter is simply a creative and interactive way to add a location to your posts. In a nutshell, Snapchat users can search and add a location filter to their videos or photo before posting on the platform. Just think of it as a Snapchat location tag.
Having said that, Snapchat is famous for its myriad of filters, including geofilters. So, before sharing a post, you can choose an overlay design describing your location. Just remember that some places can have more filter options than others. So, keep reading to know how to get a location filter on Snapchat.
Part 2: How to enable/disable and share Location Filters on Snapchat posts?
First and foremost, creating a Snapchat location filter on Android or iPhone is super-duper easy. However, to share your location on Snapchat posts, you must activate this setting within the app. Also, enable the location service on your smartphone. On Android, open Settings > Location, whereas on iPhone, click Settings > Privacy > Location Services.
Here’s how to enable or disable the Location Filter settings:
Step 1. Fire up Snapchat on your Oppo Reno 10 Pro 5G or Android phone and tap your Profile icon.
Step 2. Then, press the Settings button and find and press the Additional Services option.

Step 3. Lastly, tap Manage and then enable the Filters to toggle, and that’s it!
Now that this setting is enabled on Snapchat, you can add your location filter effect. Follow me:
Step 1. Open Snapchat and take a video or a photo.
Step 2. Next, swipe the screen to the left until you find the location effect. Remember, Snapchat uses your actual GPS location.
Step 3. You can also tag a location on Snapchat by clicking the Sticker icon on the right rail. Then, tap the Location button and then choose your GPS location. Interestingly, you can spoof a location with this feature.

Step 4. Finally, customize your video further and then click Send To. Your selected location filter will be added to your Snapchat post.

Part 3: How to Change or Add a Fake Location on Snapchat Filters?
The thing is that Snapchat uses your phone’s GPS or Wi-Fi connection to determine your actual location and add it to the location filter. Therefore, it’s virtually impossible to spoof Snapchat’s location unless you’re using a VPN service.
Fortunately, you don’t need those overpriced VPNs if you can get Dr.Fone . This smartphone utility program allows you to change your Snapchat location to anywhere in the world with a simple mouse click on your PC. In addition, you can simulate Snapchat location movements to make it look more realistic. And apart from Snapchat, you can spoof location on WhatsApp, Viber, Facebook, Facebook Messenger, Instagram, etc.
So, without dilly-dallying much, here’s how to fake a Snapchat location tag with Dr.Fone:
Dr.Fone - Virtual Location
1-Click Location Changer for both iOS and Android
- Teleport GPS location to anywhere with one click.
- Simulate GPS movement along a route as you draw.
- Joystick to simulate GPS movement flexibly.
- Compatible with both iOS and Android systems.
- Work with location-based apps, like Pokemon Go , Snapchat , Instagram , Facebook , etc.
3981454 people have downloaded it
Here is the complete guide for you to refer to while you use the Dr.Fone - Virtual Location.
Step 1. First, grab a USB cable and connect your smartphone to the PC. Remember to enable “Transfer Files” on your phone.
Step 2. Next, install and run Dr.Fone on your computer. Then, tap the Virtual Location button on the home window, and tap Get Started.


Step 3. Now allow USB debugging on your Oppo Reno 10 Pro 5G before clicking Next on Dr.Fone. Don’t know how to do that? Open Settings > Additional Settings > Developer options > USB debugging. Also, choose Dr.Fone as the mock location app.
Step 4. The Virtual Location map will launch immediately. Enter the GPS coordinates or location address on the field in the top-left corner and select the new location. If satisfied, press Move Here.

Step 5. Finally, open your Snapchat app, create a photo, and choose the location filter with your new location. It’s that simple!
Part 4: FAQs about Snapchat
 SwifDoo PDF 2-Year Plan
Q1: What is Ghost Mode on Snapchat?
Snapchat comes with an inbuilt Snap Map introduced in 2017. Besides sharing Snaps by the Our Story feature, Snap Maps lets other Snapchatters see your real-time location using Bitmojis. That said, Ghost Mode makes you invisible on the Snap Map. In other words, no one can know where you are. Cool!

Q2: What are the differences between Ghost Mode and disabling Location Filters?
The Ghost Mode makes you invisible for a specific duration or until you disable it. To use this feature, you don’t have to turn off the location feature on your smartphone. On the other hand, you just need to disable the Location Filters settings on Snapchat to turn off sharing your location tag on posts.
Q3: How accurate is the Snapchat map?
Very accurate! Snapchat uses your GPS coordinates to determine your actual location on the map. However, this map gives a location based on where you were last seen when you logged into the app. So, if you stay for a long without opening the app, it won’t update your location. But if you log in and your location service is enabled, this app will auto-update it.
 Greeting Card Builder
Q4: How does Snapchat Get Information on Your Location?
While installing the Snapchat app and creating an account, the app will practically ask you to allow it to access your location. The app will use your phone’s GPS coordinates to determine your actual location. Also, your Wi-Fi connection will tell Snapchat exactly where you are.
Q5: How to find someone in Ghost Mode on Snapchat?
Sometimes you might want to urgently find a friend on Snapchat when you are in Ghost Mode. To do that, deactivate Ghost Mode on Snapchat by clicking Profile > Settings > See My Location and disabling Ghost Mode. Now open the Snap Map, and you’ll see your location with a red Bitmoji. You’ll also see your nearby friends with enabled Snapchat locations on the map. If you can’t find them, tap the Search icon, choose or enter their name, and see them on the map or send a text.
Wrap it Up
Now you have a complete idea of what the Snapchat location filter is. In short, it is simply a creative way to share your Snapchat location tag on a post. But because you can’t spoof your location on Snapchat, I recommend using Dr.Fone - Virtual Location to teleport your Snapchat location to anywhere in the world. This tool also works with other social media apps like Facebook, WhatsApp, and Telegram. Enjoy!
How to Fake Snapchat Location without Jailbreak On Oppo Reno 10 Pro 5G
Snapchat users are very fond of using custom filters when sharing content on the app. It is a great way to ensure that your images and videos are only viewed by the people that you target. However, a new feature called Geo-filters has brought a lot of mixed feelings amongst Snachatters.
The filter is location-based, which makes any content that you share to be seen by people who are within your geographic fence.
Imagine that you are standing at the Niagara Falls and want to share with people who are in Europe; you will not be able to do this and this is why the filters are problematic to people in the Snapchat community.
Thankfully, there are ways in which you can spoof our device, allowing you to access Geofilters anywhere in the world. Today, you learn several ways in which you can achieve this objective with ease.
Part 1: Benefits that faking Snapchat brings to us
Snapchat comes with a lot of filters, both sponsored and crowdsourced, which you can use to interact with different people. When Geofilters was introduced, it meant that you could only access filters that were designed for specific locations.
Sponsored filters generally tend to target people in certain areas, and this can limit how you disseminate your content on Snapchat.
The main benefit that you get from faking Snapchat is getting access to these filters without even moving an inch.
When you spoof your device, Snapchat thinks that you are actually in the area that you have spoofed to. This virtual location will then allow you to access the filters that are available in that area.
Part 2: A free but complicated way to fake Snapchat location no jailbreak
One of the best ways to fake Snapchat without jailbreak is to use XCode. This is an app on your Oppo Reno 10 Pro 5G that allows you to tweak certain aspects of the apps that you have on your device, including Snapchat.
Get XCode on your device and then launch it. Start by using the locations that are found to setup XCode. You can download XCode from Apple App Store. You will need your Apple ID and password to use XCode.

Here are the steps that you have to follow:
Step 1: Start by creating a basic single-view application
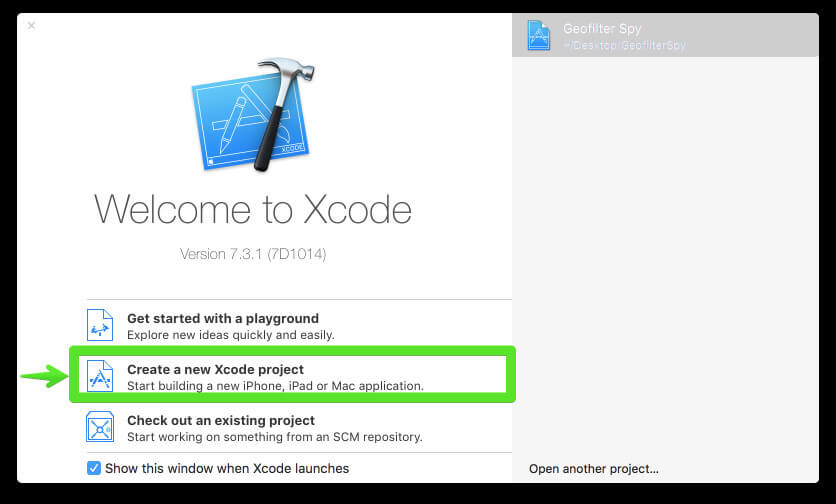
Launch XCode and then create a new project
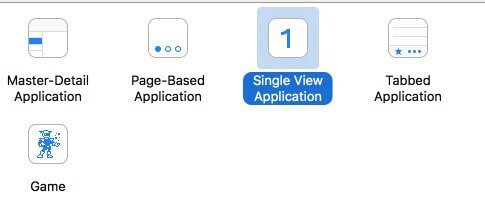
Then choose the option marked “Single View iOS application.
Now customize the project options and give it any name that you desire.

Now proceed and customize the Organization Name and the Identifier. The identifier works like a reverse domain name so you can use anything you desire.
Proceed and select swift as your preferred language and then click on “iPhone” as your device so the app will be small.
Any other options below this should be left in their default states.
Now go ahead and save the project to a location on your computer. Since the version control does not apply in this case, make sure that you uncheck the option before you save the app.


Step 2: transfer and run the created app on your iOS device
People who do not have the latest version of XCode will run into the error shown below.
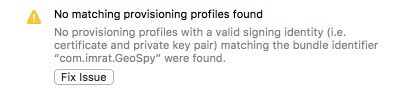
IMPORTANT: do NOT click on “Fix Issue” until you do the following tasks:
- Access the preferences on your XCode
- Choose the accounts tab
- Click on the add (+) icon at the bottom left side of your screen
- Now choose “Add Apple ID”.
- Type in your Apple ID and password
You should now have an accounts screen similar to the one shown in the image below.

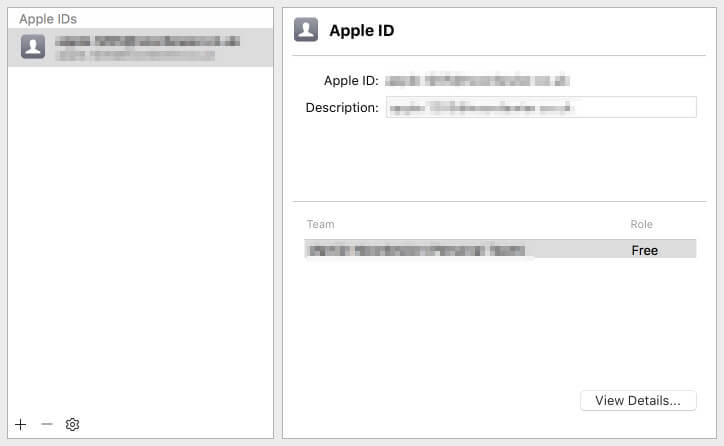
Now close the window and click on the “team” dropdown menu. You may now select the Apple ID that you just created.
Now you can go ahead and click on the “Fix Issue” button.
Now the error will be resolved and you should have a screen that is similar to the image below.
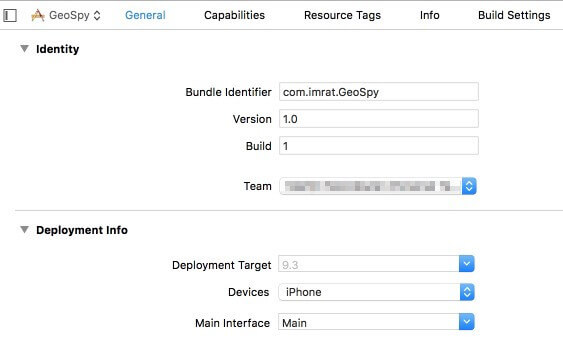
You may now run the app that you created before on your iOS device.
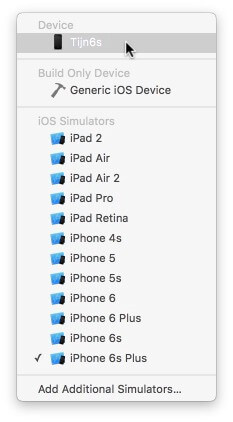
Use an original USB cable to connect the iOS device to your computer.
Towards the top right-hand corner of your screen, click on the button that is displaying your project name and then click on the iOS device.

Now your iOS device will be showing at the top. Select it and proceed.
 EmEditor Professional (Lifetime License, non-store app)
Hit the “Play” icon that is found at the top left side of your screen.
Wait for the process to be complete. You might as well get a cup of coffee as this can take quite a while.

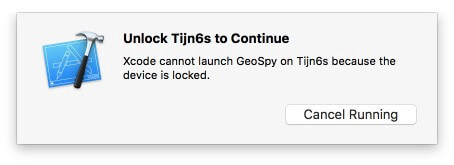
When the process is complete, XCode will install the app on your iOS device. You will get the following error if your device has not been unlocked; unlocking the iOS device will put off the error message.

Now you should be viewing a blank screen on your iOS device. Do not worry; your device has not been ruined. This is the app that you have just created and installed. Pressing the “Home” button will dismiss the blank screen.
Step 3: It’s time to spoof your location
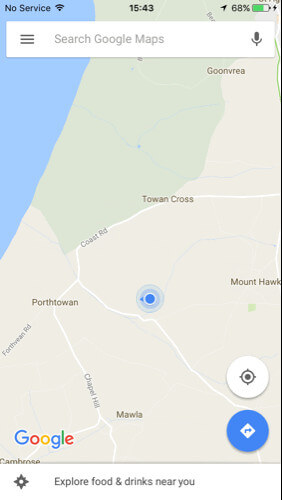
Go to Google Maps or iOS maps which will now show your current location.
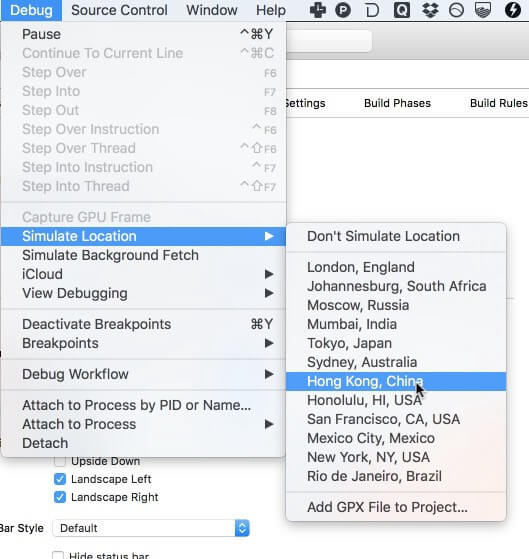
Go to XCode and then choose “Simulate Location” from the “Debug” menu and then select a different location to test.
If you have done all that you need to do, then the location of your iOS device should instantly jump to the location that you have chosen.
Now you can proceed and see if you have access to Geo-filters in the new location.
Step 4: Spy Geo-Filters on Snapchat
Now you can launch Snapchat and then access the filters in the area that you have teleported to. Remember that you can move from one location to the next on XCode without having to close Snapchat. Just cancel the current snap after changing the location and create a new snap to see the filters in the new location. If this fails to respond, then go back to Google maps or iOS map app and then ensure that you are in the desired location. Once you have done so, close Snapchat and restart it again, and you will be in the new location once more.
Part 3: A paid but easy way to fake Snapchat location without jailbreak
You can also fake your Snapchat GPS location using a premium app such as iTools. This is a popular application, used to spoof many other apps that require geo-location data to work. Another point to note is that the latest iPhone models cannot be jailbroken. The iOS version today is very secure and you cannot tweak it like before.
Thankfully, you can use a premium, not free, iTools to change your virtual location without jailbreaking the Oppo Reno 10 Pro 5G device. You can get iTools on a trial basis, but after the period expires, you will have to pay $30.95 to continue using it.
Step 1: Download and install iTools on your computer and then launch it. Connect your iOS device to your computer using the original USB cable that came with the Oppo Reno 10 Pro 5G device.
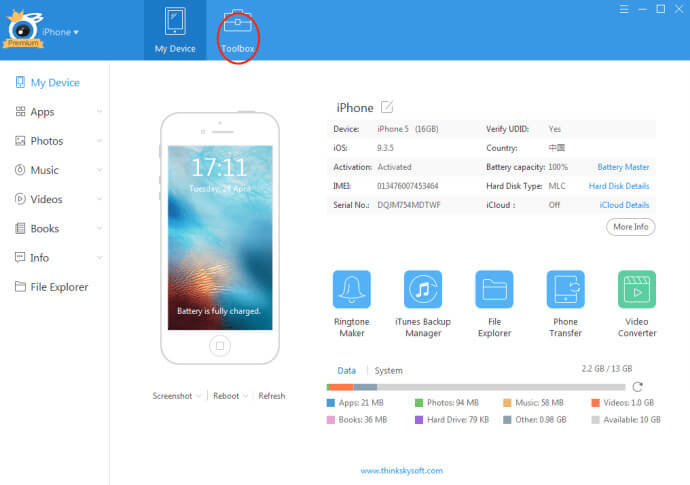
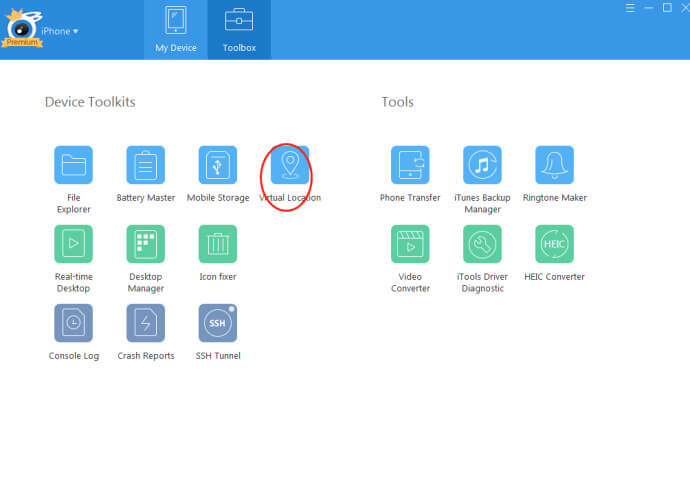
Step 2: Go to the iTools panel and click on “toolbox”.
Step 3: Select the Virtual Location button within the Toolbox Panel

Step 4: Type in the location that you want to teleport to and then click on ‘Move Here”.
 vMix Pro - Software based live production. vMix Pro includes everything in vMix 4K plus 8 channels of Replay and 8 vMix Call
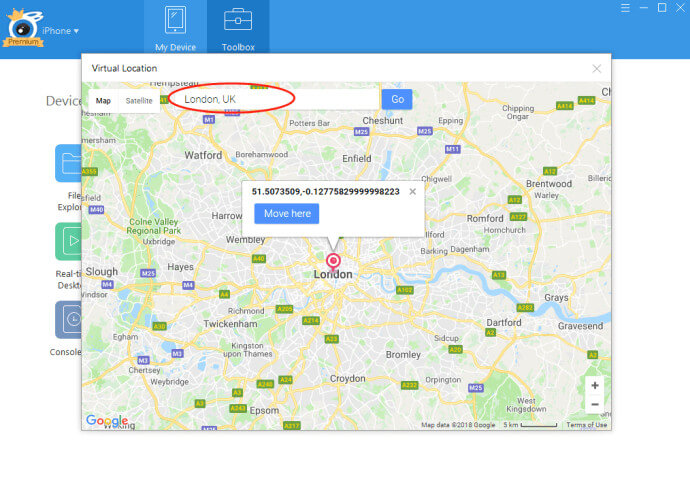
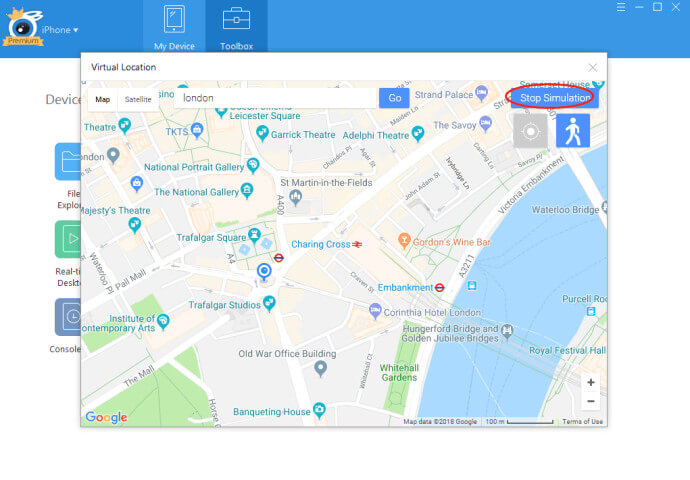
Step 5: Now open your Snapchat and you will be able to access the filters found in the location that you typed in.
Once you are finished with this spoofed location, you can simply select “Stop Simulation” in iTools. This is a premium tool, but very simple to use. It is the best tool to use, especially if you are having a device with the latest iOS version.
Part 4: A brief comparison of XCode vs. iTools to fake Snapchat GPS location
From the steps used in both methods, it is very clear that iTools is the best app to use to fake your Snapchat GPS location for several reasons. Here are some of them:
- Ease of use - Using XCode to fake your Snapchat GPS location is a long and complicated process, whereas using iTools is simple and clean.
- Price – Although XCode is free while iTools is not, the benefits of using iTools surpass the cost. This makes it less-costly when it comes to performance and convenience.
- Security – XCode may not be very secure, especially when it comes to avoiding detection by Snapchat. You may have to keep going back to XCode, and changing the location, switching off Snapchat, and restating it again. However, when using iTools, your location is fixed until you stop the simulation.
- Versatility – XCode cannot be used on the latest iOS devices without posing problems, while iTools is a simple and effective tool for all iOS versions.

In conclusion
When you want to spoof Snapchat to access Geo-Filters in any part of the world, you can use the complicated XCode or pay a fee and use the simpler iTools. There are various benefits that you gain from teleporting using these tools, with Geo-Filters access being the biggest benefit. If you want to use Snapchat all over the world without moving out of your home, then these are the ways that you can go about it.
- Title: How to Change/Fake Your Oppo Reno 10 Pro 5G Location on Viber | Dr.fone
- Author: Abigail
- Created at : 2024-07-24 18:30:22
- Updated at : 2024-07-25 18:30:22
- Link: https://location-social.techidaily.com/how-to-changefake-your-oppo-reno-10-pro-5g-location-on-viber-drfone-by-drfone-virtual-android/
- License: This work is licensed under CC BY-NC-SA 4.0.