
How to Fake Snapchat Location without Jailbreak On Vivo T2x 5G | Dr.fone
How to Fake Snapchat Location without Jailbreak On Vivo T2x 5G
Snapchat users are very fond of using custom filters when sharing content on the app. It is a great way to ensure that your images and videos are only viewed by the people that you target. However, a new feature called Geo-filters has brought a lot of mixed feelings amongst Snachatters.
The filter is location-based, which makes any content that you share to be seen by people who are within your geographic fence.
Imagine that you are standing at the Niagara Falls and want to share with people who are in Europe; you will not be able to do this and this is why the filters are problematic to people in the Snapchat community.
Thankfully, there are ways in which you can spoof our device, allowing you to access Geofilters anywhere in the world. Today, you learn several ways in which you can achieve this objective with ease.
 SwifDoo PDF 2-Year Plan
Part 1: Benefits that faking Snapchat brings to us
Snapchat comes with a lot of filters, both sponsored and crowdsourced, which you can use to interact with different people. When Geofilters was introduced, it meant that you could only access filters that were designed for specific locations.
Sponsored filters generally tend to target people in certain areas, and this can limit how you disseminate your content on Snapchat.
The main benefit that you get from faking Snapchat is getting access to these filters without even moving an inch.
When you spoof your device, Snapchat thinks that you are actually in the area that you have spoofed to. This virtual location will then allow you to access the filters that are available in that area.
Part 2: A free but complicated way to fake Snapchat location no jailbreak
One of the best ways to fake Snapchat without jailbreak is to use XCode. This is an app on your Vivo T2x 5G that allows you to tweak certain aspects of the apps that you have on your device, including Snapchat.
Get XCode on your device and then launch it. Start by using the locations that are found to setup XCode. You can download XCode from Apple App Store. You will need your Apple ID and password to use XCode.

Here are the steps that you have to follow:
Step 1: Start by creating a basic single-view application
Launch XCode and then create a new project

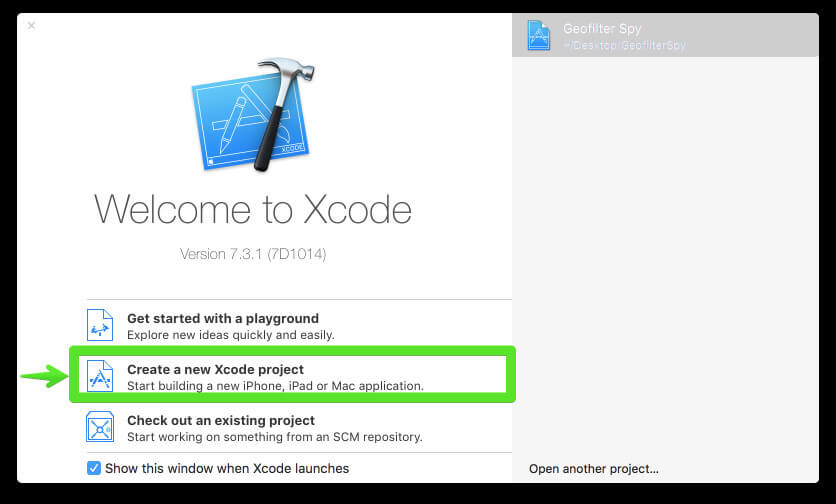
Then choose the option marked “Single View iOS application.
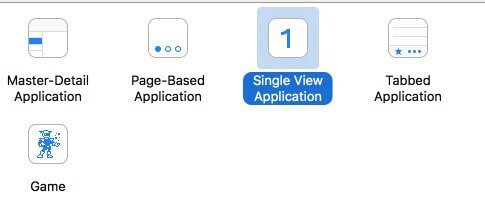
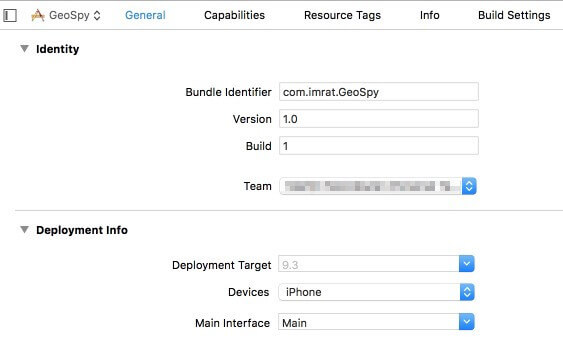
Now customize the project options and give it any name that you desire.


Now proceed and customize the Organization Name and the Identifier. The identifier works like a reverse domain name so you can use anything you desire.
Proceed and select swift as your preferred language and then click on “iPhone” as your device so the app will be small.
Any other options below this should be left in their default states.
Now go ahead and save the project to a location on your computer. Since the version control does not apply in this case, make sure that you uncheck the option before you save the app.
 NeoDownloader - Fast and fully automatic image/video/music downloader.

Step 2: transfer and run the created app on your iOS device
People who do not have the latest version of XCode will run into the error shown below.

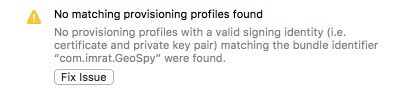
IMPORTANT: do NOT click on “Fix Issue” until you do the following tasks:
- Access the preferences on your XCode
- Choose the accounts tab
- Click on the add (+) icon at the bottom left side of your screen
- Now choose “Add Apple ID”.
- Type in your Apple ID and password
You should now have an accounts screen similar to the one shown in the image below.

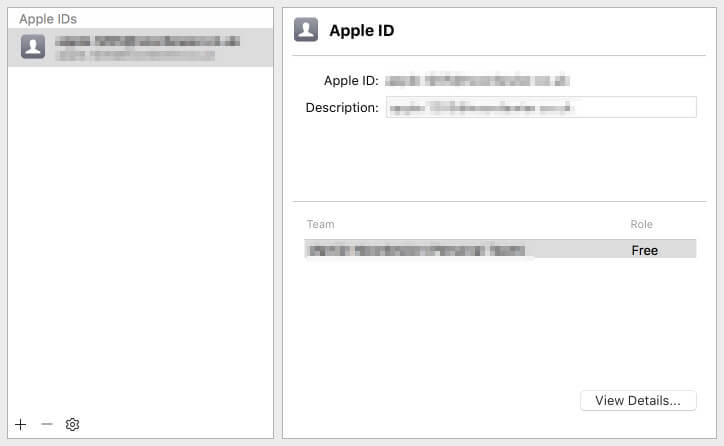
Now close the window and click on the “team” dropdown menu. You may now select the Apple ID that you just created.
Now you can go ahead and click on the “Fix Issue” button.
Now the error will be resolved and you should have a screen that is similar to the image below.
You may now run the app that you created before on your iOS device.
Use an original USB cable to connect the iOS device to your computer.
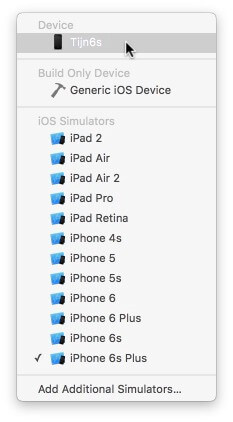
Towards the top right-hand corner of your screen, click on the button that is displaying your project name and then click on the iOS device.

Now your iOS device will be showing at the top. Select it and proceed.
Hit the “Play” icon that is found at the top left side of your screen.
Wait for the process to be complete. You might as well get a cup of coffee as this can take quite a while.
![]() FX PRO (Gold Robot + Silver Robot(Basic Package))
FX PRO (Gold Robot + Silver Robot(Basic Package))

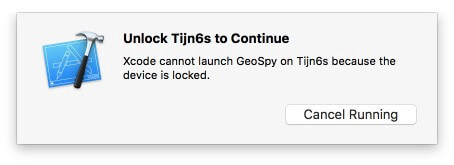
When the process is complete, XCode will install the app on your iOS device. You will get the following error if your device has not been unlocked; unlocking the iOS device will put off the error message.
Now you should be viewing a blank screen on your iOS device. Do not worry; your device has not been ruined. This is the app that you have just created and installed. Pressing the “Home” button will dismiss the blank screen.
Step 3: It’s time to spoof your location
Go to Google Maps or iOS maps which will now show your current location.
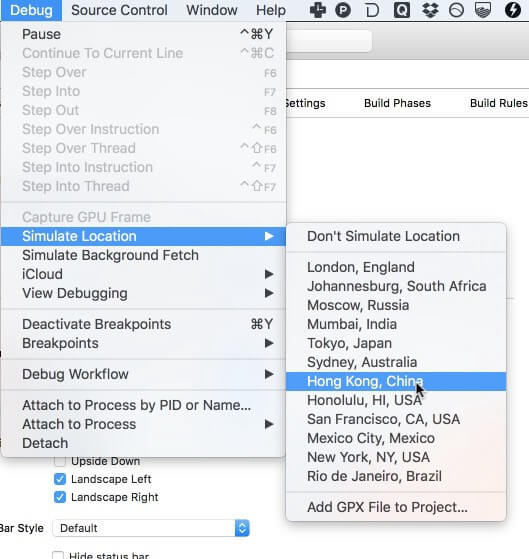
Go to XCode and then choose “Simulate Location” from the “Debug” menu and then select a different location to test.
If you have done all that you need to do, then the location of your iOS device should instantly jump to the location that you have chosen.
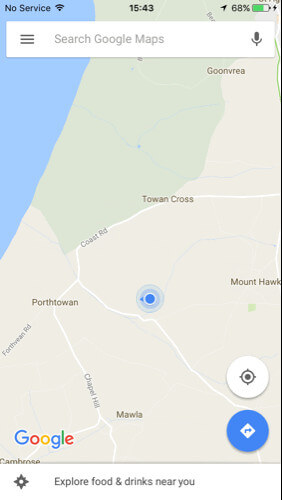
Now you can proceed and see if you have access to Geo-filters in the new location.
Step 4: Spy Geo-Filters on Snapchat
Now you can launch Snapchat and then access the filters in the area that you have teleported to. Remember that you can move from one location to the next on XCode without having to close Snapchat. Just cancel the current snap after changing the location and create a new snap to see the filters in the new location. If this fails to respond, then go back to Google maps or iOS map app and then ensure that you are in the desired location. Once you have done so, close Snapchat and restart it again, and you will be in the new location once more.
## Part 3: A paid but easy way to fake Snapchat location without jailbreakYou can also fake your Snapchat GPS location using a premium app such as iTools. This is a popular application, used to spoof many other apps that require geo-location data to work. Another point to note is that the latest iPhone models cannot be jailbroken. The iOS version today is very secure and you cannot tweak it like before.
Thankfully, you can use a premium, not free, iTools to change your virtual location without jailbreaking the Vivo T2x 5G device. You can get iTools on a trial basis, but after the period expires, you will have to pay $30.95 to continue using it.
Step 1: Download and install iTools on your computer and then launch it. Connect your iOS device to your computer using the original USB cable that came with the Vivo T2x 5G device.
Step 2: Go to the iTools panel and click on “toolbox”.
 Screensaver Factory, Create stunning professional screensavers within minutes. Create screensavers for yourself, for marketing or unlimited royalty-free commercial distribution. Make screensavers from images, video and swf flash, add background music and smooth sprite and transition effects. Screensaver Factory is very easy to use, and it enables you to make self-installing screensaver files and CDs for easy setup and distribution. Screensaver Factory is the most advanced software of its kind.
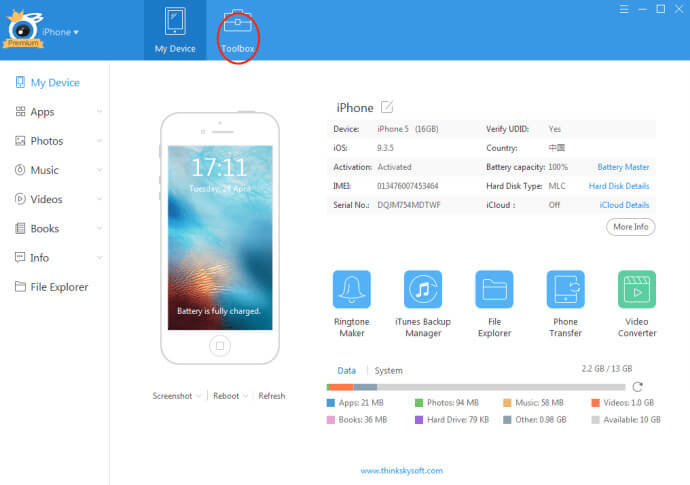
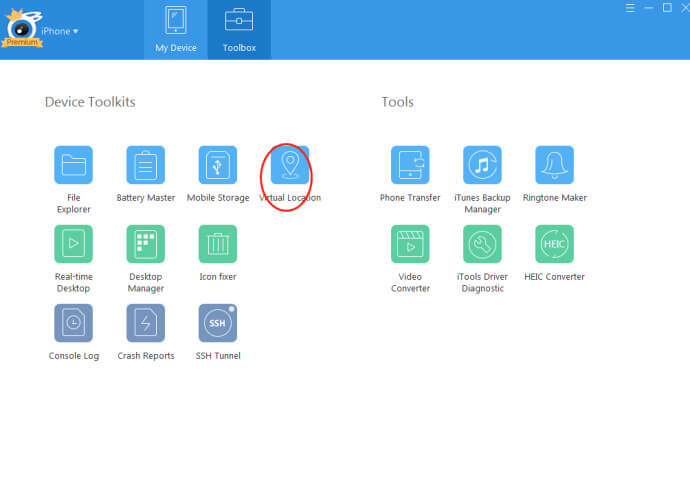
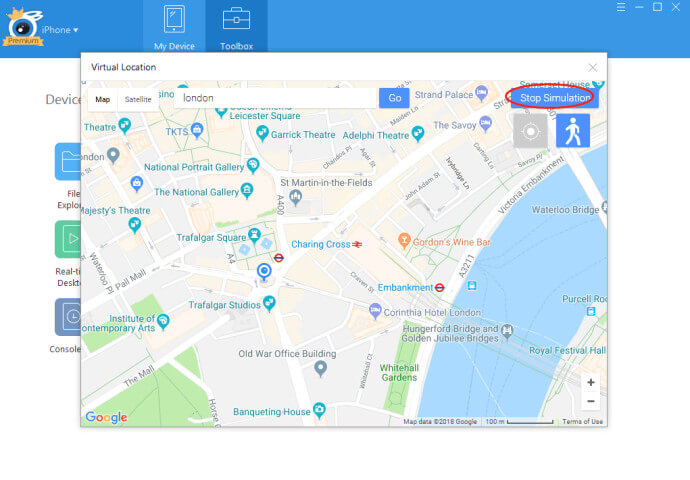
Step 3: Select the Virtual Location button within the Toolbox Panel
Step 4: Type in the location that you want to teleport to and then click on ‘Move Here”.

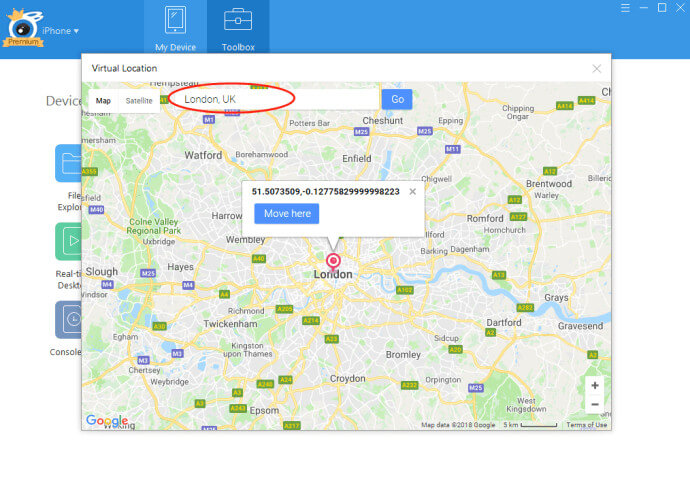
Step 5: Now open your Snapchat and you will be able to access the filters found in the location that you typed in.
Once you are finished with this spoofed location, you can simply select “Stop Simulation” in iTools. This is a premium tool, but very simple to use. It is the best tool to use, especially if you are having a device with the latest iOS version.
 vMix 4K - Software based live production. vMix 4K includes everything in vMix HD plus 4K support, PTZ control, External/Fullscreen output, 4 Virtual Outputs, 1 Replay, 4 vMix Call, and 2 Recorders.
Part 4: A brief comparison of XCode vs. iTools to fake Snapchat GPS location
From the steps used in both methods, it is very clear that iTools is the best app to use to fake your Snapchat GPS location for several reasons. Here are some of them:
- Ease of use - Using XCode to fake your Snapchat GPS location is a long and complicated process, whereas using iTools is simple and clean.
- Price – Although XCode is free while iTools is not, the benefits of using iTools surpass the cost. This makes it less-costly when it comes to performance and convenience.
- Security – XCode may not be very secure, especially when it comes to avoiding detection by Snapchat. You may have to keep going back to XCode, and changing the location, switching off Snapchat, and restating it again. However, when using iTools, your location is fixed until you stop the simulation.
- Versatility – XCode cannot be used on the latest iOS devices without posing problems, while iTools is a simple and effective tool for all iOS versions.
In conclusion
When you want to spoof Snapchat to access Geo-Filters in any part of the world, you can use the complicated XCode or pay a fee and use the simpler iTools. There are various benefits that you gain from teleporting using these tools, with Geo-Filters access being the biggest benefit. If you want to use Snapchat all over the world without moving out of your home, then these are the ways that you can go about it.

WPS Office Premium ( File Recovery, Photo Scanning, Convert PDF)–Yearly
3 Things You Must Know about Fake Snapchat Location On Vivo T2x 5G
You must know that many social media platforms could track your location. And Snapchat is one of the social media platforms that easily tracks your location and use this information to improve its features and services. But many people concern about their privacy when using social media apps. If in case if you do not want Snapchat to track our location, then a fake Snapchat location could perfectly meet your needs.
 PCDJ DEX 3 for Windows & MAC is the total entertainment DJ software solution, offering audio, video, and karaoke mixing ability. Automatic beat-sync, smart looping, 4 decks, DJ MIDI controller support, Karaoke Streaming and much more.
 SwifDoo PDF Perpetual (2-PC) Free upgrade. No monthly fees ever.
Part 1: Do you really know Snapchat?
Snapchat comes with many effective and best features that could perfectly meet your needs. Some of the best features of Snapchat are Snap Ads, filters, lenses, audio, tune performance, video streaming, instant messaging, and much more. Snapchat is the most lending application for Android and iOS apps. The best thing about this application is that it includes some useful features that you ought to incorporate when creating a Snapchat clone for your business. These features contain both photos and video options.
Best features of Snapchat:
- Snap
Snap is the best feature that is loved by all, and it is the core feature of Snapchat. With this useful feature, you could click snaps and share your pictures easily and quickly.

- Lenses
The lens features are also included in the Snapchat feature. This feature is a combination of machine learning and artificial intelligence, as it allows you to see your younger and older version. This feature helps you to boost your engagement on your application.
 TubeDigger - online video downloader from mostly any site

- Voice and video calls
Snapchat includes the voice and video call feature that could help you to connect your friends and family globally easily.
 PDF application, powered by AI-based OCR, for unified workflows with both digital and scanned documents.
- Story
The story feature that Snapchat includes is best as it could help you to broadcast your latest snap. The story format only lasts for twenty-four hours. This story features allow you to connect and effectively engage your users easily.
- Filters
Snapchat comes with an amazing feature that is called as filters. It includes many best filters that you must check to get the best results. These effective filters could be used to increase usage and connect with the audience effectively.


Part 2: Ways to Fake Snapchat Location
There are many effective ways of fake Snapchat locations without jailbreak. And some of the effective ways are mentioned below:
Method 1: Using Fake Location Apps
- iOS version: Dr.Fone-Virtual Location
If you are an iOS user and wish to fake location for a Snapchat map, Dr.Fone-Virtual Location is one of the best fake location apps that could be used on Snapchat. This iOS location changer is best for privacy keeping and more. With this effective app, you could teleport iPhone GPS anywhere in the world. It also allows you to simulate GPS movement along real roads or paths you draw and support five devices location management. To use this tool, you must follow the steps as mentioned below:
Step 1: You must download this Dr.Fone-Virtual Location tool from its official website and install it. After you have installed the tool, you must opt for the virtual location module from the main interface

Step 2: Connect your Vivo T2x 5G to the PC using the lightening cord and click on the “Get Started” option.

Step 3: Now, you will be able to check your current actual location of yours on the map. After this, you need to activate the “Teleport mode”. This will be the third icon located on the right side of the screen.
Now, enter the location that you desire to teleport and click on the “Go” option.


Step 4: The program will analyze the place that you have entered, and it will show you the distance for that place in a pop-up window. Hit on “Move Here”.

You will now be able to check the new location whenever you click the “Center On.”
- Android version: FGL pro
For Android people, many fake GPS apps can help them. Since dr.fone doesn’t support Android devices for now, we will help the users with a well-known Android app to serve the purpose, and it is FGL Pro. This app is free to download as well as works in a hassle-free way. However, if we talk about the steps, you will be a bit disappointed as the steps are lengthy for this as you will require downgrading Google Play services. Let us know what exactly we need to do.
Step 1: As mentioned, firstly, downgrade the Google Play services. Then, install the app in your Vivo T2x 5G.
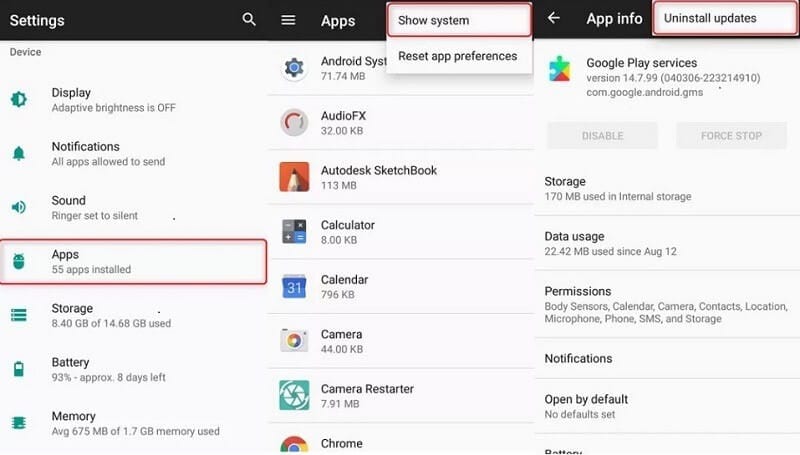
Step 2: Once installed, make sure to disable the “Find My Device” option. You can do this by “Settings” > “Security” > “Device Administrations” and turn off the option.

Step 3: Another thing to be noted after downgrading Google Play services is to uninstall the updates. Simply head to “Settings” > “Apps” > “menu” > “Show System” > “Google Play Services” > “Uninstall Updates”.
Step 4: Now, install the older Google Play Services version that you downgraded earlier. Head to “File Explorer” > “Downloads” and click apk file of Google Play Services. Tap “Install”.
Step 5: Now, go to “Settings” > “Apps” and tap the menu. Choose “Show System” > “Google Play Store” and disable it.
Step 6: Now, you need to set the FGL Pro as a mock location app. Please make sure to enable Developer options first. Then, in the menu of Developer Options, select “Select mock location app” > “FGL Pro”.

Step 7: Open the app now and set the desired location. Tap on the “Play” button, and you’re good to go.

Method 2: Using VPN
The second effective method to Snapchat fake location is through the help of a VPN. There are a lot of options when it comes to VPN. However, you can choose Surshark if you can’t decide whether it is one of the best VPN that comes with build-in fake GPS tech. It is the cheapest and the VPN that provides you with the perfect way to enhance your Snapchat experience.

Method 3: Using Xcode
The third method of fake GPS for Snapchat includes Xcode. Through Xcode, you could easily change the Snapchat location. Steps to a fake location with Xcode includes:
Step 1: In the first step, you must install Xcode from the Macs app store.

Step 2: Launch it and set up a project. Choose “Single View Application” and click “Next”.

Step 3: Provide a name to the project and hit “Next”.
 The BootIt Collection covers multi-booting, partitioning, and disk imaging on traditional PC’s using the standard BIOS and newer PC’s using UEFI. The collection includes BootIt Bare Metal (BIBM) for standard BIOS systems and BootIt UEFI (BIU) for UEFI system.
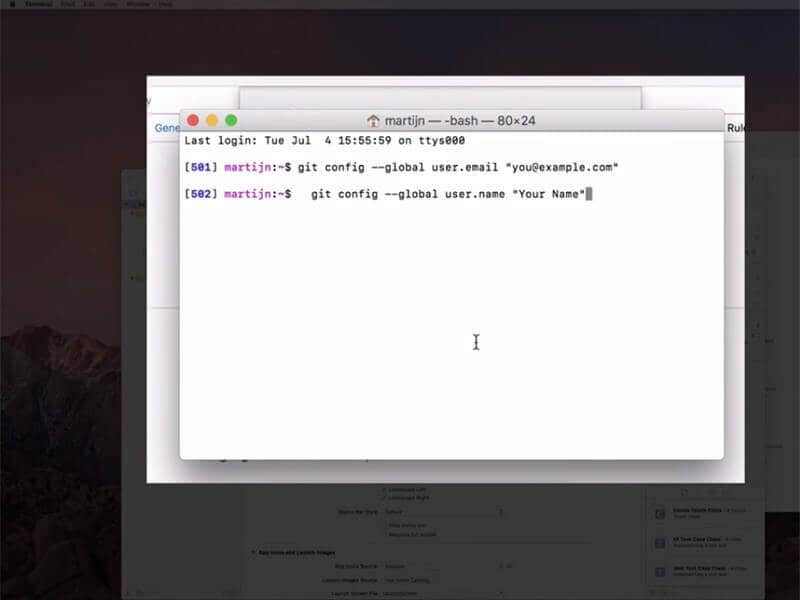
Step 4: Now, you must set up GIT on Xcode. You will notice a screen showing “Please tell me where you are” and the commands.
You are required to enter the commands in “Terminal”. Open it and type the following:
- git config –global user.email “you@example.com “
- git config –global user.name “your name”
Please note: “you@example.com ” and “your name” should be changed with your info.
 Power Tools add-on for Google Sheets, 12-month subscription
Step 5: Connect your Vivo T2x 5G to Mac and wait as Xcode will begin to process some files.
Step 6: You can now click on “Debug” menu and choose “Simulate Location”. Choose the desired location now and fake GPS.


Part 3: What to pay attention to while faking Snapchat location?
There is a certain risk that you may face while using a fake GPS Snapchat map, so you must pay attention while faking Snapchat location. Some of the fake location tools could simulate latitude and longitude perfectly but do not simulate altitude, which may sometime ban your account in Snapchat. Hence you must choose the best tool that could spoof any location without any range limitation.
Some of the Snapchat spoof does not work immediately and may also provide you with some difficulty. Hence here you must wait for some time or restart the Vivo T2x 5G device and recheck it.
Conclusion
Many different tools could help you to spoof Snapchat. But you must always prefer to choose the right one that could perfectly meet your needs. And it could provide you with the best experience of using Snapchat without any difficulty.
Dr.Fone - Virtual Location
1-Click Location Changer for both iOS and Android
- Teleport from one location to another across the world from the comfort of your home.
- With just a few selections on your computer, you can make members of your circle believe you’re anywhere you want.
- Stimulate and imitate movement and set the speed and stops you take along the way.
- Compatible with both iOS and Android systems.
- Work with location-based apps, like Pokemon Go , Snapchat , Instagram , Facebook , etc.
3981454 people have downloaded it
How to Change your Vivo T2x 5G Location on Twitter
Twitter is one of the most used social media platforms of today’s time, where anyone can voice their opinion regarding any trend or event in the form of short messages. Moreover, it’s a free platform that displays the hot debates and news based on your country, which is usually a good thing.
However, it restricts other global trends due to the limited location exposure. However, you can change the trending location according to your preferences with a few tricks to avail the best experience. If you have questions such as how to change your Twitter location, then this article is for you.

Part 1: How to Change Location on Twitter
Usually, Twitter allows you to keep tabs on current hot topics in your country. While in Nowadays, people prefer to be aware of the global trends, which are impossible to access with the default settings. But there are a few valuable ways by which you can change Twitter location regardless of any device to gain the most out of this mega content platform.
How to Change Twitter Location on Mobile Phone
Twitter for mobile is easy to use, but it offers limited privacy options compared to desktop versions, such as you can’t change your username or delete your account on the mobile Twitter. Still, it does allow you to change your location in a few easy steps:
Step 1: First, open the Twitter app, visit your profile, and go to “Settings and Privacy.”
.png) Kanto Player Professional
Kanto Player Professional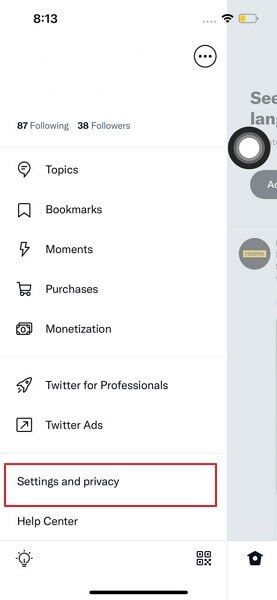
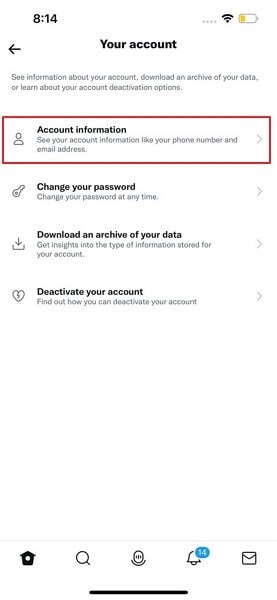
Step 2: Next, click on “Your Account” and later on “Account Info.” You have to access your “Account Information” by clicking on it.
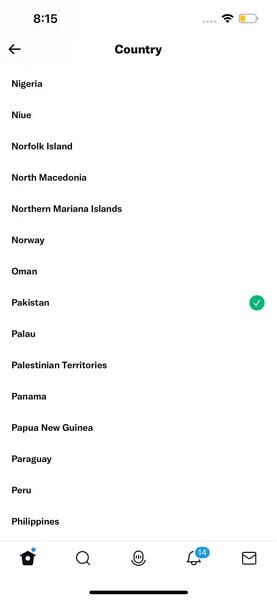
Step 3: Lastly, choose the “Country” and change the location according to your preference.
How to Change Twitter Location on a Computer
Unlike Twitter applications, the desktop version is efficient. For example, you can change the Twitter location to your desired region in just a few steps:
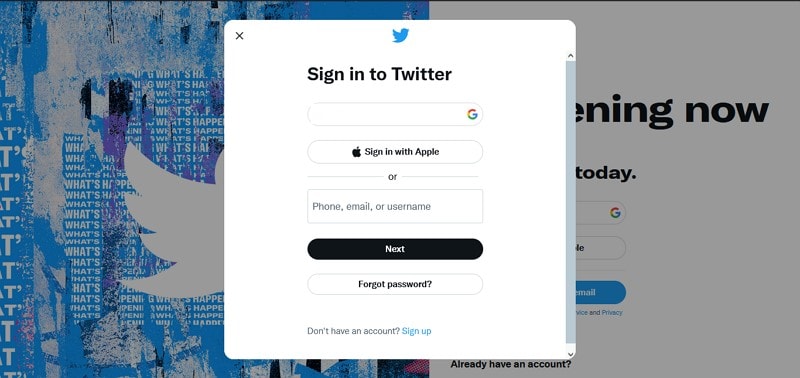
Step 1: First, go to the Twitter website and log in with your username and password.
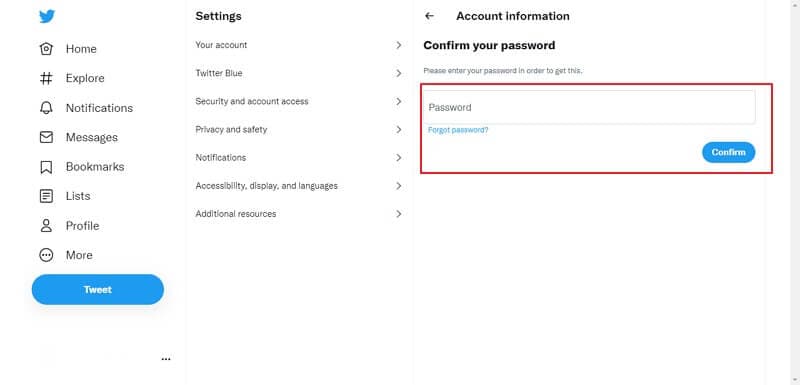
Step 2: After logging in, go to “More” options from the Twitter home and click on “Settings and Privacy,” Now, select the option of “Account Information” from the “Your Account” settings.
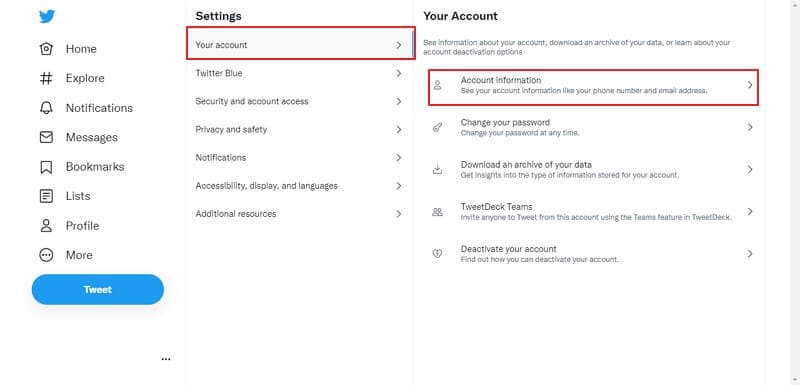
Step 3: You will be asked to enter your password. After confirming your password, click on the “Country” you wish to change your Location.
What is the Difference between My Profile Location and My Country Setting on Twitter?
Country setting and profile location are both entirely different things. The country setting determines what trends and news will be displayed on your discovery page.
In contrast, profile location is your public location that other users can see when visiting your profile. Therefore, changing your country setting will not impact your original profile location unless you make a change yourself.
Part 2: How to Fake Location on Twitter
In this technological era, changing your location to the other end of the world is just a few clicks of tasks; various software is available on the market, such as Dr.Fone, which can easily spoof your location.
Dr.Fone – Virtual Location is a well-recognized software compatible with iOS and Android devices. It can easily change your area to your desired country in a few clicks without risking your privacy.
Why Do We Need to Fake Location on Twitter?
There are several reasons people want to learn how to change location on Twitter. Some of the reasons are mentioned below:
For Privacy Protection
Almost all social media platforms use your IP address and location to provide you with a genuine experience. Still, many people do not wish to risk their privacy, and for that reason, they use software and tools to fake their location.
For Tricking Friends and Family
You can spoof your location to prank or trick your friends and family into thinking that you’re on vacation or taking a trip when you’re not.
For Making New Friends
One of the reasons people prefer to spoof their location is to socialize and make friends with people other than their region; it’s the most innovative way by which you can easily have a chat with anyone from around the world without revealing your actual location.
 PearlMountain Image Converter
Dr.Fone - Virtual Location
1-Click Location Changer for both iOS and Android
- Teleport from one location to another across the world from the comfort of your home.
- With just a few selections on your computer, you can make members of your circle believe you’re anywhere you want.
- Stimulate and imitate movement and set the speed and stops you take along the way.
- Compatible with both iOS and Android systems.
- Work with location-based apps, like Pokemon Go , Snapchat , Instagram , Facebook , etc.
3981454 people have downloaded it
How to Fake Twitter Location by Dr.Fone - Virtual Location
With Dr.Fone – Virtual Location, you can easily fake your Twitter location with a few simple steps:
Step 1: Download Dr.Fone Mobile Toolkit
Firstly, download and install the Dr.Fone – Virtual Location tool on your computer and launch it. Then, select the “Virtual Location” tool from the displayed Dr. Fone tools.
Step 2: Connect your Mobile
Connect your Vivo T2x 5G or Android device to the computer through a USB cable. Now, hit the “Get Started” button.
Step 3: Activate Teleport Mode
You can now see your actual location on the displayed maps and if the location is incorrect, click on the “Center On” icon. To fake the Twitter location, click on the “Teleport” icon at the upper right corner of the screen and search for the location where you want to spoof.
Step 4: Spoof Right Away
Finally, click on the “Move Here” icon in the popup box, and your GPS will be located at that particular location. Now launch the Twitter app, and it will directly display your selected spoof location.
 vMix Pro - Software based live production. vMix Pro includes everything in vMix 4K plus 8 channels of Replay and 8 vMix Call
 safe & secure
Part 3: FAQs About Twitter Location
- Could your location be tracked via Twitter?
Yes, you can be tracked through Twitter only when set on default settings. As per Twitter privacy, it’s required to attain your IP address, location, and other details to offer you valid trends and news that are trending within your region.
- How do I enable and disable my location on Twitter?
Choose “Settings and Privacy,” then “Privacy and Safety.” Then, under “Data sharing and off Twitter activity,” head to “Location Info.” Now, hit on “Add Location Information to your Tweets.” If that box is already ticked, your location is enabled; now, uncheck it to disable it.
- What’s the reason behind Twitter having the wrong location?
If you want your Twitter location to be accurate and precise. Firstly, you should enable the location setting from your Twitter application, then go to your mobile settings and enable location services for Twitter. Keep in mind that if one of these settings is not enabled, your location won’t be correct.
- Why does Twitter hide worldwide trends?
In 2020, Twitter changed its privacy by removing worldwide trends. Still, few global trends can be seen on the explore page, directly or indirectly connected with your location or your preference of content to offer the best experience to you. But, if you wish to explore more of these worldwide trends, you can always spoof the location.
Conclusion
Twitter is one of the most content-consuming social platforms globally. Its users are always thirsty to debate and share their opinions on various topics, which can, unfortunately, be restricted because of the limited exposure to global trends. But with the help of this detailed article, anyone can easily change Twitter location to the desired region.
safe & secure
- Title: How to Fake Snapchat Location without Jailbreak On Vivo T2x 5G | Dr.fone
- Author: Abigail
- Created at : 2024-07-24 19:35:25
- Updated at : 2024-07-25 19:35:25
- Link: https://location-social.techidaily.com/how-to-fake-snapchat-location-without-jailbreak-on-vivo-t2x-5g-drfone-by-drfone-virtual-android/
- License: This work is licensed under CC BY-NC-SA 4.0.