
How to Hide/Fake Snapchat Location on Your Apple iPhone 15 Pro Max | Dr.fone
How to Hide/Fake Snapchat Location on Your Apple iPhone 15 Pro Max
The GPS functionality is very prominent these days. Especially when various apps or websites are making use of your geological location to deliver more relevant content. Be it, social networking apps or gaming apps, for instance, Snapchat, and Pokemon Go respectively.
 NeoDownloader - Fast and fully automatic image/video/music downloader.
Talking about Snapchat, this app offers you different badges and filters depending upon your Geographical location. It actually utilizes the GPS feature of your device to determine where you are located. This can sometimes be annoying as you may wish to access a filter or badge that is not available at your Geological location. Now, this is where you need the Snapchat spoof location app. You not only can hide your actual location from Snapchat. Instead, cast a fake location on Snapchat map, and eventually, you can easily access the badges/filters at your convenience!
Sounds interesting, right? Let’s understand more about the tutorials on how to hide/fake location on Snapchat map.
Part 1. What Snapchat is using your location for?
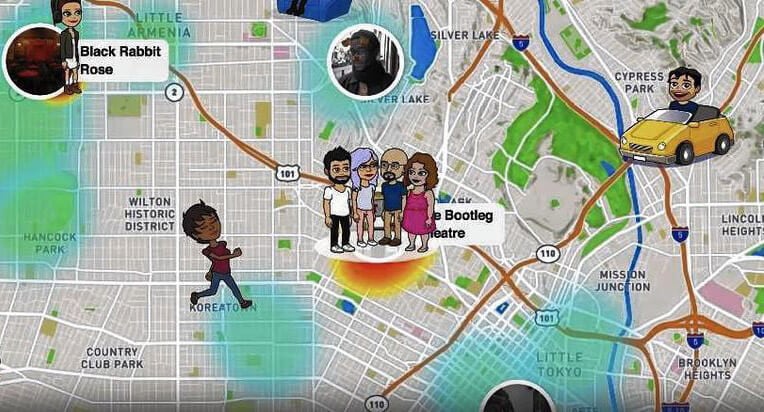
Snapchat basically utilizes your location for the SnapMap feature that furnishes the location-based filters etc. over your device. This SnapMap feature was unveiled in 2017. If you haven’t deliberately enabled it yet or you’re unaware of this feature, implies that you’re still “off the grid”. If you wish to enable this feature, you literally need to authorize Snapchat “3x times” and the last, fourth one to authorize your device.
With the SnapMap feature enabled, you can easily get to know about the whereabouts of your friends, and in turn, there’re allowed to know yours. As long as the Snapchat app is running over your screen, the SnapMap location of your Bitmoji gets updated dynamically. But as soon as you quit the app, the last known location of your Bitmoji is displayed over the SnapMap.

Part 2. Why people want to hide/fake location on Snapchat?
When it comes to fake Snapchat location there can be several reasons behind that. Here are some scenarios where people do wish to hide/fake location on Snapchat. Let’s explore.
- Sometimes, you may wish to utilize the cute filter that you saw your favorite celebrity putting up when he/she was in Sydney, Australia (or any other location).
- Or, you may wish to simply spoof location Snapchat for fun and be popular among your friends that you know some really cool tricks.
- Perhaps, you wish to stay ahead one step ahead in the dating game. For instance, you’re planning to move to a location a hundred miles away, and wish to have a person to spend quality time with when you reach there.
- Another reason is that is absolutely fun to trick people into believing that you’re spending your leisure time on an expensive tour. For instance, you can check in to a classy restaurant (you’ve never been to in real) in Dubai by mocking the GPS location.
- Even better for the kids who wish to fake GPS location to hide their real location over the location-sharing SnapMap feature from their parents, family, or friends.
Part 3. How to hide location on Snapchat
When it comes to disabling or hiding the location on Snapchat, the tutorial is extremely easy. Snapchat itself offers you a setting called Ghost mode. You just need to enable it. Here’s how to get it done.
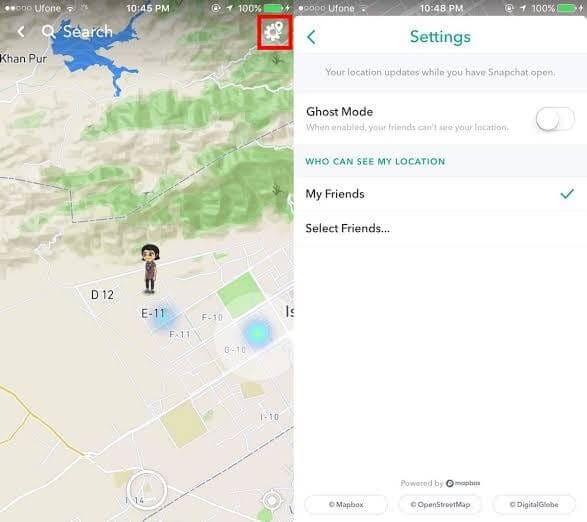
First, get into the Snapchat app and then visit either the Discover screen or the Camera or Friends. Next, tap on the magnifying glass and hit on Map.
As soon as the SnapMap screen loads up, you need to access the settings by hitting the Gear icon on the top right corner.

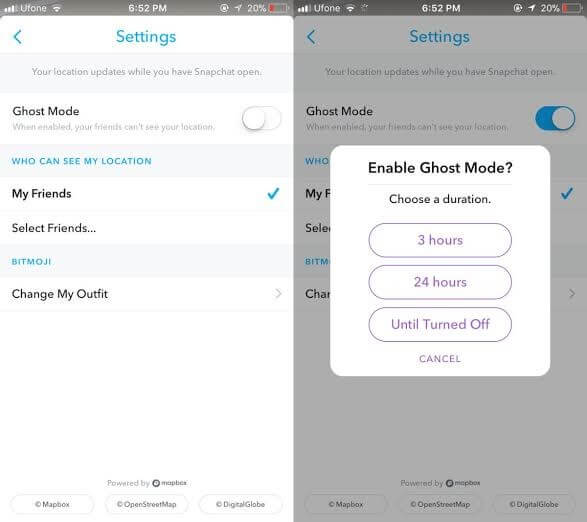
Then, make use of the settings to set up your privacy and hit on the “Ghost Mode” toggle switch to turn it on. A pop-up window will appear with 3 different settings:
- 3 hours : Ghost mode is turned on for 3 straight hours.
- 24 hours : Ghost mode is turned on for 24 straight hours.
- Until Turned Off : Ghost mode is turned on until you manually turn it off.
Selecting either of the aforementioned settings will hide your location from SnapMap. Implies, other than you no one will be able to locate you over SnapMap.
Part 4. How to fake Snapchat location on iPhone
4.1. Change Snapchat location to anywhere using a Smart Tool (easy)
You can easily spoof location on Snapchat using the tool Dr.Fone - Virtual Location (iOS) . This tool is easy to operate and works perfectly when it comes to spoofing any location. Here is how to fake GPS Snapchat iPhone without jailbreak.
Step 1: To begin with this Snapchat location spoofer, simply head to the official website of Dr.Fone – Virtual Location (iOS). Download the software package from there and then install it afterwards.

Step 2: After successful downloading, open the tool. Now, you need to opt for the “Virtual Location” module from the main interface. Post doing this, click on the “Get Started” button.

Step 3: You can notice your current virtual location on the map in the next window. If you can’t, simply go to the “Current Virtual Location” icon available on the lower right side of the screen. Click on it and it will show your current virtual location.

Step 4: It’s time to activate the “Teleport Mode”. To do this, all you need is to click on the first icon given on the upper right side. After this, you need to enter the location where you desire to teleport in the blank field given on the upper left. Hit on “Go” when you’re done.

Step 5: A few moments later, the system will perceive the desired location you have entered. A pop-up box will come up where the distance will be shown. Click on the “Move Here” option in the box.

Step 6: This is it! The location has been changed to the desired one now. Now, whenever you click the “Current Virtual Location” icon, you will see the new location.
 Simple and intuitive video editing
Also, on your iOS device, you can now Fake Snapchat location or in any other location-based app.


4.2. Change Snapchat Location using Xcode (complex)
Now, if we talk about fake location for Snapchat map on iPhone, it’s not as easy as it looks. You need to be an extremely tech-savvy person to fake Snapchat location without jailbreaking your Apple iPhone 15 Pro Max. You simply can’t download a Snapchat location spoofer app over your Apple iPhone 15 Pro Max and fake it. But fret not, we’re glad to bring you a detailed tutorial with which you can easily perform location spoofing on Snapchat and that too, without jailbreaking your Apple iPhone 15 Pro Max.
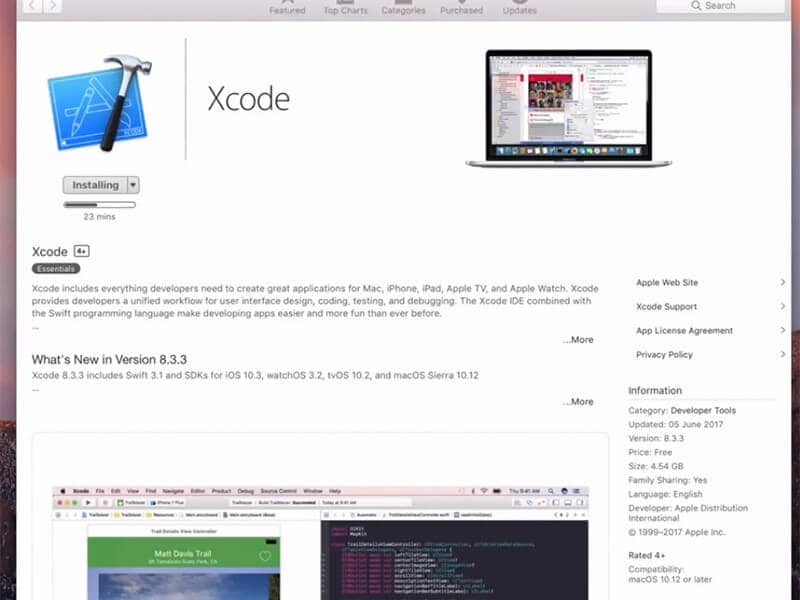
Step 1: Install Xcode and Set up a Dummy app
- Grab your Mac computer first and then head over to the App Store. Now, look for the Xcode application and get it installed on your computer.
 SwifDoo PDF Perpetual (2-PC) Free upgrade. No monthly fees ever.
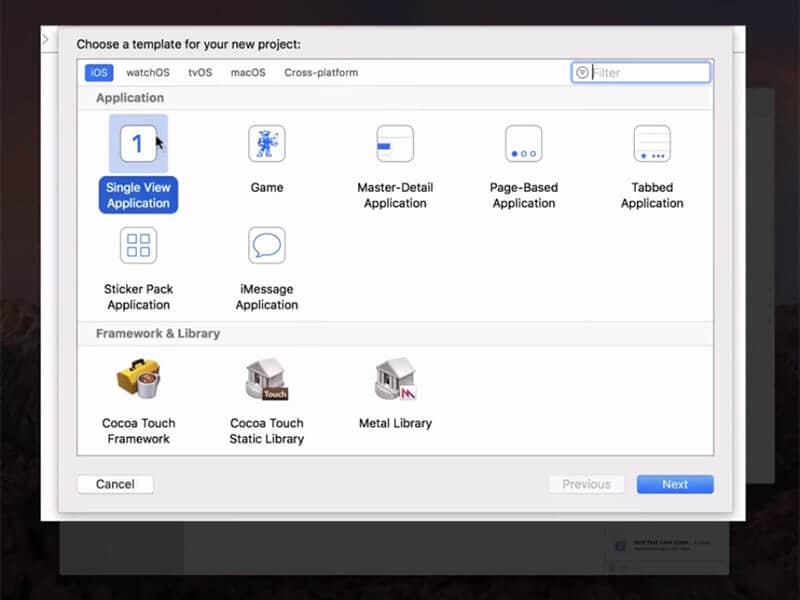
- Once the application is installed, launch it over. The Xcode window will come up over your screen. Now, set up a new project and select “single view application” followed by hitting “Next”.
 Lyric Video Creator Professional Version
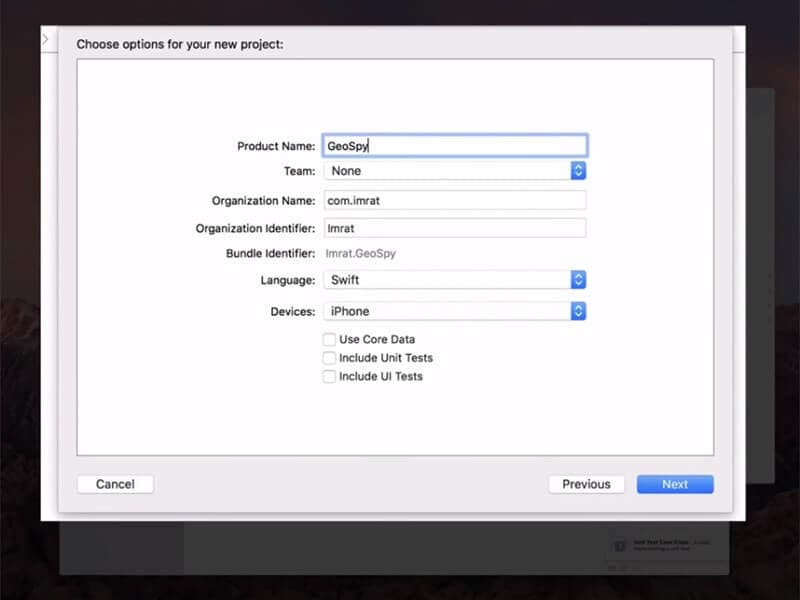
- Then, give a name to your project, for instance, “GeoSpy” and hit on the “Next” button.
Step 2: Setup GIT on Xcode
On the upcoming screen, Xcode will throw up a pop-up message stating “Please tell me who you are” and some GIT commands that you need to execute.
For this, fire up the “Terminal”over your Mac and then execute the commands as follows:
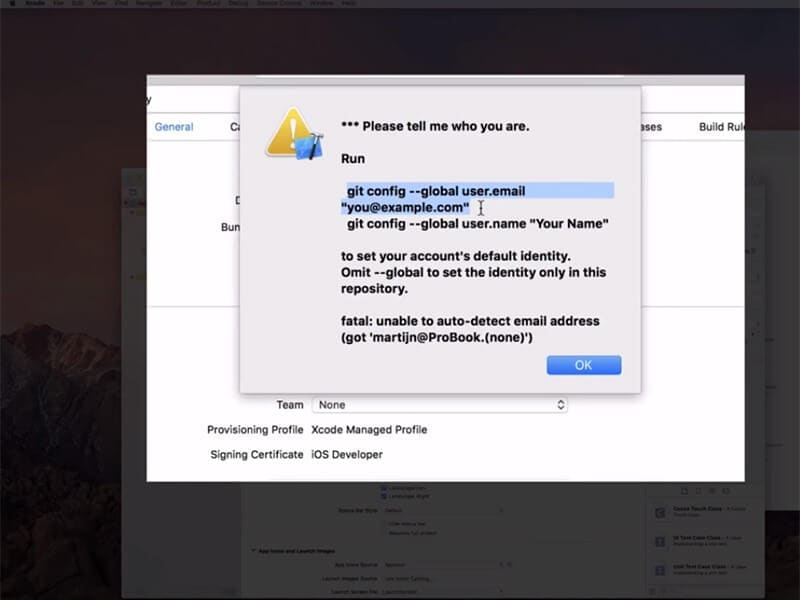
- git config –global user.email “you@example.com “
- git config –global user.name “your name”
Note: Change the values for “you@example.com ”and “your name” with your information.
 vMix 4K - Software based live production. vMix 4K includes everything in vMix HD plus 4K support, PTZ control, External/Fullscreen output, 4 Virtual Outputs, 1 Replay, 4 vMix Call, and 2 Recorders.
- Next, you need to make sure that to set up a development team and meanwhile, connect your Apple iPhone 15 Pro Max to your Mac computer.

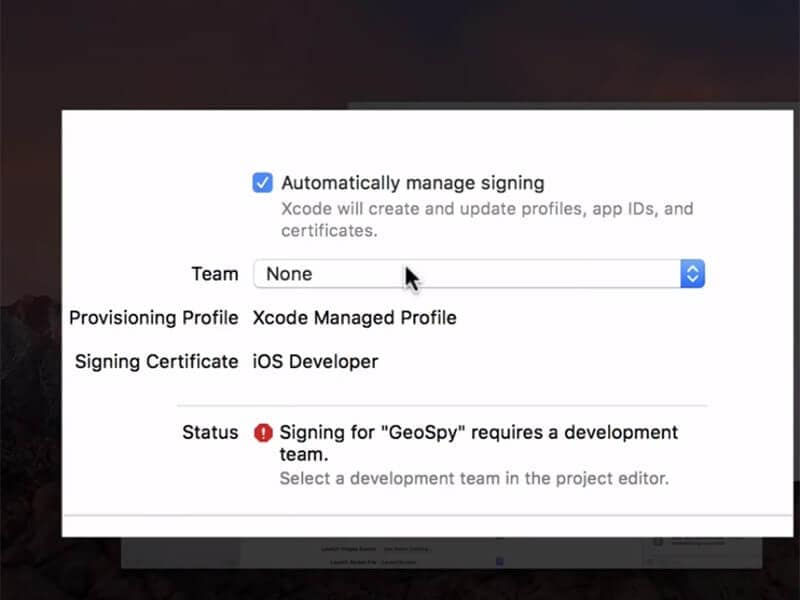
- Once done, opt it in as the build device and while you do it, ensure to keep it unlocked.
- Lastly, if everything is performed correctly, Xcode will now process some symbol files, please be patient and wait for it to complete.

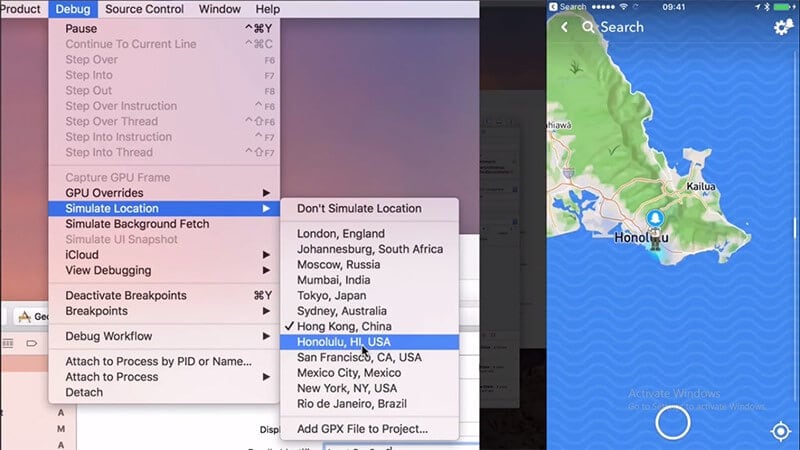
Step 3: Move Bitmoji
Now, you’re all set to fake location for Snapchat map. For this, simply hit on the “Debug” menu and then opt for “Simulate Location” from the drop-down window. Lastly, select the location from the list as per your preference and you’re done.

WPS Office Premium ( File Recovery, Photo Scanning, Convert PDF)–Yearly
Part 5. How to fake Snapchat location on Android
Last but not least, the next method to fake Snapchat location is for Android devices. For this, you need to download a Snapchat spoof app (easily available over Google Play Store) on your Android device. Here’s all that you need to do.
- Head to the Google Play Store and then look for the “fake GPS” app. You may be provided with several similar options, be it free or paid. If you get along with any other app, it may require your Android device to be rooted.
- You need to opt for the “Fakegps free” app for Snapchat. This app doesn’t require you to root your Android. But ensure that you are running on Android version 6.0 or higher.
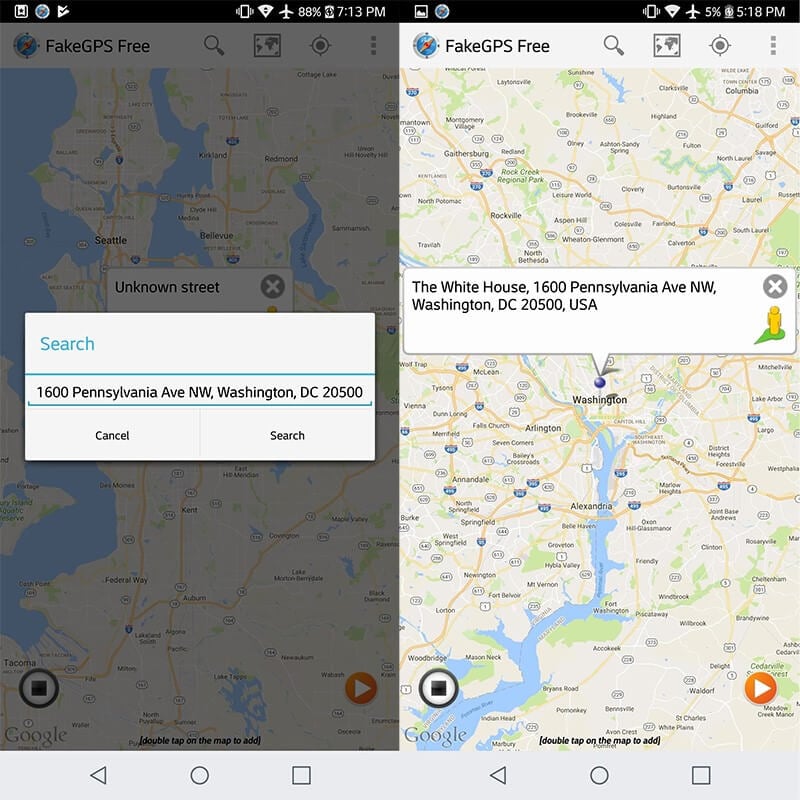
- Install the Fake GPS Free app for Snapchat and then launch it afterwards. On the main screen, you’ll be asked to“ENABLE MOCK LOCATIONS”. Hit on it and you’ll be redirected to the“Developer options” screen.
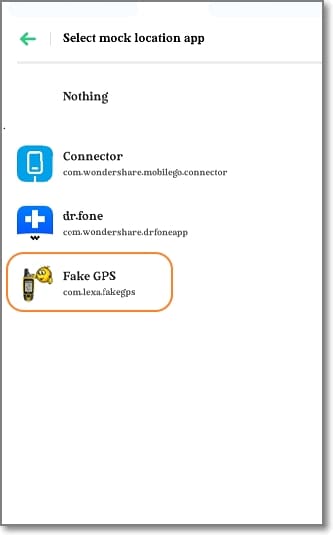
- Here, you need to simply tap on the “Select Mock Location App” option and opt for “FakeGPS Free” from the list of options appearing.

Note: You may need to enable the “Developer options” first to access these settings. For this, head to the “Settings”>“About Phone”> hit on “Build Number” – x7 times.
Once done with enabling mock location, hit the back button on your touch screen to retreat back to the Fake GPS Free app.
Now, hit on the “Search” icon over the top to find the desired location. Or, simply double tap over the map on your desired location to drop the pin.
Lastly, hit the “play” button available over the right bottom of your screen to activate the fake GPS location for Snapchat.
Final Words
While reaching towards the end of the article, we are pretty sure that you now fully understand what it takes to fake Snapchat location on Android or iPhone. The aforementioned ways are fully tested and work even without rooting or jailbreaking your devices respectively. Happy Spoofing!
 Power Tools add-on for Google Sheets, Lifetime subscription
Edit and Send Fake Location on Telegram For your Apple iPhone 15 Pro Max in 3 Ways
Telegram is an ad-free messaging application for Android and iOS. This app was established in 2013 and facilitates secure conversations among more than 550 active users. But despite its super-tight security, location-sharing on Telegram remains a concern among many. Like Facebook, the “People Nearby” feature on Telegram can expose your location to unwanted people. So, how can one create a fake GPS on Telegram? If you’re one of those concerned users, this post will teach you how to create a Telegram fake GPS quickly and easily. Let’s learn!
Part 1. Why Fake Location on Telegram?
There are numerous reasons to fake location on Telegram. However, here are the main ones:
1. Protect your privacy
While signing up on Telegram, you’ll often allow the messaging app to track your GPS location. Unfortunately, this also applies to other messaging apps like Facebook, WhatsApp, Instagram, etc. Therefore, to prevent Telegram from accessing and sharing your real-time location, you’ll need to spoof GPS.
2. Prank your friends
Social media pressure is real. But instead of the negativity, you can concentrate on the prank side of it. For example, you might want to convince your close cousin or new girlfriend that you live and work in Las Vegas when you’re actually in Texas. Whichever the case, spoofing your location can give you a new social status.
3. Make new friends
As said before, Telegram has a “People Nearby” feature for giving you friend recommendations based on your actual location. In addition, you can see Telegram groups near your GPS location. So, if you intend to go international and meet new friends, change your Telegram location. This way, all suggestions on the “People Nearby” feature will match your new GPS location.
Part 2. How to Send Fake Location on Telegram?
We are here to provide the three most-used methods for you to change location on Telegram. Not every solution is suitable for every situation that everyone encounters, but there is always one that is right for you. Some methods may require the assistance of a computer, some can be done only on a mobile phone, and the success rate varies greatly. Now let’s learn how to fake location on Telegram using three simple methods.
Method 1: Change Telegram location on Android/ iOS with the best Location Changer
If you want to completely varnish your location on Telegram, install a powerful GPS tool like Dr.Fone - Virtual Location . With this computer program, you can spoof your Telegram location with just a few mouse clicks. It’s simple to use and offers excellent compatibility with Android and iPhone apps. You can teleport your Telegram location to anywhere in the world. In addition, you can make the location transfer more realistic by enabling the multi-stop and one-stop route features. Just point to a location on the map and get going.
Dr.Fone - Virtual Location key features
- Change location on Telegram, WhatsApp , Facebook , Hinge , etc.
- Compatible with most iPhone and Android versions.
- Easy to set up and comprehend the virtual location map.
- Teleport Telegram location through driving, biking, cycling, or walking.
So, without dilly-dallying much, follow me to create a Telegram fake location with Dr.Fone:
Step 1. Launch Dr.Fone Virtual Location on PC
Install and run Dr.Fone on your PC and then connect your smartphone to your computer using a USB wire. While doing so, make sure you enable the “Transfer Files” option on your phone. Then, on the home window of Dr.Fone, tap Virtual Location and then tap Get Started on the new window.
Step 2. Link your smartphone to Dr.Fone


Next, open your smartphone’s Settings app and enable USB debugging to connect it to Dr.Fone. Fortunately, this program comes with a simple guide for all iOS and Android versions.
Pro tip: If you’re an Android user, click Settings> Additional Settings> Developer options> USB debugging. Also, remember to choose Dr.Fone under the “Select mock location app” section.
Step 3. Choose your desired location and move
After successfully connecting your device to Dr.Fone, tap Next to open the Virtual Location map. Now enter the Teleport Mode and key in the GPS coordinates or location you want to move to. Alternatively, simply tap a spot on the map and click Move Here. And there is that!
Method 2: Fake a live telegram location via VPN (Android & iOS)
Using a VPN (Virtual Private Network) is arguably the most reliable way to create a Telegram fake GPS. With a professional VPN service, you can change your device’s IP address and access international websites, TV stations, movie channels, and so on. In other words, it connects you to a computer server in a country where you’re typically restricted. Popular VPN services include NordVPN and ExpressVPN.
For example, let’s learn how to set up the ExpressVPPN service on Android/iPhone:
- ▪ Step 1. Download the VPN app on Google Play Store, launch it, and create an account.
- ▪ Step 2. Follow the on-screen instructions to set up ExpressVPN and choose a VPN server location.
- ▪ Step 3. Lastly, tap the Power button to connect to the VPN server in the country you’ve selected. That was easy, huh?
Method 3: Fake location on Telegram from free on Android
It’s absolutely okay to operate on a thin budget these days. So, if you’re after a free VPN service for Android, use a Fake GPS location . It’s a free program that allows you to spoof your GPS location on Android with a few screen taps. Let’s have a look!
Step 1. Fire up Play Store and search for “fake GPS location.” You’ll see a yellow emoji holding a phone. Install that app!
Step 2. Next, open Additional Settings and choose Developer options on your phone. Then, set Fake GPS location as the mock location app.
Step 3. Now launch the app and choose your new GPS location. If satisfied, simply tap the green Play button.
Part 3. FAQs About Creating a Fake GPS on Telegram?
Q1: Can my friends know when I fake a Telegram location?
Unfortunately, you can easily detect if someone is faking their Telegram GPS location. A fake location usually has a “red pin” on the address. The actual location doesn’t.
Q2: Is Telegram better than WhatsApp?
You’ll be surprised to learn that Telegram offers better security features than WhatsApp. This platform encrypts messages between you and the server, meaning that no one else can access your chats. For WhatsApp, the jury is still out.
Q3: Can I spoof location on iPhone?
Sadly, creating a Telegram fake location on iPhone isn’t as straightforward as Android. In other words, you can’t just install a GPS app from Play Store and enjoy the new sites. So, use a program like Dr.Fone - Virtual Location or purchase a VPN service.
Conclusion
There you go; you can now create a new Telegram location to prank your friends or make new circles using a premium VPN service like ExpressVPN. However, VPN monthly subscriptions can empty your wallet. So, use a pocket-friendly and reliable option like Dr.Fone - Virtual Location to easily fake GPS location on Android and iPhone. Give it a try!
 safe & secure
Why Your WhatsApp Live Location is Not Updating and How to Fix on your Apple iPhone 15 Pro Max
WhatsApp is a free messaging app owned by Meta, initially Facebook. Currently, this platform boasts over two billion active users, even outshining Messenger and WeChat. One of WhatsApp is popular is letting users share their live Location with individuals and group chats. However, sometimes you may experience the annoying WhatsApp location not updating issue. Luckily, this article has a solution to this problem. Let’s learn! We’ll also address how to share my Location on the WhatsApp issue.
First and foremost, let’s discuss some of the reasons why your WhatsApp live location is not updating on Android or iPhone. Below are some of them:
- Reason 1: Weak internet connection
You should be conversant with the idea that WhatsApp can’t function without the internet. In other words, you can’t send or receive messages and calls without a strong internet. And the same applies to updating your live Location.
- Reason 2: Disabled location feature
Here’s another reason why WhatsApp live Location is not updating on iPhone or Android. While signing up, WhatsApp will request to access your phone’s GPS location. Therefore, disabling this feature by mistake can prevent WhatsApp from updating your Location.
- Reason 3: Inappropriate time and date
Although uncommon with modern phones, this can be another reason for a wrong live location on WhatsApp. Therefore, connect your phone to the internet to update your date and time. You might also want to restart your phone and see if it works.

Part 2. How to Fix WhatsApp Live Location Not Updating Problem?
Now that you already know why WhatsApp’s Live Location isn’t updating, it’s time to check out the solutions. Let’s go!

1. Restart internet connection
Sometimes, it only takes a simple phone restart to get things back on track. Another thing, you can enable and disable “flight mode” to restart your data connection. Of course, this will also sort out any bugs in your WhatsApp app.
2. Update the app and phone
When last did you update your system and apps? It is very easy! You should constantly update your apps and phone system to enjoy better performance and security.
3. Enable location service
You can also check if your location service is enabled on iPhone or Android settings. On iPhone, click Settings > Privacy > Location Service. It’s even easier on Android. Swipe down your screen, long-press the GPS button, and enable the Location toggle.
4. Reset location service on iPhone/Android
iPhone users can try to reset the Location & Service settings. To do that, open Settings > General > Reset > Reset Location & Privacy. And for Android users, please try to take the refer the steps below to follow:
- Swipe down from the top of the screen
- Tap the Location icon;
- If you can’t find the Location icon, please go to settings, or tap the “Edit” icon to go on;
- Turn Google Location Accuracy on or off**.**

5. Uninstall and reinstall WhatsApp
If all else fails, then it’s probably time to get handy. Uninstall your WhatsApp app and then get a newer version on Play Store or App Store. But often, this won’t be necessary after updating the app.

Part 3: [WhatsApp Tip] Fake WhatsApp Live Location with Unreal Accuracy
There have been multiple security concerns about WhatsApp before. But while the jury is still out, do yourself a favor and protect your live Location from spyware and other users. Also, you might want to spoof WhatsApp location for business purposes and prank friends.
That said, learning to fake Location on WhatsApp is super simple with Wondershare Dr.Fone . With this GPS app, you can teleport your WhatsApp live location to anywhere in the world. And to make your new Location more believable, this program lets you simulate movements by foot, scooter, or car. It works with all iPhone/Android versions and other social media apps like Instagram, Facebook, Telegram, and Twitter.
You can check out this video for further instruction.
safe & secure
Below is how to spoof WhatsApp live location with Dr.Fone:
Step 1. Open the Virtual Location tool.
Install and launch Dr.Fone on PC and connect your phone to PC with a USB firewire. Then, tap the Virtual Location button on the home page and click Get Started on the pop-up window.
Step 2. Connect your phone to Dr.Fone.
To connect your phone to this all-in-one software, first, enable “transfer files” instead of “charging” on your phone. Then, enable USB debugging under the settings tab. On Android, just click Settings >Additional Settings > Developer options > USB debugging.
Step 3. Choose a new WhatsApp live location to share.
After USB debugging is on, tap Next and enter the new location on the search field at the top-left corner. Now choose the area and tap Move Here. And there is that! Interestingly, you can choose a movement route and customize the speed.

Part 4. How to Send Live Location on WhatsApp?
In 2017, WhatsApp rolled out a brand-new feature that allows users to send their live location to family and friends. This location can come in handy if you want to meet up somewhere or let your friends and family know you’re safe and secure. And lest I forget, you can also use it to prank your friends.
Note, however, that WhatsApp only allows you to share your real-time location for 8 hours, 1 hour, or 15 minutes. In other words, this gives you control over how long users can see you on the map. Moreover, this information can’t be shared with anyone once you stop sharing.
So without wasting time, here’s how to send live Location on WhatsApp for Android or iPhone:
Step 1. Enable the GPS service on your phone by clicking the GPS button on the control panel.
Step 2. Open WhatsApp and tap the group chat or individual chat with which you want to share the Location.
Step 3. Now click the Attach button on the text field and click Location.

Step 3. From there, allow WhatsApp access to your device’s location and then press the Share Live Location button.

Step 3. Last but not least, set the duration your contact will view your Location, add a comment, and tap the Send button. That’s it!
Note: As you can see, WhatsApp relies on your GPS location to share your actual location. So, use Wondershare Dr.Fone to change your device’s location and then share it on WhatsApp.
Part 5: How to Fix Common WhatsApp Issues on Android & iPhone
Wondershare Dr.Fone is the perfect tool to handle all your WhatsApp issues. Below are some common issues it can help you with:
1. Lost Messages
Sometimes you might accidentally or intentionally delete WhatsApp chats or messages. Fortunately, Dr.Fone can help you dig out and recover those messages with a simple click. Just launch the Data Recovery tool , connect your phone to the software, and Dr.Fone will scan for all lost and current messages.
 Nero Burning ROM:
The ultimate burning program for all your needs!
2. Transfer WhatsApp data
Thanks to the fast-paced mobile technology, it’s inevitable to migrate to a new phone. But you’ll have to sacrifice all your WhatsApp data. Luckily, Dr.Fone allows you to backup, restore, and transfer all WhatsApp data .
3. Backup WhatsApp Business chats
Having a WhatsApp Business account is vital if you’re an online marketer. Here, you can create a business profile and enjoy quick replies, automatic messaging, accurate statistics, and so on. So, to avoid losing your invoices and other business chats, use Dr.Fone to back up and transfer your WhatsApp Business chats to a new phone.
Final Words
See, there’s nothing complex about the WhatsApp live location not updating issue. Just edit and restart the app or check your location settings if it’s enabled. And, of course, use Dr.Fone - Virtual Location to share a fake location on WhatsApp and perform other WhatsApp tasks like backing up and transferring data. Thank me later!
safe & secure
- Title: How to Hide/Fake Snapchat Location on Your Apple iPhone 15 Pro Max | Dr.fone
- Author: Abigail
- Created at : 2024-07-24 16:45:01
- Updated at : 2024-07-25 16:45:01
- Link: https://location-social.techidaily.com/how-to-hidefake-snapchat-location-on-your-apple-iphone-15-pro-max-drfone-by-drfone-virtual-ios/
- License: This work is licensed under CC BY-NC-SA 4.0.