
How to Hide/Fake Snapchat Location on Your Lava Yuva 3 Pro | Dr.fone
How to Hide/Fake Snapchat Location on Your Lava Yuva 3 Pro
The GPS functionality is very prominent these days. Especially when various apps or websites are making use of your geological location to deliver more relevant content. Be it, social networking apps or gaming apps, for instance, Snapchat, and Pokemon Go respectively.

Talking about Snapchat, this app offers you different badges and filters depending upon your Geographical location. It actually utilizes the GPS feature of your device to determine where you are located. This can sometimes be annoying as you may wish to access a filter or badge that is not available at your Geological location. Now, this is where you need the Snapchat spoof location app. You not only can hide your actual location from Snapchat. Instead, cast a fake location on Snapchat map, and eventually, you can easily access the badges/filters at your convenience!
Sounds interesting, right? Let’s understand more about the tutorials on how to hide/fake location on Snapchat map.
Part 1. What Snapchat is using your location for?
Snapchat basically utilizes your location for the SnapMap feature that furnishes the location-based filters etc. over your device. This SnapMap feature was unveiled in 2017. If you haven’t deliberately enabled it yet or you’re unaware of this feature, implies that you’re still “off the grid”. If you wish to enable this feature, you literally need to authorize Snapchat “3x times” and the last, fourth one to authorize your device.
With the SnapMap feature enabled, you can easily get to know about the whereabouts of your friends, and in turn, there’re allowed to know yours. As long as the Snapchat app is running over your screen, the SnapMap location of your Bitmoji gets updated dynamically. But as soon as you quit the app, the last known location of your Bitmoji is displayed over the SnapMap.

 Jet Profiler for MySQL, Enterprise Version: Jet Profiler for MySQL is real-time query performance and diagnostics tool for the MySQL database server. Its detailed query information, graphical interface and ease of use makes this a great tool for finding performance bottlenecks in your MySQL databases.
 Part 2. Why people want to hide/fake location on Snapchat?
When it comes to fake Snapchat location there can be several reasons behind that. Here are some scenarios where people do wish to hide/fake location on Snapchat. Let’s explore.
- Sometimes, you may wish to utilize the cute filter that you saw your favorite celebrity putting up when he/she was in Sydney, Australia (or any other location).
- Or, you may wish to simply spoof location Snapchat for fun and be popular among your friends that you know some really cool tricks.
- Perhaps, you wish to stay ahead one step ahead in the dating game. For instance, you’re planning to move to a location a hundred miles away, and wish to have a person to spend quality time with when you reach there.
- Another reason is that is absolutely fun to trick people into believing that you’re spending your leisure time on an expensive tour. For instance, you can check in to a classy restaurant (you’ve never been to in real) in Dubai by mocking the GPS location.
- Even better for the kids who wish to fake GPS location to hide their real location over the location-sharing SnapMap feature from their parents, family, or friends.
Part 3. How to hide location on Snapchat
When it comes to disabling or hiding the location on Snapchat, the tutorial is extremely easy. Snapchat itself offers you a setting called Ghost mode. You just need to enable it. Here’s how to get it done.
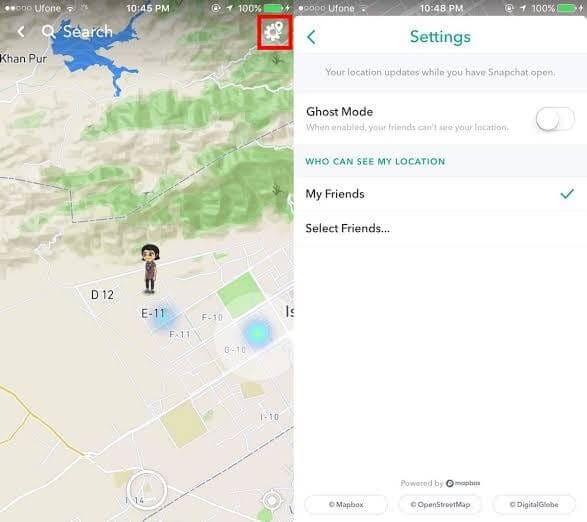
First, get into the Snapchat app and then visit either the Discover screen or the Camera or Friends. Next, tap on the magnifying glass and hit on Map.
As soon as the SnapMap screen loads up, you need to access the settings by hitting the Gear icon on the top right corner.

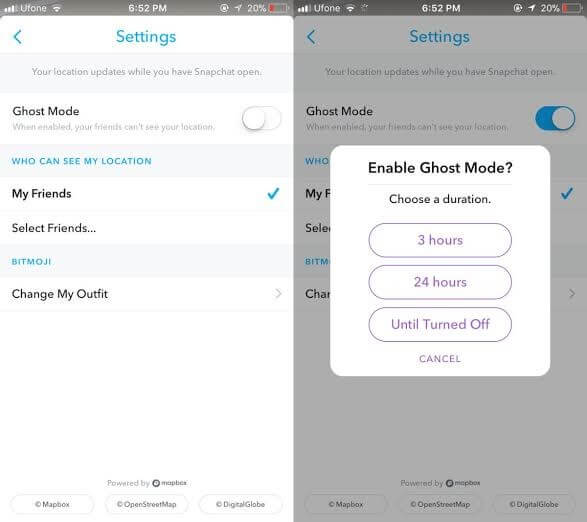
Then, make use of the settings to set up your privacy and hit on the “Ghost Mode” toggle switch to turn it on. A pop-up window will appear with 3 different settings:
- 3 hours : Ghost mode is turned on for 3 straight hours.
- 24 hours : Ghost mode is turned on for 24 straight hours.
- Until Turned Off : Ghost mode is turned on until you manually turn it off.
Selecting either of the aforementioned settings will hide your location from SnapMap. Implies, other than you no one will be able to locate you over SnapMap.

Part 4. How to fake Snapchat location on iPhone

4.1. Change Snapchat location to anywhere using a Smart Tool (easy)
You can easily spoof location on Snapchat using the tool Dr.Fone - Virtual Location (iOS) . This tool is easy to operate and works perfectly when it comes to spoofing any location. Here is how to fake GPS Snapchat iPhone without jailbreak.
Step 1: To begin with this Snapchat location spoofer, simply head to the official website of Dr.Fone – Virtual Location (iOS). Download the software package from there and then install it afterwards.
 Nero Burning ROM:
The ultimate burning program for all your needs!

Step 2: After successful downloading, open the tool. Now, you need to opt for the “Virtual Location” module from the main interface. Post doing this, click on the “Get Started” button.

Step 3: You can notice your current virtual location on the map in the next window. If you can’t, simply go to the “Current Virtual Location” icon available on the lower right side of the screen. Click on it and it will show your current virtual location.

Step 4: It’s time to activate the “Teleport Mode”. To do this, all you need is to click on the first icon given on the upper right side. After this, you need to enter the location where you desire to teleport in the blank field given on the upper left. Hit on “Go” when you’re done.

Step 5: A few moments later, the system will perceive the desired location you have entered. A pop-up box will come up where the distance will be shown. Click on the “Move Here” option in the box.
 SwifDoo PDF Perpetual (2-PC) Free upgrade. No monthly fees ever.

Step 6: This is it! The location has been changed to the desired one now. Now, whenever you click the “Current Virtual Location” icon, you will see the new location.
Also, on your iOS device, you can now Fake Snapchat location or in any other location-based app.


Key features:
• Import from any devices and cams, including GoPro and drones. All formats supported. Сurrently the only free video editor that allows users to export in a new H265/HEVC codec, something essential for those working with 4K and HD.
• Everything for hassle-free basic editing: cut, crop and merge files, add titles and favorite music
• Visual effects, advanced color correction and trendy Instagram-like filters
• All multimedia processing done from one app: video editing capabilities reinforced by a video converter, a screen capture, a video capture, a disc burner and a YouTube uploader
• Non-linear editing: edit several files with simultaneously
• Easy export to social networks: special profiles for YouTube, Facebook, Vimeo, Twitter and Instagram
• High quality export – no conversion quality loss, double export speed even of HD files due to hardware acceleration
• Stabilization tool will turn shaky or jittery footage into a more stable video automatically.
• Essential toolset for professional video editing: blending modes, Mask tool, advanced multiple-color Chroma Key
4.2. Change Snapchat Location using Xcode (complex)
Now, if we talk about fake location for Snapchat map on iPhone, it’s not as easy as it looks. You need to be an extremely tech-savvy person to fake Snapchat location without jailbreaking your Lava Yuva 3 Pro. You simply can’t download a Snapchat location spoofer app over your Lava Yuva 3 Pro and fake it. But fret not, we’re glad to bring you a detailed tutorial with which you can easily perform location spoofing on Snapchat and that too, without jailbreaking your Lava Yuva 3 Pro.
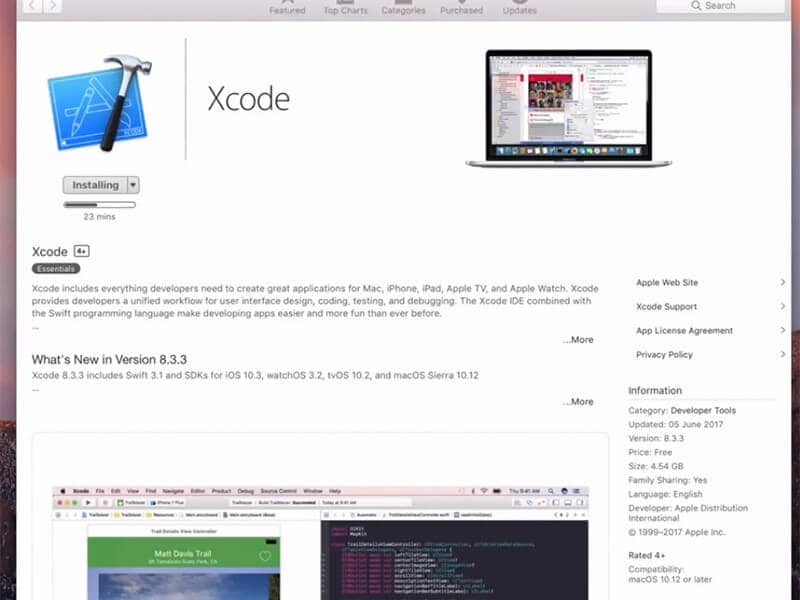
Step 1: Install Xcode and Set up a Dummy app
- Grab your Mac computer first and then head over to the App Store. Now, look for the Xcode application and get it installed on your computer.
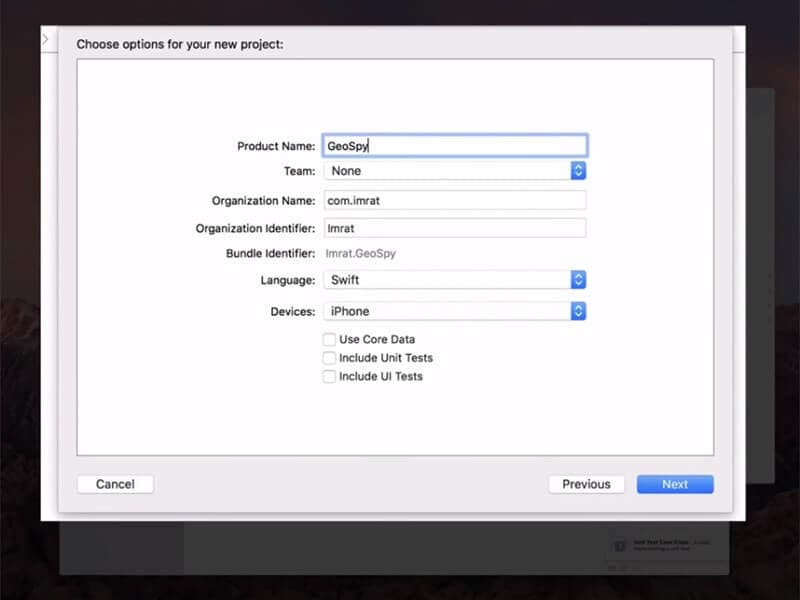
- Once the application is installed, launch it over. The Xcode window will come up over your screen. Now, set up a new project and select “single view application” followed by hitting “Next”.
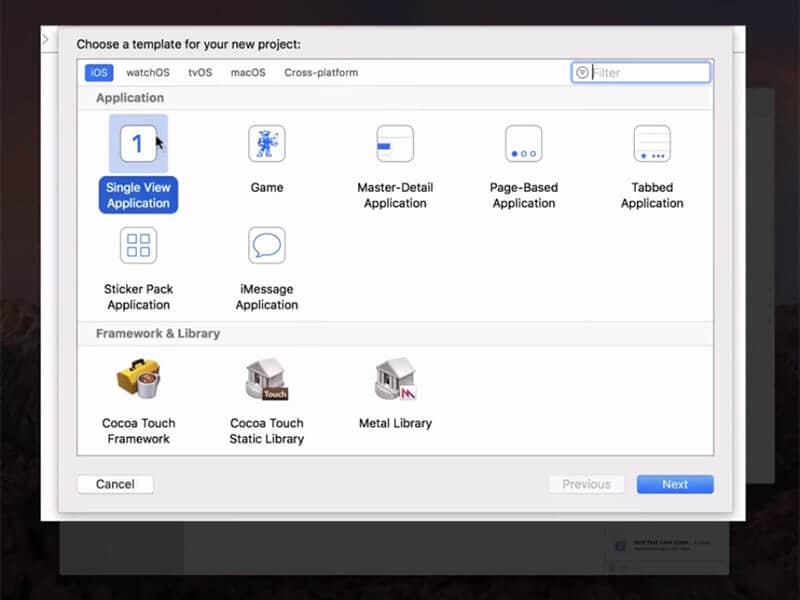
- Then, give a name to your project, for instance, “GeoSpy” and hit on the “Next” button.
 ZoneAlarm Pro Antivirus + Firewall NextGen
Step 2: Setup GIT on Xcode
- On the upcoming screen, Xcode will throw up a pop-up message stating “Please tell me who you are” and some GIT commands that you need to execute.
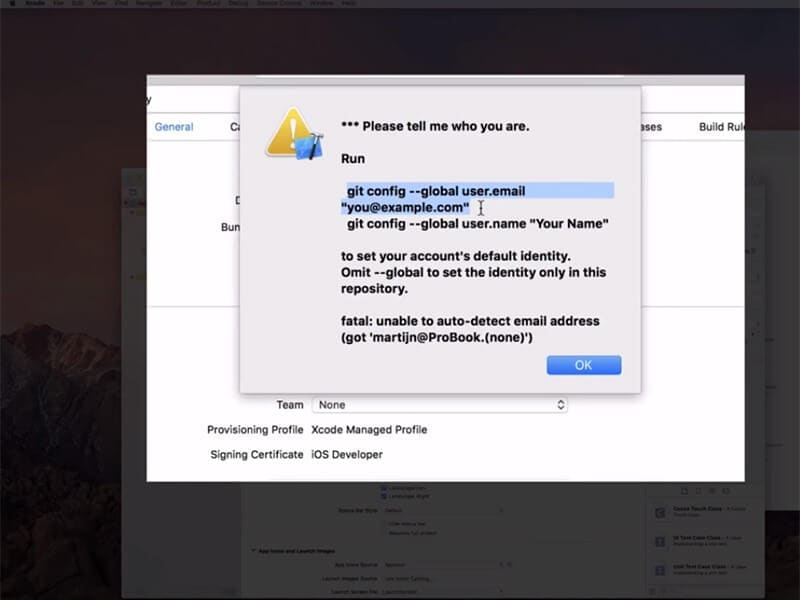
- For this, fire up the “Terminal”over your Mac and then execute the commands as follows:
- git config –global user.email “you@example.com “
- git config –global user.name “your name”
Note: Change the values for “you@example.com ”and “your name” with your information.

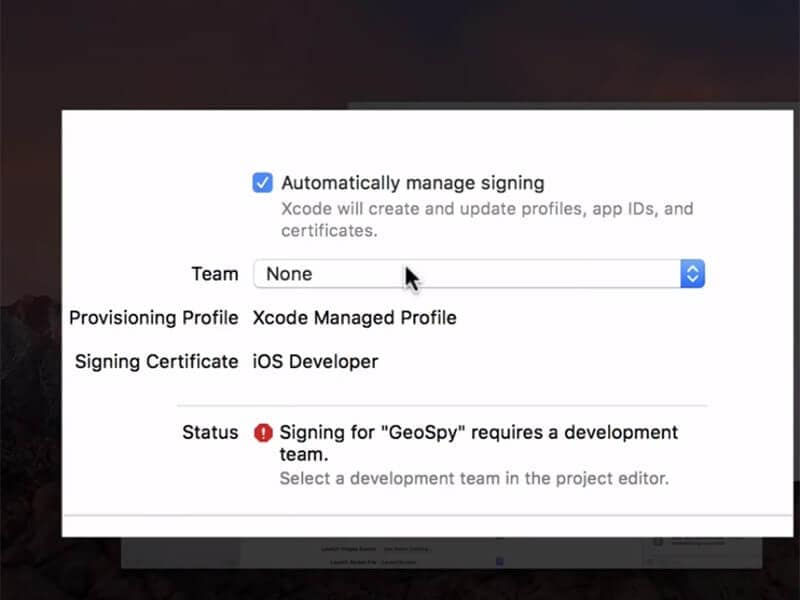
Next, you need to make sure that to set up a development team and meanwhile, connect your Lava Yuva 3 Pro to your Mac computer.
Once done, opt it in as the build device and while you do it, ensure to keep it unlocked.
Lastly, if everything is performed correctly, Xcode will now process some symbol files, please be patient and wait for it to complete.

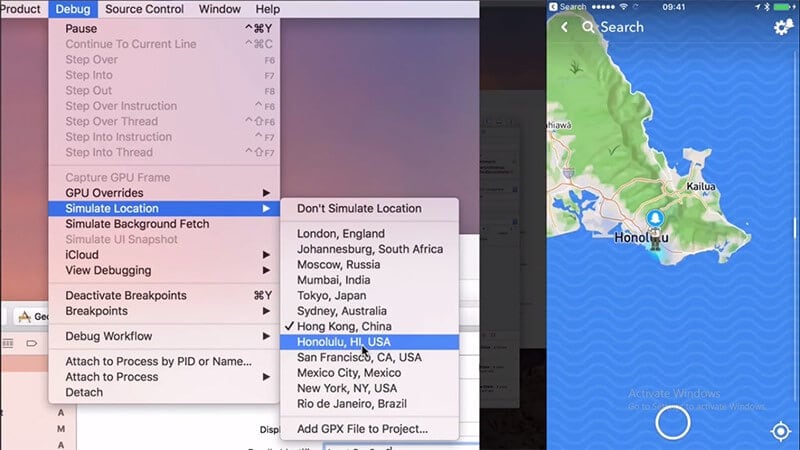
Step 3: Move Bitmoji
Now, you’re all set to fake location for Snapchat map. For this, simply hit on the “Debug” menu and then opt for “Simulate Location” from the drop-down window. Lastly, select the location from the list as per your preference and you’re done.

Part 5. How to fake Snapchat location on Android
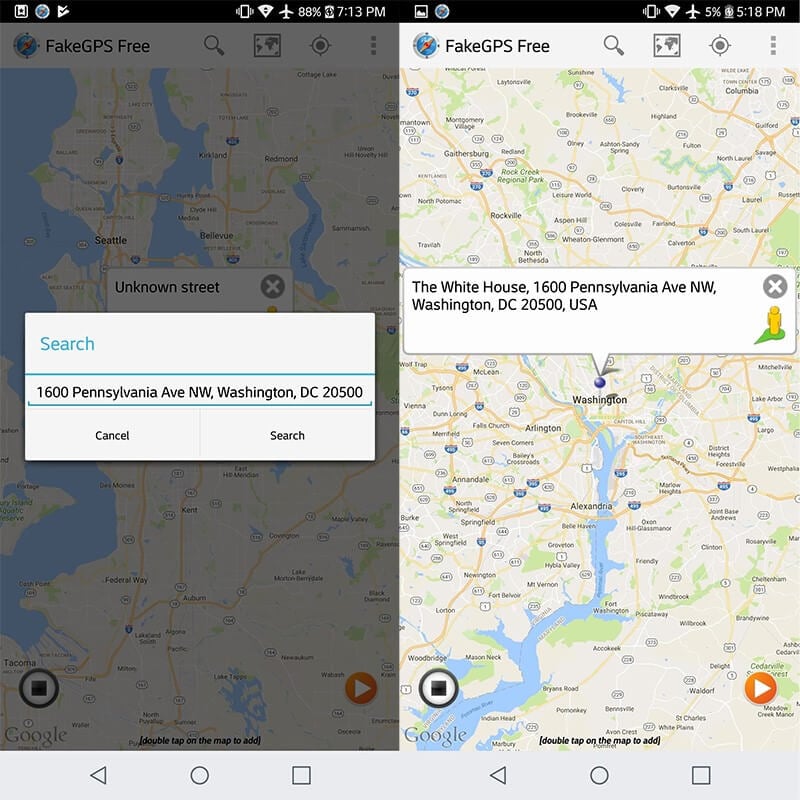
Last but not least, the next method to fake Snapchat location is for Android devices. For this, you need to download a Snapchat spoof app (easily available over Google Play Store) on your Lava Yuva 3 Pro. Here’s all that you need to do.
Head to the Google Play Store and then look for the “fake GPS” app. You may be provided with several similar options, be it free or paid. If you get along with any other app, it may require your Lava Yuva 3 Pro to be rooted.
You need to opt for the “Fakegps free” app for Snapchat. This app doesn’t require you to root your Android. But ensure that you are running on Android version 6.0 or higher.
Install the Fake GPS Free app for Snapchat and then launch it afterwards. On the main screen, you’ll be asked to“ENABLE MOCK LOCATIONS”. Hit on it and you’ll be redirected to the“Developer options” screen.
Here, you need to simply tap on the “Select Mock Location App” option and opt for “FakeGPS Free” from the list of options appearing.

Note: You may need to enable the “Developer options” first to access these settings. For this, head to the “Settings”>“About Phone”> hit on “Build Number” – x7 times.
Once done with enabling mock location, hit the back button on your touch screen to retreat back to the Fake GPS Free app.
Now, hit on the “Search” icon over the top to find the desired location. Or, simply double tap over the map on your desired location to drop the pin.
Lastly, hit the “play” button available over the right bottom of your screen to activate the fake GPS location for Snapchat.
Final Words
While reaching towards the end of the article, we are pretty sure that you now fully understand what it takes to fake Snapchat location on Android or iPhone. The aforementioned ways are fully tested and work even without rooting or jailbreaking your devices respectively. Happy Spoofing!
How to Detect and Stop mSpy from Spying on Your Lava Yuva 3 Pro
In this era of smartphones and smart gadgets, our lives have been stored inside these devices. Privacy gets more important and urgent when so many apps can spy on you easily. Being concerned about your privacy is a very important thing to consider. We care about your privacy, and we have the tools to take proper measures for the mSpy parental control app.
There are many apps like mSpy that normal users can’t detect due to their stealth behavior. If you want to know how to detect and stop mSpy from spying on you, then you are in the right place. This article will show you how to detect and remove mSpy on Android and iPhone devices without being tech-savvy. Read all the guidelines below on removing mSpy from Android and iPhone without hassle.
Part 1: What is mSpy, and is mSpy detectable on Your Lava Yuva 3 Pro?
In this increasingly cynical world, people are using all sorts of monitoring software to monitor the phone activities of kids and employees. One such software is mSpy. Technically, mSpy is made as a business and parental monitoring app at first. But now, it is also used as a spy app that lets you look into someone else’s mobile phone or device.
Spying should not be misunderstood here as this app focuses mainly on checking employees’ devices or kids’ phones. It could be hard to discover since mSpy secretly works in the background. It monitors messages, phone calls, location, social media activity, and other device usages. Different features offered by mSpy are mSpy parental control, mSpy Instagram tracker, mSpy WhatsApp tracker, etc.
The process of detecting mSpy varies from different phone systems, Android or iPhone. Moreover, mSpy is a background app, so you can not normally see if it is installed on your phone or not. But don’t worry, we will help you out with how to detect mSpy. Below we have listed the two detection methods separately.

How to Detect mSpy on Android Devices
For detecting mSpy on an Android phone, that’ll be more direct if you check Update Service through the phone settings. Follow these steps:


- Step 1: Go to your Lava Yuva 3 Pro phone settings.
- Step 2: Select Security.
- Step 3: Go to Device Administrators or Device Admin apps.
- Step 4: Navigate to Update Service (the name mSpy uses to run undetected). See if this service is enabled or disabled. If it is, you have spying software installed on your Lava Yuva 3 Pros.
How to Detect mSpy on iPhone Devices
Apple users don’t have a way to tell for sure if mSpy is installed compared to Android users. But, there are some ways to tell if their devices are monitored.
1. Download history on the App Store
Certain apps masquerade as unharmful but turn out to be spyware. Recently, the malware was found in an app called System Update. That app was installed outside of App Store. After installation, the app hid and exfiltrated data from the users’ devices to the operators’ servers. It’s important to note which apps every user is hiding in their phone. Go to the App Store and download the history. This will help you figure out which apps have recently been downloaded on your Lava Yuva 3 Pro.
2. Unusually High Data Usage
There is a big sign that spyware is running in the background. To check the mobile data on your Lava Yuva 3 Pro, you need to go to Settings and click on Mobile Data. You will be to see your overall data usage. Scroll down to know how much mobile data individual apps are using. Suppose any user’s average internet usage is around 200 MB per day, and suddenly it increases rapidly to about 800MB per day with the exact usage of the internet. In that case, the user has to be aware as something is fishy.
3. Have Access to Your Device’s Microphone or Camera
When an app uses the microphone on iPhones, you will see an orange dot at the top of your screen and, similarly, a green dot for the camera. On Android phones, when an app starts, you will see a microphone or camera icon popup in the top right corner, which then turns into a green dot. These are healthy indicators that you should not ignore. Also, go to the list of apps that are allowed to access your Lava Yuva 3 Pro’s camera or microphone. If you see mSpy there, that means your phone is being spied on.
4. Increased Device Shut Down Time
If the Lava Yuva 3 Pro device fails to turn off properly or takes an unusually long time to do so, it can point to the presence of spyware, or if the phone reboot without your command, then maybe someone is controlling your phone.
5. Jailbreak your own iPhone and download apps from untrusted sources
If you detect the presence of an app named Cydia, then consider it an alarm bell. This advanced package tool will further install apps from untrusted sources. To find out if your Lava Yuva 3 Pro is jailbroken or not:
- Step 1: Drag your finger downward from the center of the iOS home screen.
- Step 2: Type “Cydia” in the Search field.
- Step 3: If you find Cydia, then your Lava Yuva 3 Pro is jailbroken.
Some signs can come in handy when you want to ensure if someone is spying on you or not
Part 2: How to Stop Somebody Spying Using mSpy on the phone?
When you figure out that somebody is spying on your device, the first thing that comes to your mind is how to stop it. If someone has installed mSpy on your device, you can easily control the process. This section will mention the complete process of stopping mSpy on your device. Like the spying app detection process, the spying app removal process is also different in the case of iPhone and Android devices. Below we have mentioned the complete processes of removing mSpy from your Lava Yuva 3 Pro and iPhone device. There are two ways that you can use to remove this app from your devices
Method 1: Prevent mSpy from Spying via Phone Settings App
To remove mSpy from your Lava Yuva 3 Pro manually, one needs to activate two-factor authentication and change your iCloud password.
 The BootIt Collection covers multi-booting, partitioning, and disk imaging on traditional PC’s using the standard BIOS and newer PC’s using UEFI. The collection includes BootIt Bare Metal (BIBM) for standard BIOS systems and BootIt UEFI (BIU) for UEFI system.
- Step 1: To change the password, you have to go to Settings.
- Step 2: Click on Profile.
- Step 3: Select Password & Security.
- Step 4: Change password and activate two-factor authentication.
For Android users, you can refer to the following steps to follow:
- Step 1: Go to your Lava Yuva 3 Pro Settings.
- Step 2: Select Security.
- Step 3: Go to Device Administrators or Device admin apps.
- Step 4: Navigate to Update Service (the name mSpy uses to run undetected).
- Step 5: Select Deactivate.
- Step 6: Go back to Settings.
- Step 7: Select Apps.
- Step 8: Uninstall Update Service.
Method 2: Play Protect Feature on Google Play Store [Android only]
Another trick for removing mSpy from your device is by taking help from the Play Protect feature on Google Play Store. But one limitation of this method is that it does not work for iPhone. It is only useful for Android devices.

- Step 1: You can also go to the Google Play store.
- Step 2: Select your Profile.
- Step 3: Select Play Protect.
- Step 4: If it detects any harmful app, select Uninstall it.
- Step 5: Or scan the Lava Yuva 3 Pro device for any harmful apps.
- Step 6: It will notify you if any risky app is found.
Method 3: Spoof Location to Prevent mSpy from Location Tracking [Recommended]
You can use one more method to remove the mSpy app from your device. This method works for both Android as well as iPhone devices. This method spoofs location to prevent the mSpy app from tracking your location. If you feel that someone is tracking your location, you can use third-party app software that helps fake your location. One such app is Dr.Fone - Virtual Location . It is a full mobile device solution for both Android and iPhone devices. It helps solve a wide range of problems ranging from data loss and system breakdowns to phone transfer and whatnot. Dr.Fone Virtual Location is a great thing that allows you to change and fake your location. It also lets you trick the location-based apps and mock GPS locations with customized speed.
Features of Dr.Fone - Virtual Location
- Teleport GPS location with one click to anywhere.
- For stimulation of GPS movement flexibility, the joystick is available.
- Export or import GPX files for saving created routes.
- Offers perfect gaming stability with no crashing risks.
- Support location-based and social media-sharing apps without jailbreak.
Take a look at the video below to quickly learn how to spoof location to stop mSpy from tracking you.
 safe & secure
Step-by-step Guideline to Spoof Location via Dr.Fone Virtual Location
Step 1: Download Dr. Fone and launch the program.
Step 2: Select “Virtual Location” among all the options.
Step 3: Connect your Lava Yuva 3 Pro/Android to your computer and click “Get Started”****.

Step 4: You will find your actual location on the map in the new window. If the spot is not inaccurate, tap the “Centre On” icon in the lower right to display the accurate location.
 Glary Utilities PRO - Premium all-in-one utility to clean, speed up, maintain and protect your PC
Step 5: Activate the “teleport mode” by touching the icon in the upper right corner. Enter the place you would like to teleport to in the upper corner left field, and tap on “Go.” Set Rome in Italy as an example.
Step 6: Click “Move Here” in the popup box.
 KoolReport Pro is an advanced solution for creating data reports and dashboards in PHP. Equipped with all extended packages , KoolReport Pro is able to connect to various datasources, perform advanced data analysis, construct stunning charts and graphs and export your beautiful work to PDF, Excel, JPG or other formats. Plus, it includes powerful built-in reports such as pivot report and drill-down report which will save your time in building ones.
 It will help you to write dynamic data reports easily, to construct intuitive dashboards or to build a whole business intelligence cockpit.
KoolReport Pro package goes with Full Source Code, Royal Free, ONE (1) Year Priority Support, ONE (1) Year Free Upgrade and 30-Days Money Back Guarantee.
Developer License allows Single Developer to create Unlimited Reports, deploy on Unlimited Servers and able deliver the work to Unlimited Clients.
Step 7: The location is fixed to Rome, Italy, whether you tap the “Centre On” icon or try to locate yourself on your Lava Yuva 3 Pro or Android phone. It will be the exact location in your location-based app as well.
 With Screensaver Wonder you can easily make a screensaver from your own pictures and video files. Create screensavers for your own computer or create standalone, self-installing screensavers for easy sharing with your friends. Together with its sister product Screensaver Factory, Screensaver Wonder is one of the most popular screensaver software products in the world, helping thousands of users decorate their computer screens quickly and easily.
Method 4: Your Last Resort: Do a Factory Reset
Check phone settings app-reset options and clear out all the data from your phones if nothing works from all the above options, one last option is left, factory reset. For that,

- Step 1: Go to phone Settings.
- Step 2: Select System.
- Step 3: Chose Reset options.
- Step 4: Click on factory reset.
Or you can also make use of a third-party app - Dr.Fone - Data Eraser to wipe out data in some clicks
Dr.Fone - Data Eraser
Stop mSpy from Spying on You by Factory Reset
- Permanently erase all data, such as photos, videos, etc from your iOS device.
- It let you uninstall or delete useless applications from your device in batch.
- You can preview data before erasing it.
- Easy and click through the erase process.
- Provide support to all iOS versions and devices, which include the iPhone and iPad.
4,008,671 people have downloaded it
Not even professional identity thieves will be able to access your private data on iPhone or Android devices again. With the help of a third-party app, Dr.Fone – Data Eraser, you can erase all data permanently. This data eraser helps you render your data wholly unreadable and then cleans up the whole disk. It is a one-click solution to wipe all personal data like photos, contacts, messages, call logs, social app data, etc.
Part 3: How to Tell if Your Cell Phone is Being Tracked FAQ
### Q1: Is it possible if someone remotely install surveillance software on My Lava Yuva 3 Pro?Basically, it could be extremely hard to remotely install phone surveillance software on an iPhone or Android smartphone without having physical access to the Lava Yuva 3 Pro device in advance. Some remote spying apps will allow you to track the location of an iPhone, but you’d require the user’s iCloud login and password to enable the tracking of the Lava Yuva 3 Pro device. Anything more than that, and you’d need physical access.
Q2: Can Someone Spy on You When your Phone is Off?
Sadly yes. According to What Whistleblower Edward Snowden has said in a 2014 interview that the NSA could listen to and spy on conversations using the microphone on a smartphone, even if you turn off your devices. It makes it by using spyware that prevents your smartphone from actually turning off.
Q3: Can Someone Read My WhatsApp Chats on My Cell Phone?
Sadly, yes. While it isn’t possible on iOS devices, apps can intercept your WhatsApp messages on Android devices due to the operating system’s sandboxing security.
Q4: What Other Forms of Spyware Are There?
Other forms of Spyware include keyboard loggers, Adware, browser hijackers, and modem hijackers.
 ZoneAlarm Extreme Security NextGen
To Wrap it up
In the 21st century, when the world is connected through one device, almost everybody shares an undercurrent of worry. That is, is someone spying on me through my devices or not? And as much risky and fatal as this can be for a person who does not know if he is being tracked or not, there are solutions one can employ to safeguard himself. This article was all about how to detect and how to remove mSpy on iPhone and Android. Hopefully, now you are well aware of the different methods with their steps. With the help of Dr.Fone - Virtual Location , you can easily spoof or fake your location to hide the real one.
 safe & secure
How To Activate and Use Life360 Ghost Mode On Lava Yuva 3 Pro
Life360 is a popular location-sharing app among families and friends. The platform enables real-time tracking of loved ones’ whereabouts on smartphones. But there are moments when you might want to disable it for privacy.
If you’re intrigued by maintaining privacy on Life360, read on further. Learn how to activate the Life360 Ghost Mode. It’s a valuable feature when you need personal space without alerting your family or friends. Uncover the steps to use Ghost Mode in Life360 through a location-sharing app. Enjoy a balance between staying connected and maintaining your privacy.
Part 1. What Does Life360 Ghost Mode Mean?
Life360 Ghost Mode is a workaround and not an official feature. It’s an unofficial term for those who hide or spoof their GPS location within the Life360 platform.
- Ghost Mode is activated using external tools to conceal or manipulate your GPS location within the Life360 app.
- It’s a workaround to gain an added layer of privacy. It allows you to control the visibility of your real-time location on the Life360 map.
- Unlike turning off the internet or your phone, Ghost Mode involves more nuanced methods. It ensures discreet location management.
- Turning off the internet or the phone displays a clear “No Network” or “Phone Off” message. Ghost Mode provides a different status indication to make your Life360 look normal.
Now that you know all of Life360 Ghost Mode updates and their significance, let’s explore the steps to enable it. Learn how to activate Ghost Mode within the Life360 app by using a dedicated tool.

Part 2. How To Activate Ghost Mode on Life360
Wondershare Dr.Fone - Virtual Location is a versatile tool for enhancing privacy. With its key features, you can activate Life360’s Ghost Mode. It offers great control over your GPS location. Here are the key features of Dr.Fone to maximize Ghost Mode.
- Spoof your location without leaving home
Dr.Fone allows you to manipulate your GPS location without moving. It provides a seamless way to activate Ghost Mode on Life360.
- Automatic movement (change directions in real-time)
The tool enables automatic movement. It allows you to alter your location in real-time, simulating authentic movements.
- 360-degree directions
Dr.Fone offers the flexibility of 360-degree directions. It gives you precise control over your virtual location within the Life360 app.
- Keyboard control
The keyboard control feature allows for effortless navigation, making it user-friendly for both novices and experienced users.
Activate Ghost Mode With Dr.Fone - Virtual Location
Follow these step-by-step instructions to activate Ghost Mode on Life360 using Dr.Fone - Virtual Location:
- Step 1: Download and install Dr.Fone on your computer. Launch the app and connect your smartphone. Next, click on Toolbox > Virtual Location. Click Get Started and tick the I am aware of the disclaimer box.
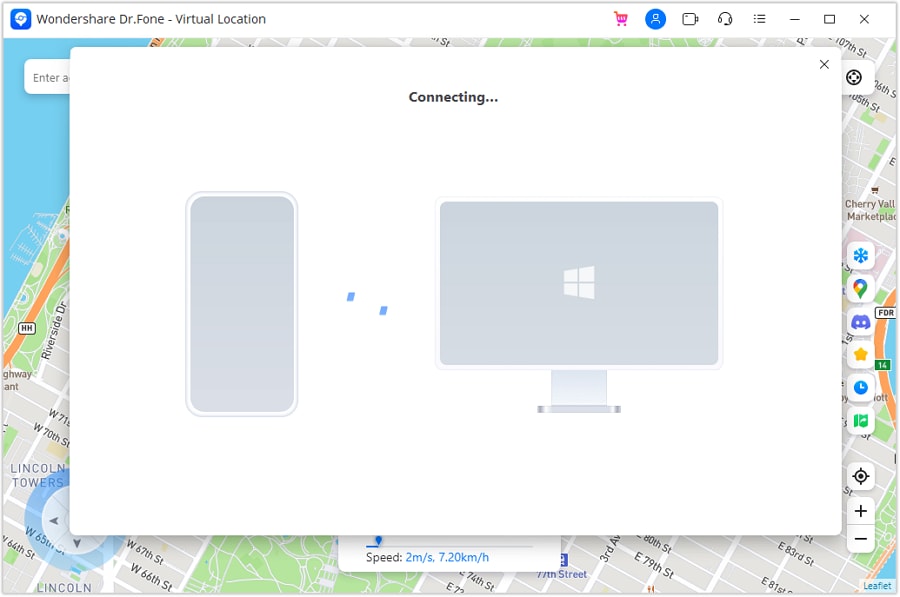
- Step 2: Follow the on-screen instructions. Once connected, click Manage Device to control your location without moving. Choose the “One-Stop Route” function from the top right. Tap anywhere on the map to set your destination.


- Step 3: Input the number of movements, and select Round or Loop trip. Adjust the walking speed and click Move Here to start the simulation. You can Pause or Clear at any point to start again.

- Step 4: Activate Teleport Mode by choosing the first icon in the top-right. Enter your desired location in the Search bar, press Enter, and confirm on the map. Click Move Here to change your smartphone’s location. Ensure alignment with the spoofed location on your computer. You are now under Life360 Ghost Mode.
 The Tube Sites Submitter is a fast and efficient tool for anyone who needs to upload videos quickly, easily and automatically to hundreds of tube sites in mere minutes .
Part 3. Will Others Know if Ghost Mode Is Activated on Life360?
Activating Ghost Mode on Life360 through a virtual location changer presents both advantages and potential drawbacks.
- Enhanced privacy
Ghost Mode provides an added layer of privacy. It allows you to move without being tracked by family or friends.
- Risk of miscommunication
Others won’t know your location, potentially leading to miscommunication or emergency concerns.
- Potential for sneaking out
You can engage in activities like sneaking out without being monitored by their Life360 circle.
Pros of Ghost Mode Activation
Here are the pros of using Ghost Mode on Life360.
- **Discreet movements.**Enables you sers to move discreetly, maintaining confidentiality.
- **Freedom of movement.**Offers freedom in activities without constant location tracking.
- Privacy control. You have control over when and how you share your location information.
Cons of Ghost Mode Activation
Here are some unwanted scenarios if you’re under Life360 Ghost Mode.
- Emergency concerns. Others won’t be aware of your actual location, posing risks in emergencies.
- **Accident risk.**Lack of real-time tracking may hinder quick assistance in case of accidents.
- Communication challenges. Potential for miscommunication as your true whereabouts remain undisclosed.
Part 4. Other Methods To Turn Off Location on Life360
When Ghost Mode feels too troublesome, alternative methods exist to turn off location sharing on Life360 temporarily. Here’s a guide on six different approaches:
Method 1: Turning Off WiFi and Data
Disabling WiFi and data on Life360 is a common method to prevent location tracking. Here’s a step-by-step guide:
- Step 1: Launch Life360 on your phone. Turn off WiFi and data; you can specifically disable them on iPhones for the Life360 app.

- Step 2: In Settings, locate Life360 Disable Cellular Data, Background Refresh, and Motion & Fitness. Once done, the Life360 location will then remain static at the current position.
Method 2: Dsiable Location Services for Life360
Disabling location services provides an effective solution for pausing Life360 without detection, The method applies to both Android and iOS devices. Here’s how:
- Step 1 (iOS): Go to Settings > Privacy > Location Services. Scroll and find Life360.
- Step 1 (Android): Go to Settings > Apps > Life360.

- Step 2 (Android): Tap Permissions > Location. Choose Deny or Ask every time to deactivate location access for Life360.
- Step 2 (iOS): Tap on it and opt for Never to turn off location access for Life360.
Method 3: Low Data Mode
Disabling WiFi and Data on Life360 might trigger notifications, alerting anyone to your offline status. An alternative method to deactivate Life360 awareness is by using Low Data Mode:
For iOS: Open the Settings app on your Lava Yuva 3 Pro or iPad. Tap on Wi-Fi. Select the i icon beside the connected Wi-Fi network. Toggle on the Low Data Mode switch.

For Android: Open the Settings app. Scroll and tap on Cellular or Mobile Data. Tap on Cellular Data Options or Mobile Data Options. Toggle on the Low Data Mode switch.
Method 4: Turn on Airplane Mode
Activating Airplane Mode deactivates all network connections. It includes GPS, offering a swift solution to cease location sharing on Life360. The action also suspends calls, texts, and internet access, so keep that in mind. Follow the steps:
For iOS: Swipe your screen to access the Control Center. Tap the airplane icon to activate Airplane Mode. Alternatively, go to Settings > Airplane Mode. Toggle the switch beside it On.


For Android: Swipe your screen to access the quick settings menu. Tap the airplane icon to enable Airplane Mode. Alternatively, go to Settings > Airplane Mode. Toggle the switch beside it On.

Method 5: Use a Burner Phone
While it may seem cumbersome, using a burner phone is a straightforward method to disable location sharing on Life360. Install Life360 on the burner phone using the same account. Connect it to the relevant WiFi, and then remove Life360 from your primary device.
Method 6: Use a VPN Service
Using a VPN service alters your IP address, which can help spoof Life360 to show an inaccurate location. The approach is beneficial when you aim to conceal your location without entirely turning off location sharing. Remember, though, that it’s not foolproof and may not provide consistent results.
Conclusion
Life360 Ghost Mode, though not an official feature, provides a discreet way to enhance privacy within the app. While it’s a valuable tool for moments when you need personal space, be aware of its downsides. If Ghost Mode seems too risky, explore alternative methods.
The ease of enabling Ghost Mode on/off using Dr.Fone makes it a convenient option. Striking the right balance between connectivity and privacy in Life360 requires thoughtful consideration. Explore the dynamics of Ghost Mode in Life360 to decide if it aligns with your preferences and needs.
- Title: How to Hide/Fake Snapchat Location on Your Lava Yuva 3 Pro | Dr.fone
- Author: Abigail
- Created at : 2024-07-24 17:07:04
- Updated at : 2024-07-25 17:07:04
- Link: https://location-social.techidaily.com/how-to-hidefake-snapchat-location-on-your-lava-yuva-3-pro-drfone-by-drfone-virtual-android/
- License: This work is licensed under CC BY-NC-SA 4.0.