
How To Leave a Life360 Group On Oppo Find X7 Without Anyone Knowing? | Dr.fone
How To Leave a Life360 Group On Oppo Find X7 Without Anyone Knowing?
Do you keep asking yourself how do I leave a Life360 group? If so, you’re on the right page. In a world where connectivity is key, Life360 has emerged as a trusted family safety app. It provides a digital reach through its innovative location tracking “Circle.” However, sometimes, you might want to leave it without raising eyebrows.
Whether it’s a matter of privacy or a brief escape, the art of leaving a Life360 group unnoticed is subtle. The article will show you how to leave a Life360 Circle without anyone knowing. Read to learn more.

Part 1. How To Leave a Life360 Circle
Life360 has become a household name. It’s a digital haven for families to stay connected through its “Circle.” The Circle functions as a virtual space where family members’ locations are shared. While this can be beneficial, there are times when you wish to leave a Circle for personal reasons.

How To Leave a Life360 Circle You Created
The default method of leaving a Life360 Circle is straightforward but comes with a catch. All members within the Circle are notified when someone leaves. The notification serves as a built-in transparency feature. It keeps everyone aware of any changes in the group dynamics. Follow the steps on how to leave Circle in Life360 when you created it yourself:
- Step 1: Launch the Life360 app on your device and go to Settings. Tap on Circle Management and select the Circle you intend to exit.

- Step 2: Choose the option Leave Circle. If you were the admin, ensure that you designated a new admin before leaving. Apart from that, the process is straightforward. Follow the on-screen instructions.
 DEX 3 RE is Easy-To-Use DJ Mixing Software for MAC and Windows Designed for Today’s Versatile DJ.
Mix from your own library of music, iTunes or use the Pulselocker subsciprtion service for in-app access to over 44 million songs. Use with over 85 supported DJ controllers or mix with a keyboard and mouse.
DEX 3 RE is everything you need without the clutter - the perfect 2-deck mixing software solution for mobile DJs or hard-core hobbiests.
PCDJ DEX 3 RE (DJ Software for Win & MAC - Product Activation For 3 Machines)

How To Leave a Life360 Circle You’re a Part Of
Here’s how to leave a circle in Life360 that you’re a part of. Here are the detailed steps:
- Step 1: Open your Life360 on your smartphone. Log in if necessary. Tap the Circle Switcher located at the top of your screen. Choose the specific Circle you wish to exit. Afterward, access the Gear icon positioned in the upper left corner.


- Step 2: Choose Circle Management from the list. Tap on Leave Circle at the bottom of the screen. Confirm your decision by selecting Yes in the popup. You’ll no longer be associated with the Circle, and it won’t appear in your Circles list. If you wish to rejoin, you’ll need a new invitation from the Circle Admin.

Part 2. How To Leave a Life360 Circle Without Anyone Knowing
Leaving a Life360 Circle through the standard method may not align with your preference in certain scenarios. In such cases, there are many methods you can use to maintain your privacy without alerting fellow Circle members. Here are some strategic approaches:
Method 1: Using an App To Spoof Your Location
One of the most effective and safe ways to trick Life360 without triggering notifications is by using Wondershare Dr.Fone - Virtual Location. The tool offers a seamless solution for location spoofing with the following key features:
- **One-click location changer.**Change your location with one click.
- **Simulate GPS movement along your usual route.**Mimic your typical movements without being physically present.
- **Cross-platform compatibility.**Compatible with both iOS and Android devices.
- **Easy 3-step process.**Easy and intuitive steps for hassle-free location manipulation.

How To Spoof Your Life360 Circle Location Using Dr.Fone
Follow the steps below to learn how to leave a Life360 Circle without anyone knowing using Dr.Fone’s Virtual Location tool:
- Step 1: Download and install Dr.Fone, then connect your Oppo Find X7 via USB cable. Launch the tool from Toolbox > Virtual Location. Click Get Started to proceed.
 PDF application, powered by AI-based OCR, for unified workflows with both digital and scanned documents.
- Step 2: Activate Developer Mode on your smartphone by following on-screen instructions in Settings > Privacy & Security > Developer Mode. Restart the Oppo Find X7 device, unlock it, and select Turn On. Enter your password.

- Step 3: On the map, enter the number of movements and select Round or Loop trip. Adjust the speed, then click Move Here to start the simulation. Pause or clear to revert.

- Step 4: To activate Teleport Mode, click the Search bar. Type a location and hit Enter. Click Move Here to change the smartphone location on the map. Verify on your smartphone’s maps application. Once done, you spoofed a Life360 circle without anyone knowing.

WPS Office Premium ( File Recovery, Photo Scanning, Convert PDF)–Yearly

The next method can serve as a last resort if using Dr.Fone is impossible. Be aware that they come with the trade-off of notifying other Circle members. Maintaining open communication within the Circle is crucial. Do these alternatives only when it’s necessary for your privacy.
Method 2: Turning Off Mobile Data and Wi-Fi
If Dr.Fone is unavailable, a simple tactic is to disable both mobile data and Wi-Fi.
- Step 1: Open your device settings. Go to Connections or Network & Internet.
- Step 2: Disable both mobile data and Wi-Fi. Life360 will lose real-time tracking capability, but be cautious, as this may raise suspicion.

Method 3: Switching To Airplane Mode
Another option is to activate Airplane Mode, severing all connections, including location sharing. Again, this method may alert Circle members to your departure.
- Step 1: Access your device settings. Look for Connections or Network & Internet.

- Step 2: Toggle on Airplane Mode. The method severs all connections, including location sharing.
Method 4: Turning Off Your Oppo Find X7
A straightforward yet noticeable method involves turning off your device. While it suspends location tracking on Life360, frequent use may draw attention.
Method 5: Disabling Background App Refresh
In your device settings, disable Background App Refresh for Life360. Although this may impact location accuracy, it’s an option to consider if Dr.Fone isn’t accessible.
- Step 1: Go to your device Settings. Look for Apps or Application Manager.

- Step 2: Locate Life360 and disable Background App Refresh for the app. Alternatively, you can disable Background App Refresh as a whole.
 Easy and Safe Partition Software & Hard Disk Manager
Method 6: Enabling Battery Saving Mode
Switching to “Battery saving” or “Power saving” mode can affect the frequency of Life360 updates. While it offers a subtle way to limit location sharing, it may not provide foolproof privacy. Follow the steps:
- Step 1: Go to your device Settings. Look for the Battery option.

- Step 2: Enable Battery saving or Power saving mode.

Method 7: Getting a Burner Phone
Acquiring a secondary, inexpensive phone for Life360 use may be an alternative if all else fails. This method involves monetary considerations and may not be practical for everyone.
Part 3. A Deep Dive on Life360’s Circle Feature
Life360’s Circle feature serves as the cornerstone of the app. It fosters connectivity and safety among its users. After diving into how to leave a Circle on Life360 in the above parts, it’s time to have a comprehensive look at essential aspects of the Circle feature:

Can You Remove Someone From a life360 Circle?
As the admin, you have the authority to remove someone from a Life360 Circle. The control ensures that you can manage the group dynamics and permissions.
 Forex Robotron Gold Package
How To Know if Someone Leaves the Circle?
Life360 notifies Circle members when someone leaves. The transparency feature aims to keep everyone informed about changes within the group.
Can You Include Non-Family Members in a Circle?
While Life360 is designed for family safety, you can include non-family members in a Circle. The flexibility caters to scenarios where close friends or caregivers need to be part of the safety network.
Is Circle Place Alerts Really That Useful?
The Circle Place Alerts feature proves valuable for users. It allows predefined locations to trigger alerts when members enter or leave those areas. While useful for safety monitoring, its practicality may vary depending on individual preferences and needs.
 CalendarBudget - Monthly subscription membership to CalendarBudget via web browser or mobile app. Support included.
 What if People in the Circle Feel Micromanaged?
Knowing the feeling of being micromanaged, especially among kids and teens, Life360 introduces the Bubble feature. The Bubble feature allows users to set a custom safety zone. It balances monitoring and granting a sense of autonomy within a designated area.

Conclusion
Leaving a Life360 Circle can be achieved through the standard method. However, it alerts other members, which can be annoying. While alternative methods exist, they often trigger notifications. If you want to know how to leave a Life360 circle without anyone knowing, Dr.Fone is recommended as the optimal tool.
The platform is proficient in location spoofing without alerting the Circle. Whether addressing privacy concerns or aiming for a quick escape, Dr.Fone proves its worth. It’s the preferred choice if you google the question, “How do I leave a life360 group online.” Ensure a seamless alone time without notifying other members.
Simple and Effective Ways to Change Your Country on YouTube App Of your Oppo Find X7
YouTube is easily the most popular video-sharing and media platform today. It’s where you can find free popular and trending videos across the globe to stream to your heart’s content. However, you’ll notice that some videos are blocked in some countries for several reasons, including copyright claims, legal requests, or licensing rights.
If you want to bypass these restrictions, simply read below to learn the simplest and most effective ways to change your location on YouTube. You’ll be able to access content that is otherwise restricted in your country by following our handy guide in no time.
Part 1: How to Change Location Settings on YouTube?
You can change your YouTube location settings if you want to make some videos available in your country. We’ll show you how to change your YouTube region, whether you’re on a computer, Android, iPhone, or iPad, by following these simple steps below.
Method 1: Change Your Location on YouTube from Computer
Here are the steps to change location on YouTube while using a computer.
Step 1: Click your Profile Picture.
 WonderFox DVD Ripper Pro
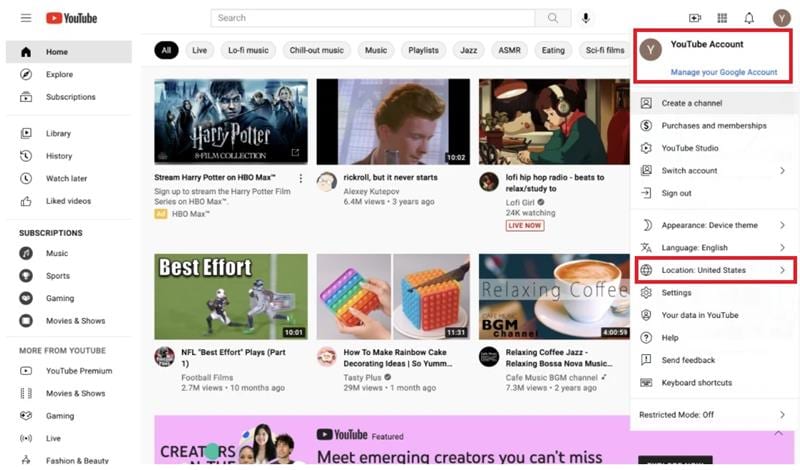
Step 2: Click Location.
Step 3: Choose the location you’d like to use.
 PaperScan Professional: PaperScan Scanner Software is a powerful TWAIN & WIA scanning application centered on one idea: making document acquisition an unparalleled easy task for anyone.
Method 2: Change Your Location on YouTube from Android
Here’s how to change your country on YouTube if you’re on Android.
Step 1: Open YouTube on your Oppo Find X7.
Step 2: Tap your Profile Picture and choose Settings > General > Location.
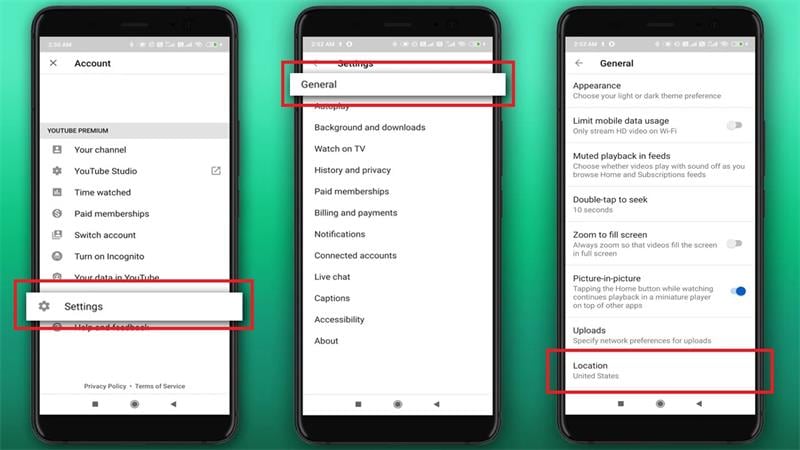
Step 3: Choose your desired country from the list of available options.
Method 3: Change Your Location on YouTube from iPhone and iPad
Lastly, if you’re using an iPhone or an iPad, simply follow the steps below to change your location on YouTube.
Step 1: Tap your Profile Picture.
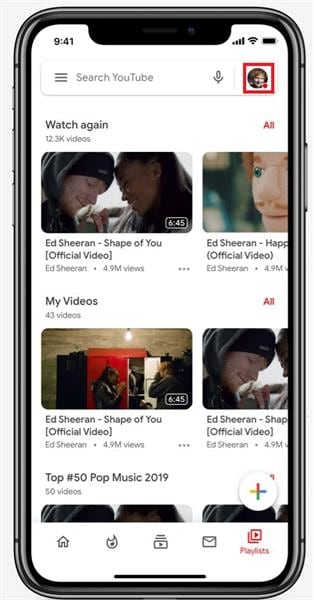
Step 2: Tap Settings > General > Location.
Step 3: Select your desired country.
Part 2: How to Change Your Country to Watch Blocked YouTube Videos?
There are generally no issues when watching YouTube videos anywhere you are. The only instance to have problems accessing YouTube is when you are in a country where the platform is blocked, such as in North Korea or China. Even then, some contents are still geo-restricted unless you’re in the right region.
In this part, we’re listing five different methods to access YouTube’s full library so you can stream all you want.
Method 1: Change Your Home Area on YouTube Manually
Here are the steps to manually manage your home area on YouTube to change your location.
Step 1: Sign up for YouTube TV and open the YouTube TV application.
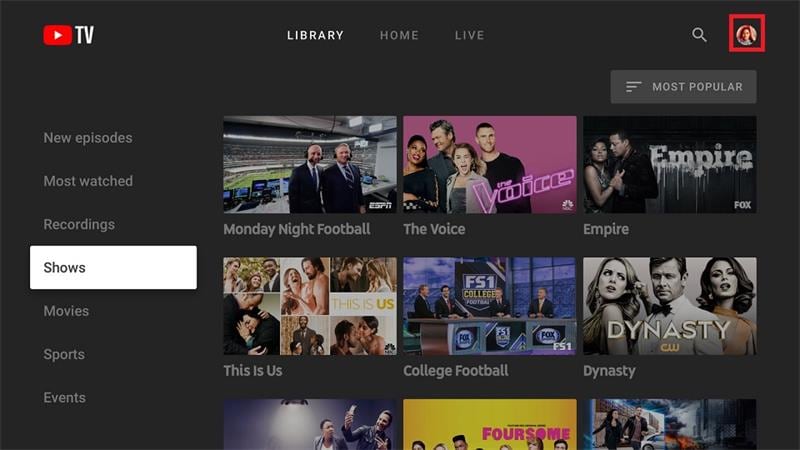
Step 2: Click your Profile Picture and click Location > Home Area.
Step 3: Update your home area.
Note
You can only change your location twice a year. You should also use YouTube at least once every three months in your country to ensure YouTube TV provides the correct local networks.
 TubeDigger - online video downloader from mostly any site
Method 2: Change Location on YouTube Using a VPN
The simplest and most effective way to unblock restricted content on YouTube is by using a VPN. In this example, we’ll be using NordVPN to change your location on YouTube using a VPN. Here are the steps.
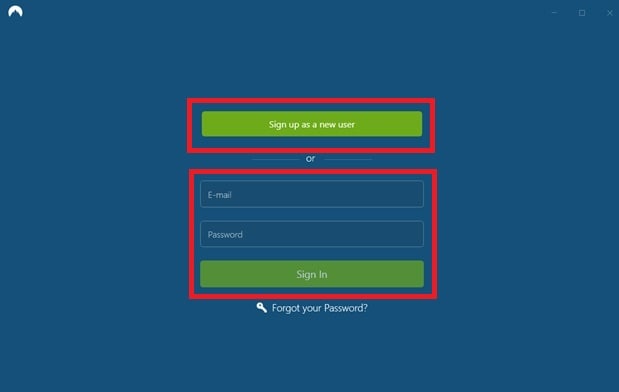
Step 1: Download and install NordVPN. Sign in or create an account.
Step 2: Use Quick Connect or connect to a specific country by clicking on the pin on the map. You can click on Search here as well to find a specific server in the country of your choosing. There’s also a list of countries at the left sidebar so you can choose a server manually.

Step 3: Open YouTube and browse previously blocked content.
The Best VPNs for YouTube
Aside from NordVPN, there are other VPNs you can try to access content on YouTube, including ExpressVPN, CyberGhost, and Surfshark.
NordVPN utilizes up to 5,200 servers in 60 countries, with some servers optimized for ultra-fast streaming. It’s one of the fastest VPNs available today, where you can unblock geo-restricted content wherever you are, with a no-logs policy for unbreakable encryption.
Like NordVPN, ExpressVPN optimizes speed for downloading and streaming. It uses more than 3,000 servers in more than 90 countries to provide cutting-edge connectivity, which includes 256-bit AES encryption for perfect anonymity.
CyberGhost has over 7,000 servers in more than 80 countries to unblock geo-restricted content across YouTube, Netflix, Amazon Prime, and more. CyberGhost doesn’t keep logs of your activities as well, ensuring your activity is safe.
Lastly, Surfshark is another reliable VPN to unblock restricted content on YouTube and other platforms. It uses up to 3,200 servers in 65 countries to provide a high-speed and low-latency connection at all times. Surfshark has a no-logs policy like the three VPNs on the list, making your online activity safe and anonymous.
Here’s a handy table to compare the best VPNs available today in terms of ratings, number of servers, supported devices, prices, and more.
| NordVPN | ExpressVPN | CyberGhost | Surfshark | |
|---|---|---|---|---|
| Number of Servers | 5,200 Servers | 3,000 Servers | 7,000 Servers | 3,200 Servers |
| Streaming Reliability | Excellent | Good | Good | Excellent |
| Streaming Services | YouTube | |||
| Netflix | ||||
| HBO Go | ||||
| Amazon Prime | ||||
| SkyGo | ||||
| BBC iPlayer | ||||
| Etc. | YouTube | |||
| Netflix | ||||
| HBO Go | ||||
| Amazon Prime | ||||
| SkyGo | ||||
| BBC iPlayer | ||||
| Etc. | YouTube | |||
| Netflix | ||||
| Amazon Prime | ||||
| BBC iPlayer | YouTube | |||
| Netflix | ||||
| HBO Go | ||||
| Amazon Prime | ||||
| SkyGo | ||||
| BBC iPlayer | ||||
| Etc. | ||||
| Supported Devices | Windows, macOS, iOS, Android, Linux, Smart TVs, Routers | Windows, macOS, iOS, Android, Linux | Windows, macOS, Linux (command line), iOS, Android | Windows, macOS, iOS, Android, Linux |
| Average Speeds | 100+ MBPS | 100+ MBPS | 100+ MBPS | 100+ MBPS |
| 24/7 Support | Yes - with live chat | Yes - with live chat | Yes, but email only: [email protected] | Yes, but email only: [email protected] |
| Free Trial | None - but with a 30-day money-back guarantee | None - but with a 30-day money-back guarantee | 24-Hour free trial | 7-day free trial for Android, iOS, and macOS only |
| Prices | $11.99 - 1 Month | |||
| $59.88 - 1 Year | ||||
| $95.76 - 2 Years | $12.95 - 1 Month | |||
| $59.95 - 6 Months | ||||
| $99.95 - 1 Year | $12.99 - 1 Month | |||
| $41.94 - 6 Months | ||||
| $56.94 - 2 Years + 4 months free | $12.95 - 1 Month | |||
| $47.88 - 1 Year | ||||
| $59.76 - 2 Years |
Method 3: Change Your Country on YouTube Using a Proxy Server
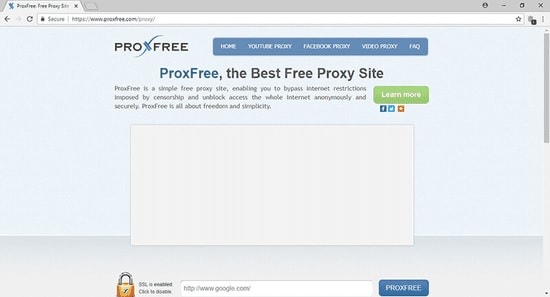
Using a Proxy to mask your location on the internet allows you to change your country on YouTube to access blocked content. In this example, we’ll use ProxFree YouTube Proxy to view locked YouTube content. Here are the steps to change your country on YouTube using a Proxy Server.
Step 1: Go to ProxFree YouTube Proxy .
Step 2: On the Server Location dialogue box, choose a country in the available options on the dialogue box.
Step 3: Enter the URL of the specific video you want to see unblocked and click PROXFREE to open YouTube in the proxy’s tab.
 PCDJ Karaoki is the complete professional karaoke software designed for KJs and karaoke venues. Karaoki includes an advanced automatic singer rotation list with singer history, key control, news ticker, next singers screen, a song book exporter and printer, a jukebox background music player and many other features designed so you can host karaoke shows faster and easier!
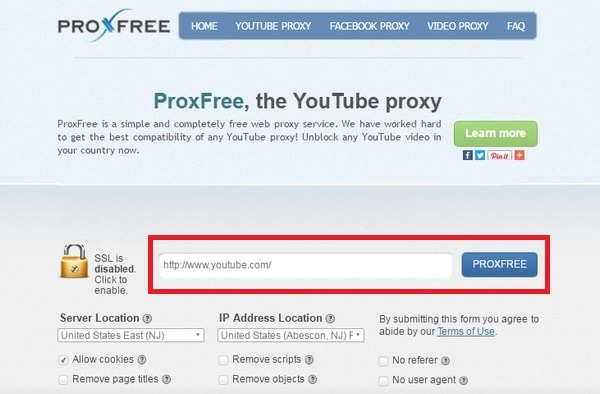
Note: You can also use YouTube’s search bar once YouTube’s tab is open on your proxy to search YouTube videos as usual.
Method 4: Change Your Country on YouTube Using a SmartDNS
Using SmartDNS to bypass YouTube geo-restrictions is useful for viewing blocked content in your country. This is because SmartDNS changes the Oppo Find X7 device’s virtual location by editing its DNS address. Here are the steps to change your country on YouTube using SmartDNS.
Step 1: Find and select a DNS Server address from different DNS providers online. In this example, we’ll be using SurfShark .
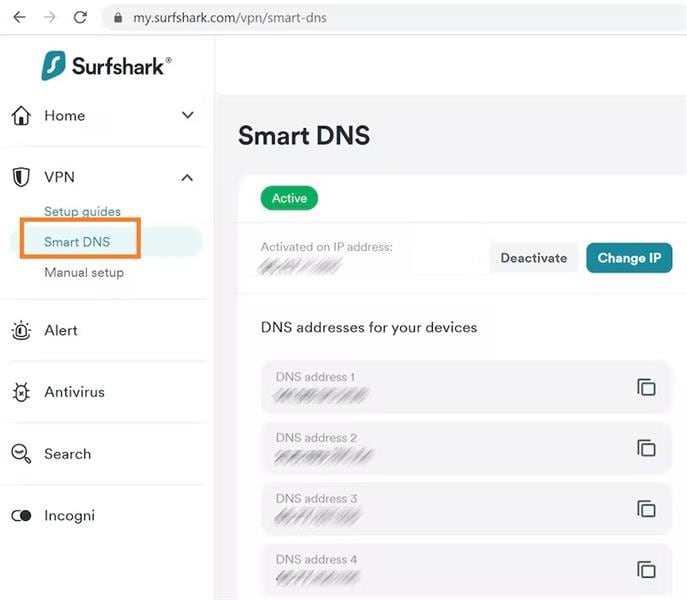
Step 2: Login or create an account. Click Smart DNS > Activate Smart DNS. Take note of the DNS address available to input on your computer’s Network Settings.
Step 3: Open Network Settings on your computer and find DNS Settings.
Step 4: Input your DNS Server address and click Ok once done. The DNS address should activate once you reconnect to the internet.
Note****_:_ Your IP address changes every 24 hours, which your ISP does. You’ll have to update your DNS address when it happens.
Method 5: Other Ways to Bypass YouTube’s Regional Filter
The easiest way to bypass YouTube’s regional filter is simply by downloading YouTube videos outright. Many websites are available online that allow you to download YouTube clips for free. In the step-by-step guide below, we’ll be using iTubeGo to download YouTube videos for viewing at a later time.
Step 1: Download and install iTubeGo . Launch the application on your computer.
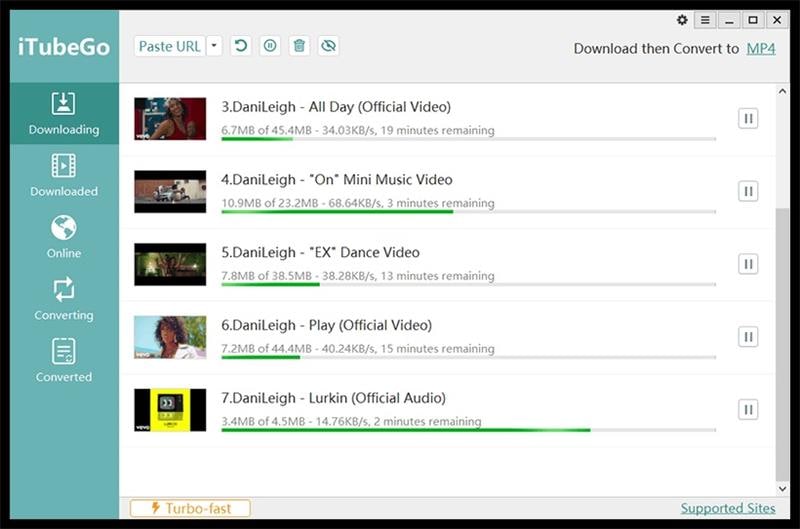
Step 2: Click Paste URL and paste the YouTube video’s URL on the dialogue box.
Step 3: Click Download to save the YouTube clip on your computer.
Here are the pros and cons of using each method to unblock geo-restricted content on YouTube.
| Pros & Cons | Manually on YouTube TV | Using VPNs | Using Proxy Servers | Using SmartDNS | Offline Downloads |
|---|---|---|---|---|---|
| Pros | You can easily change locations without downloading other applications. | Change countries on-the-fly to access even more content. | Some Proxy Servers don’t require downloading applications to use. | Unblocks geo-restricted content, much like VPNs. | You can always watch videos at a later time once downloaded. |
| Cons | You’re only allowed to change twice a month. | VPNs aren’t free, and you have to pay for a subscription. | Setting up Proxy Servers requires a little bit of technical know-how. | DNS is prone to manipulation by hackers. | You need to download a dedicated program to save YouTube videos. |
Part 3: Why Do Regions Block YouTube Content?
Although all YouTube videos are hosted on the same platform, a lot of them are geo-restricted to specific countries for various reasons. Many YouTubers sometimes lock their content in certain countries/regions due to licensing rights. YouTube may also block specific content to countries/regions to comply with local laws.
Conclusion
There are multiple ways to change your country on YouTube to access content that is otherwise unavailable in your location. You can change your country in settings on the YouTube app or use other methods, including using VPNs, SmartDNS, or Proxy Servers, to name a few. If all else fails, you can download an application that lets you save YouTube videos for offline viewing at a later time.
3 Things You Must Know about Fake Snapchat Location On Oppo Find X7
You must know that many social media platforms could track your location. And Snapchat is one of the social media platforms that easily tracks your location and use this information to improve its features and services. But many people concern about their privacy when using social media apps. If in case if you do not want Snapchat to track our location, then a fake Snapchat location could perfectly meet your needs.

Part 1: Do you really know Snapchat?
Snapchat comes with many effective and best features that could perfectly meet your needs. Some of the best features of Snapchat are Snap Ads, filters, lenses, audio, tune performance, video streaming, instant messaging, and much more. Snapchat is the most lending application for Android and iOS apps. The best thing about this application is that it includes some useful features that you ought to incorporate when creating a Snapchat clone for your business. These features contain both photos and video options.
Best features of Snapchat:
- Snap
Snap is the best feature that is loved by all, and it is the core feature of Snapchat. With this useful feature, you could click snaps and share your pictures easily and quickly.

- Lenses
The lens features are also included in the Snapchat feature. This feature is a combination of machine learning and artificial intelligence, as it allows you to see your younger and older version. This feature helps you to boost your engagement on your application.

- Voice and video calls
Snapchat includes the voice and video call feature that could help you to connect your friends and family globally easily.

- Story
The story feature that Snapchat includes is best as it could help you to broadcast your latest snap. The story format only lasts for twenty-four hours. This story features allow you to connect and effectively engage your users easily.
- Filters
Snapchat comes with an amazing feature that is called as filters. It includes many best filters that you must check to get the best results. These effective filters could be used to increase usage and connect with the audience effectively.

Part 2: Ways to Fake Snapchat Location
There are many effective ways of fake Snapchat locations without jailbreak. And some of the effective ways are mentioned below:

Method 1: Using Fake Location Apps
- iOS version: Dr.Fone-Virtual Location
If you are an iOS user and wish to fake location for a Snapchat map, Dr.Fone-Virtual Location is one of the best fake location apps that could be used on Snapchat. This iOS location changer is best for privacy keeping and more. With this effective app, you could teleport iPhone GPS anywhere in the world. It also allows you to simulate GPS movement along real roads or paths you draw and support five devices location management. To use this tool, you must follow the steps as mentioned below:
Step 1: You must download this Dr.Fone-Virtual Location tool from its official website and install it. After you have installed the tool, you must opt for the virtual location module from the main interface


Step 2: Connect your Oppo Find X7 to the PC using the lightening cord and click on the “Get Started” option.
Step 3: Now, you will be able to check your current actual location of yours on the map. After this, you need to activate the “Teleport mode”. This will be the third icon located on the right side of the screen.
Now, enter the location that you desire to teleport and click on the “Go” option.
Step 4: The program will analyze the place that you have entered, and it will show you the distance for that place in a pop-up window. Hit on “Move Here”.
You will now be able to check the new location whenever you click the “Center On.”
- Android version: FGL pro
For Android people, many fake GPS apps can help them. Since dr.fone doesn’t support Android devices for now, we will help the users with a well-known Android app to serve the purpose, and it is FGL Pro. This app is free to download as well as works in a hassle-free way. However, if we talk about the steps, you will be a bit disappointed as the steps are lengthy for this as you will require downgrading Google Play services. Let us know what exactly we need to do.
Step 1: As mentioned, firstly, downgrade the Google Play services. Then, install the app in your Oppo Find X7.
Step 2: Once installed, make sure to disable the “Find My Device” option. You can do this by “Settings” > “Security” > “Device Administrations” and turn off the option.
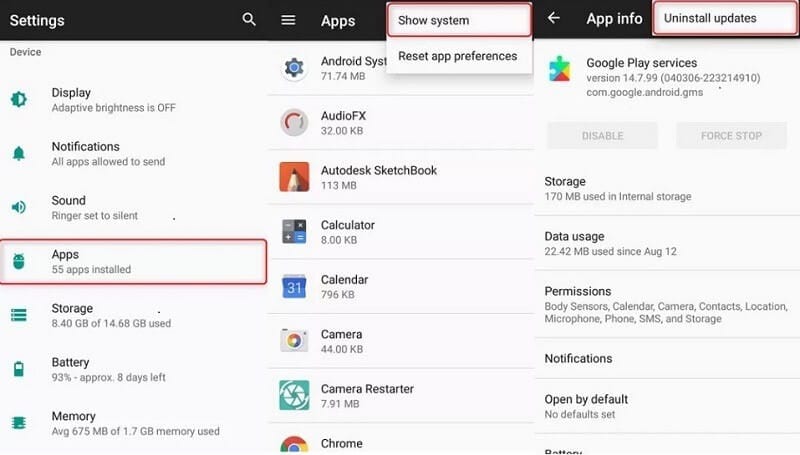
Step 3: Another thing to be noted after downgrading Google Play services is to uninstall the updates. Simply head to “Settings” > “Apps” > “menu” > “Show System” > “Google Play Services” > “Uninstall Updates”.
Step 4: Now, install the older Google Play Services version that you downgraded earlier. Head to “File Explorer” > “Downloads” and click apk file of Google Play Services. Tap “Install”.

Step 5: Now, go to “Settings” > “Apps” and tap the menu. Choose “Show System” > “Google Play Store” and disable it.
Step 6: Now, you need to set the FGL Pro as a mock location app. Please make sure to enable Developer options first. Then, in the menu of Developer Options, select “Select mock location app” > “FGL Pro”.


Step 7: Open the app now and set the desired location. Tap on the “Play” button, and you’re good to go.

Method 2: Using VPN
The second effective method to Snapchat fake location is through the help of a VPN. There are a lot of options when it comes to VPN. However, you can choose Surshark if you can’t decide whether it is one of the best VPN that comes with build-in fake GPS tech. It is the cheapest and the VPN that provides you with the perfect way to enhance your Snapchat experience.


Method 3: Using Xcode
The third method of fake GPS for Snapchat includes Xcode. Through Xcode, you could easily change the Snapchat location. Steps to a fake location with Xcode includes:
Step 1: In the first step, you must install Xcode from the Macs app store.

Step 2: Launch it and set up a project. Choose “Single View Application” and click “Next”.

Step 3: Provide a name to the project and hit “Next”.

Step 4: Now, you must set up GIT on Xcode. You will notice a screen showing “Please tell me where you are” and the commands.
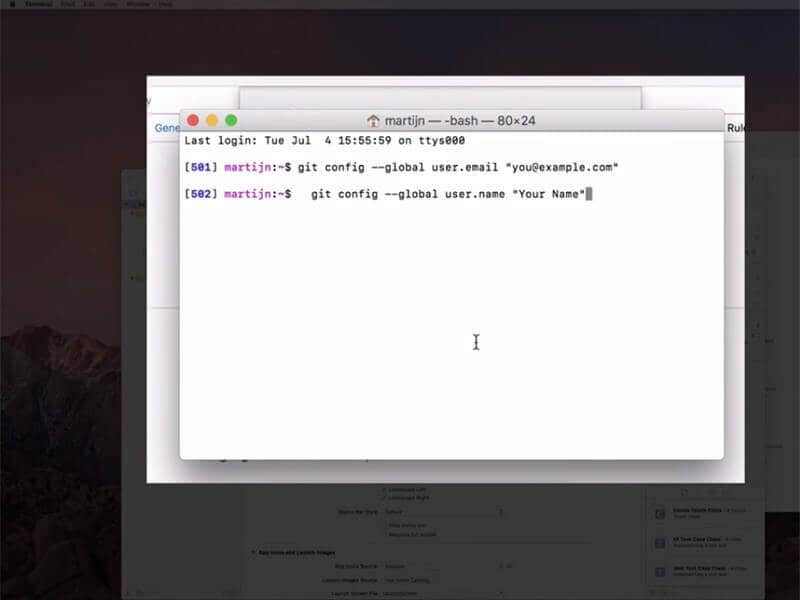
You are required to enter the commands in “Terminal”. Open it and type the following:
- git config –global user.email “you@example.com “
- git config –global user.name “your name”
Please note: “you@example.com ” and “your name” should be changed with your info.
 Allavsoft Batch Download Online Videos, Music Offline to MP4, MP3, MOV, etc format
Step 5: Connect your Oppo Find X7 to Mac and wait as Xcode will begin to process some files.
Step 6: You can now click on “Debug” menu and choose “Simulate Location”. Choose the desired location now and fake GPS.

Part 3: What to pay attention to while faking Snapchat location?
There is a certain risk that you may face while using a fake GPS Snapchat map, so you must pay attention while faking Snapchat location. Some of the fake location tools could simulate latitude and longitude perfectly but do not simulate altitude, which may sometime ban your account in Snapchat. Hence you must choose the best tool that could spoof any location without any range limitation.
Some of the Snapchat spoof does not work immediately and may also provide you with some difficulty. Hence here you must wait for some time or restart the Oppo Find X7 device and recheck it.
Conclusion
Many different tools could help you to spoof Snapchat. But you must always prefer to choose the right one that could perfectly meet your needs. And it could provide you with the best experience of using Snapchat without any difficulty.
 The BootIt Collection covers multi-booting, partitioning, and disk imaging on traditional PC’s using the standard BIOS and newer PC’s using UEFI. The collection includes BootIt Bare Metal (BIBM) for standard BIOS systems and BootIt UEFI (BIU) for UEFI system.
Dr.Fone - Virtual Location
1-Click Location Changer for both iOS and Android
- Teleport from one location to another across the world from the comfort of your home.
- With just a few selections on your computer, you can make members of your circle believe you’re anywhere you want.
- Stimulate and imitate movement and set the speed and stops you take along the way.
- Compatible with both iOS and Android systems.
- Work with location-based apps, like Pokemon Go , Snapchat , Instagram , Facebook , etc.
3981454 people have downloaded it
- Title: How To Leave a Life360 Group On Oppo Find X7 Without Anyone Knowing? | Dr.fone
- Author: Abigail
- Created at : 2024-07-24 18:46:43
- Updated at : 2024-07-25 18:46:43
- Link: https://location-social.techidaily.com/how-to-leave-a-life360-group-on-oppo-find-x7-without-anyone-knowing-drfone-by-drfone-virtual-android/
- License: This work is licensed under CC BY-NC-SA 4.0.