
How To Pause Life360 Location Sharing For Vivo Y78 5G | Dr.fone
How To Pause Life360 Location Sharing For Vivo Y78 5G
Life360 has become a household name in location-sharing apps, renowned for its ability to connect family and friends seamlessly across Android and iOS platforms. This app enhances safety and fosters a sense of closeness among its users.
However, there are moments when you might crave a bit of privacy or a break from constant connectivity. Whether for a surprise, personal space, or a digital detox, the need to discreetly pause Life360 arises. This article delves into the nuances of how to pause Life360. It will also provide insightful tips on how to do it without alerting others.
 DLNow Video Downloader
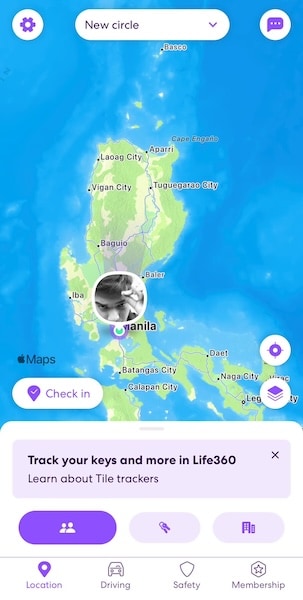

Part 1: What Is Life360 and How To Pause Life360 From the App
Life360 is not just an app; it’s a digital lifeline connecting people with their loved ones. It’s primarily designed for family and close friends. By offering real-time location sharing, it ensures that members of your “Circle” (a group within the app) know where you are at any given moment. This feature is handy for parents monitoring their children’s whereabouts or friends coordinating meet-ups.
The Purpose of Life360
At its core, Life360 is about safety and connectivity. The app includes features like location history, driving reports, and even crash detection, making it a versatile tool for modern families. It provides several benefits, like:
- Safety assurance. Knowing the whereabouts of your loved ones, especially in emergencies, can be invaluable.
- Convenience. Planning gatherings or ensuring a family member has arrived safely at a destination becomes more manageable.
- Emergency response. The app can alert users to potential emergencies involving Circle members.
Reasons of Pausing Life360
However, there are instances where learning how to pause Life360 becomes necessary:
- Battery health. Constant GPS tracking can drain your phone’s battery significantly. Temporarily pausing the app can help conserve battery life.
- Privacy. Sometimes, you might want some privacy about your location. Thus, some people would like to pause their Life360 location sharing.
Methods To Pause Life360 From the App
Now, the question is, can you pause your location on Life360? Pausing Life360 can be done for a specific circle or the entire app. This section will show you some general steps to pause your location for the app. You can do it only for a specific circle or the whole app. Here’s how you can do those.
Pausing Location for a Specific Circle
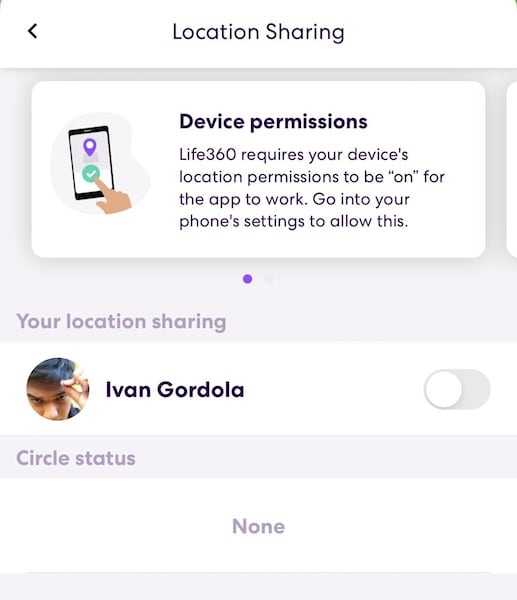
Open Life360 and go to the main screen. Select the Circle you want to pause. Then, tap on Settings (usually represented by a gear icon) in the upper-right corner. Look for an option like Location Sharing and toggle it off. This action pauses your location sharing only for the selected Circle.
Pausing the Whole App
Regarding this method, pausing the location sharing for all your circles usually involves going through your phone’s S ettings and disabling location services for Life360. If you don’t want to do that, you can turn off location sharing for all your circles through the steps provided above.
By understanding and utilizing these features wisely, you can maintain your connection with your loved ones while managing your digital boundaries and battery health effectively. Remember, the aim is to balance connectivity with personal needs.

Part 2: How To Pause Life360 From Settings
Life360 offers flexibility within its app and through your device’s settings. Understanding how to use these options can provide additional control over location sharing. Explore the various ways how to pause Life360 outside the app itself.
Pause Life360 From Android Settings
First, navigate to your Vivo Y78 5G’s Settings. Then, look for the section listing all installed apps. This is usually named as “Apps.” Locate Life360 on the list of apps and open it. You should be able to see a Force Stop button at the bottom of the screen.
By selecting Force Stop, you temporarily halt the app’s function without uninstalling it. This operation stops location sharing until you open the app again.
Pause Life360 From iOS Settings
To pause the Life360 location on iOS, you’ll have to open the Settings app on your iOS device. Browse through your apps and select Life360. Alternatively, you can use the search bar and type “Life360”. Once in the app’s menu, change location services to While Using the App. Thus, it will not share your location unless you open the app.

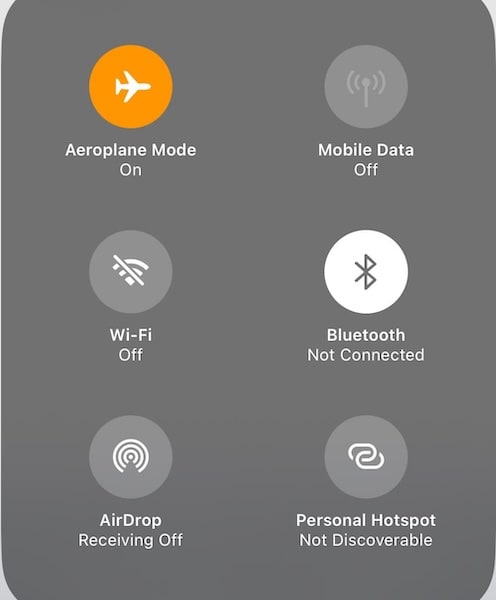
Pause by Using Airplane Mode
This can be done from the quick settings panel on both Android and iOS devices. Turning on Airplane Mode disables all wireless connections, including cellular data and GPS, effectively pausing Life360. The great thing is that Life360 will only show your last known location to your circles. It will not say that “location services are off,” unlike the first two methods.

Pause by Uninstalling
Removing the app from your device will stop it from sharing your location. The beauty of this method is that it won’t automatically notify your circles or remove you from them. However, some members might notice that your location updates are unavailable.
Each method serves a different purpose and offers varying levels of discretion. Whether conserving battery, seeking privacy, or temporarily disconnecting, these methods provide a way to pause Life360 location without drawing unwanted attention. Remember, communicating with your Circle members about your need for privacy to maintain trust is always a good idea.
Part 3: How To Pause Life360 With a Virtual Location Spoofer
Sometimes, pausing your location sharing on Life360 may raise questions or concerns among your circle members, particularly if they are close family or friends. If you’re planning a surprise or need private time without arousing suspicion, a virtual location spoofer can be handy. This method will teach you how to pause your location on Life360 without them knowing.
Wondershare’s Dr.Fone toolkit is more than just a data recovery solution. Among its various features, the Virtual Location changer is particularly useful for those looking to spoof their location. This feature allows you to simulate being in a specific location without actually being there. It’s a clever way to maintain privacy or plan a surprise without giving away your real whereabouts.
How To Use Dr.Fone To Spoof Your Location on Life360
To learn how to pause location on Life360 without them knowing using Dr.Fone, follow the steps below:
- Step 1: Download and install the Dr.Fone on your device. Connect your phone to your PC to begin the process. After launching the software, access Virtual Location from the Toolbox interface. Then, click Get Started to continue.
- Step 2: After launching the function, you’ll notice the One-Stop Route function at the top-right section. This feature is crucial for setting up your virtual movement.


- Step 3: To define how your virtual location behaves, you can decide how often the app simulates a Round trip or Loop trip. Once you’ve set parameters like Speed, click Move Here to start the simulation.

Note: TheRound trip and Loop trip are particularly useful for creating the impression of movement in a specific area. Parameters can make your virtual movement more believable.
Conclusion
This article explored various methods of pausing location sharing on Life360. Life360 is essential for many who share their locations with friends and family. The options are diverse, from simple app-based methods to more advanced settings adjustments and even a virtual location spoofer like Dr.Fone.
While it’s always recommended to maintain open communication with your Circle about pausing location sharing, there are times when privacy or surprise plans necessitate discretion. For those moments, Dr.Fone - Virtual Location emerges as a reliable solution for location spoofing and other phone management needs. Remember, using these tools responsibly is key to maintaining trust in your relationships.
How to Change/Fake Your Vivo Y78 5G Location on Viber
Viber is one of the most commonly used messenger apps. It allows you to send short messages like texts, videos, images, audio, and documents. Viber also has another exciting feature that will enable you to share your location. But sometimes, you might want to change location on Viber to prank your friends or for security purposes. So, read on to learn how to fake location on Viber with some simple solutions.
Part 1: What is the My Location feature on Viber?
If you’ve used WhatsApp’s location feature before, you’ll know what Viber’s “My Location” is all about. With this feature, you can share your live location for whatever reasons you may have. For example, you may want to share your live location with your kids or vice-versa. Or, you might simply want to share a fake location on Viber with your nosy friends.
But as good as it sounds, this live location feature is enabled by default on your Vivo Y78 5G/Android browser. Therefore, you can send a location on Viber without knowing. This can be advantageous to stalkers or even cause misunderstanding in your relationship. What’s worse, it shares your actual location with every text you send. But fret not because this post will help you disable or enable My Location on Viber according to your needs.

Part 2: How to disable or enable My Location on Viber?
So, without wasting too much time, let’s find out the steps to disable/enable Viber location-sharing feature. It’s straightforward.
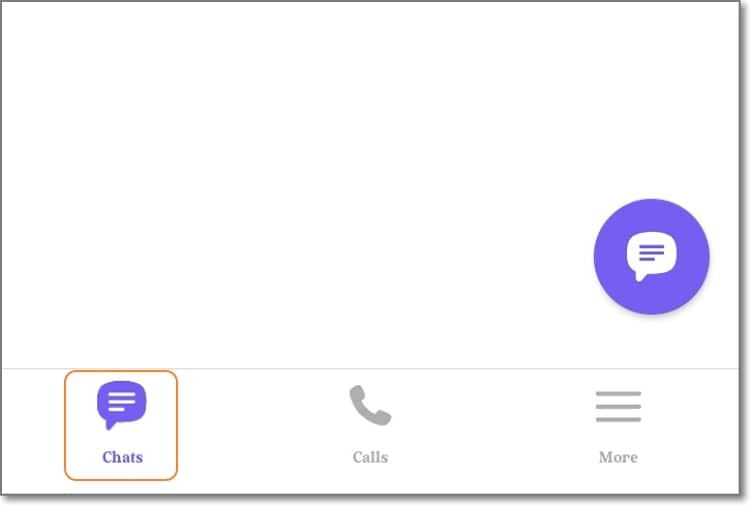
Step 1. Fire up your Viber app on mobile or PC and tap the Chats button. Here, proceed to open a chat that you want to enable/disable location sharing.
Step 2. Next, tap the Ellipsis (three dots) icon at the top-right corner of the screen and choose Chat Info. Alternatively, simply swipe the screen to the left.
 Easy and Safe Partition Software & Hard Disk Manager
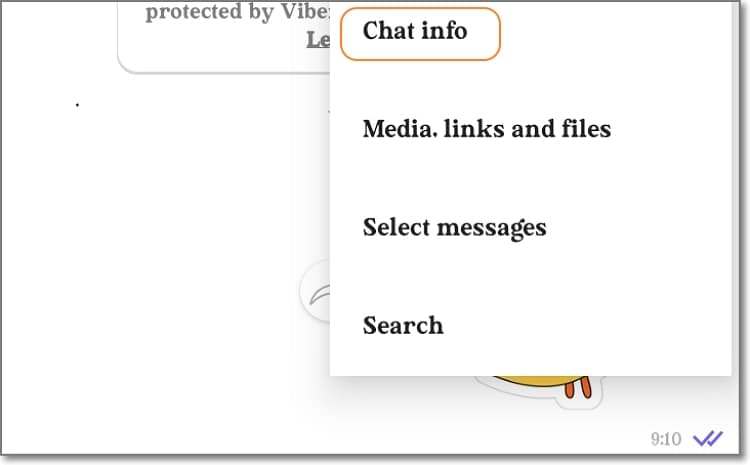
Step 3. On the Chat Info window, simply enable or disable the Attach location always toggle. It’s done!

Pro tip: You might be wondering how to share your actual Viber location with a chat or group. Again, this is very straightforward. Simply open the conversation and tap the three dots on the text field. Then, click the Share Location button and choose your location on the Google map. Lastly, tap Send location to share the Viber location with your selected contact.


Part 3: Can I send a fake location on Viber, and How?
So, is it possible to Viber’s fake location? Unfortunately, Viber doesn’t allow users to share a different place from the real one. That’s because the app asks to automatically access your actual location data using Wi-Fi or GPS while signing up. Therefore, based on the permission you set yourself, the answer is NO.
But nothing is impossible in the tech world. You can easily instruct Viber to share a different location using a third-party app or service like Dr.Fone - Virtual Location . With this professional GPS tool, you teleport your Viber location to anywhere in the world with a simple mouse click.
It’s compatible with Android/iOS devices and boasts a simple-to-understand map. Interestingly, you can walk or drive to your new location and even stop between destinations to make it more believable. It’s nothing complex!
You can check out the this video for further instruction.
Key features of Dr.Fone - Virtual Location:
- Compatible with all Android and iOS versions.
- Teleport Viber location to anywhere in the world.
- Walk or drive to your new Viber location.
- Simulate Viber movements with custom speed.
- Works with Pokemon Go , Facebook, Instagram , Snapchat , Viber, etc.
Steps to change Viber location with Dr.Fone:
Step 1. Launch Dr.Fone Virtual Location.
Install and run Wondershare Dr.Fone on your Windows/Mac computer, and then tap the Virtual Location tab on the Home page.
Step 2. Connect your phone to Dr.Fone with a USB cable.
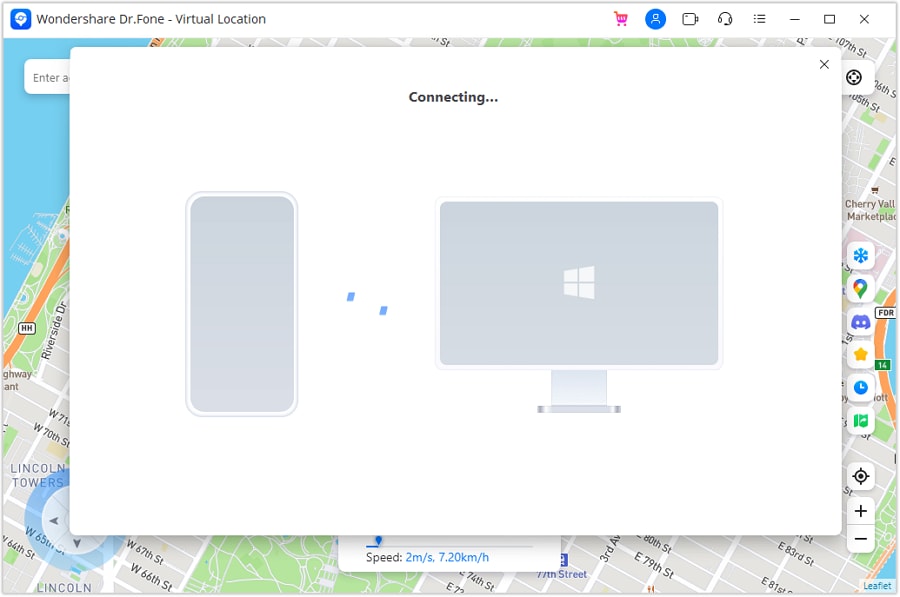
Connect your smartphone to your PC using a USB wire and tap Get Started on the new Dr.Fone pop-up window. Remember to enable the “File Transfer” option on your smartphone instead of “Charging.”
Step 3. Link your phone to Dr.Fone via USB debugging

Press the Next button to begin connecting your phone to Dr.Fone. If the connection fails, enable USB debugging on your phone by following the on-screen instructions. On Android phones, tap Settings > Additional settings > Developer options > USB debugging. In addition, set Dr.Fone as the mock location app on your phone.
Step 4. Enter the GPS coordinates or location address.

Key features:
• Import from any devices and cams, including GoPro and drones. All formats supported. Сurrently the only free video editor that allows users to export in a new H265/HEVC codec, something essential for those working with 4K and HD.
• Everything for hassle-free basic editing: cut, crop and merge files, add titles and favorite music
• Visual effects, advanced color correction and trendy Instagram-like filters
• All multimedia processing done from one app: video editing capabilities reinforced by a video converter, a screen capture, a video capture, a disc burner and a YouTube uploader
• Non-linear editing: edit several files with simultaneously
• Easy export to social networks: special profiles for YouTube, Facebook, Vimeo, Twitter and Instagram
• High quality export – no conversion quality loss, double export speed even of HD files due to hardware acceleration
• Stabilization tool will turn shaky or jittery footage into a more stable video automatically.
• Essential toolset for professional video editing: blending modes, Mask tool, advanced multiple-color Chroma Key

If the connection is successful, the Virtual Location map will launch automatically on Dr.Fone. Now enter the coordinates or address in the location field at the top-left corner. After finding the exact location that you want, simply tap Move Here before sharing your new location on Viber. That is easy, right?
 With Screensaver Wonder you can easily make a screensaver from your own pictures and video files. Create screensavers for your own computer or create standalone, self-installing screensavers for easy sharing with your friends. Together with its sister product Screensaver Factory, Screensaver Wonder is one of the most popular screensaver software products in the world, helping thousands of users decorate their computer screens quickly and easily.
Dr.Fone - Virtual Location
1-Click Location Changer for both iOS and Android
- Teleport from one location to another across the world from the comfort of your home.
- With just a few selections on your computer, you can make members of your circle believe you’re anywhere you want.
- Stimulate and imitate movement and set the speed and stops you take along the way.
- Compatible with both iOS and Android systems.
- Work with location-based apps, like Pokemon Go , Snapchat , Instagram , Facebook , etc.
3981454 people have downloaded it
Part 4: Why send fake location on Viber?
Now that you know how to spoof location on Viber. Let’s discuss some reasons to spoof location on this messaging app. Below are some common ones:
- Protect your privacy
Many people don’t want other online users to have a clue of their actual whereabouts. If you’re one of them, use a third-party tool to spoof your Viber location on your Vivo Y78 5G or Android.
- Prank your friends
Do you want to show your friends that you’re in London or New York when you’re in some remote village/town somewhere in reality? Yes, that sounds cool!
- Improve sales
If you’re a digital marketer, you might want to convince your potential clients that the goods are from a specific region or city close to them. Believe it or not, this can lead to more sales closures.
 vMix Basic HD - Software based live production. vMix Basic HD includes 4 inputs, 3 cameras, streaming, recording, playlist.
Wrap it Up
You can share your live location on Viber just like you would on Facebook, WhatsApp, and other social media apps. But because most of these apps don’t allow you to share fake locations, I recommend Dr.Fone - Virtual Location change your area to anywhere in the world. Give it a try!

How To Activate and Use Life360 Ghost Mode On Vivo Y78 5G
Life360 is a popular location-sharing app among families and friends. The platform enables real-time tracking of loved ones’ whereabouts on smartphones. But there are moments when you might want to disable it for privacy.
If you’re intrigued by maintaining privacy on Life360, read on further. Learn how to activate the Life360 Ghost Mode. It’s a valuable feature when you need personal space without alerting your family or friends. Uncover the steps to use Ghost Mode in Life360 through a location-sharing app. Enjoy a balance between staying connected and maintaining your privacy.
Part 1. What Does Life360 Ghost Mode Mean?
Life360 Ghost Mode is a workaround and not an official feature. It’s an unofficial term for those who hide or spoof their GPS location within the Life360 platform.
- Ghost Mode is activated using external tools to conceal or manipulate your GPS location within the Life360 app.
- It’s a workaround to gain an added layer of privacy. It allows you to control the visibility of your real-time location on the Life360 map.
- Unlike turning off the internet or your phone, Ghost Mode involves more nuanced methods. It ensures discreet location management.
- Turning off the internet or the phone displays a clear “No Network” or “Phone Off” message. Ghost Mode provides a different status indication to make your Life360 look normal.
Now that you know all of Life360 Ghost Mode updates and their significance, let’s explore the steps to enable it. Learn how to activate Ghost Mode within the Life360 app by using a dedicated tool.

Part 2. How To Activate Ghost Mode on Life360
Wondershare Dr.Fone - Virtual Location is a versatile tool for enhancing privacy. With its key features, you can activate Life360’s Ghost Mode. It offers great control over your GPS location. Here are the key features of Dr.Fone to maximize Ghost Mode.

- Spoof your location without leaving home
Dr.Fone allows you to manipulate your GPS location without moving. It provides a seamless way to activate Ghost Mode on Life360.
- Automatic movement (change directions in real-time)
The tool enables automatic movement. It allows you to alter your location in real-time, simulating authentic movements.
- 360-degree directions
Dr.Fone offers the flexibility of 360-degree directions. It gives you precise control over your virtual location within the Life360 app.
- Keyboard control
The keyboard control feature allows for effortless navigation, making it user-friendly for both novices and experienced users.
Activate Ghost Mode With Dr.Fone - Virtual Location
Follow these step-by-step instructions to activate Ghost Mode on Life360 using Dr.Fone - Virtual Location:
- Step 1: Download and install Dr.Fone on your computer. Launch the app and connect your smartphone. Next, click on Toolbox > Virtual Location. Click Get Started and tick the I am aware of the disclaimer box.
- Step 2: Follow the on-screen instructions. Once connected, click Manage Device to control your location without moving. Choose the “One-Stop Route” function from the top right. Tap anywhere on the map to set your destination.

- Step 3: Input the number of movements, and select Round or Loop trip. Adjust the walking speed and click Move Here to start the simulation. You can Pause or Clear at any point to start again.

- Step 4: Activate Teleport Mode by choosing the first icon in the top-right. Enter your desired location in the Search bar, press Enter, and confirm on the map. Click Move Here to change your smartphone’s location. Ensure alignment with the spoofed location on your computer. You are now under Life360 Ghost Mode.
Part 3. Will Others Know if Ghost Mode Is Activated on Life360?
Activating Ghost Mode on Life360 through a virtual location changer presents both advantages and potential drawbacks.
- Enhanced privacy
Ghost Mode provides an added layer of privacy. It allows you to move without being tracked by family or friends.
- Risk of miscommunication
Others won’t know your location, potentially leading to miscommunication or emergency concerns.
- Potential for sneaking out
You can engage in activities like sneaking out without being monitored by their Life360 circle.
 Nero Burning ROM:
The ultimate burning program for all your needs!
Pros of Ghost Mode Activation
Here are the pros of using Ghost Mode on Life360.
- **Discreet movements.**Enables you sers to move discreetly, maintaining confidentiality.
- **Freedom of movement.**Offers freedom in activities without constant location tracking.
- Privacy control. You have control over when and how you share your location information.
Cons of Ghost Mode Activation
Here are some unwanted scenarios if you’re under Life360 Ghost Mode.
- Emergency concerns. Others won’t be aware of your actual location, posing risks in emergencies.
- **Accident risk.**Lack of real-time tracking may hinder quick assistance in case of accidents.
- Communication challenges. Potential for miscommunication as your true whereabouts remain undisclosed.
Part 4. Other Methods To Turn Off Location on Life360
When Ghost Mode feels too troublesome, alternative methods exist to turn off location sharing on Life360 temporarily. Here’s a guide on six different approaches:
Method 1: Turning Off WiFi and Data
Disabling WiFi and data on Life360 is a common method to prevent location tracking. Here’s a step-by-step guide:
- Step 1: Launch Life360 on your phone. Turn off WiFi and data; you can specifically disable them on iPhones for the Life360 app.

- Step 2: In Settings, locate Life360 Disable Cellular Data, Background Refresh, and Motion & Fitness. Once done, the Life360 location will then remain static at the current position.
 NeoDownloader - Fast and fully automatic image/video/music downloader.
Method 2: Dsiable Location Services for Life360
Disabling location services provides an effective solution for pausing Life360 without detection, The method applies to both Android and iOS devices. Here’s how:
- Step 1 (iOS): Go to Settings > Privacy > Location Services. Scroll and find Life360.
- Step 1 (Android): Go to Settings > Apps > Life360.

- Step 2 (Android): Tap Permissions > Location. Choose Deny or Ask every time to deactivate location access for Life360.
- Step 2 (iOS): Tap on it and opt for Never to turn off location access for Life360.

Method 3: Low Data Mode
Disabling WiFi and Data on Life360 might trigger notifications, alerting anyone to your offline status. An alternative method to deactivate Life360 awareness is by using Low Data Mode:
For iOS: Open the Settings app on your Vivo Y78 5G or iPad. Tap on Wi-Fi. Select the i icon beside the connected Wi-Fi network. Toggle on the Low Data Mode switch.

For Android: Open the Settings app. Scroll and tap on Cellular or Mobile Data. Tap on Cellular Data Options or Mobile Data Options. Toggle on the Low Data Mode switch.
Method 4: Turn on Airplane Mode
Activating Airplane Mode deactivates all network connections. It includes GPS, offering a swift solution to cease location sharing on Life360. The action also suspends calls, texts, and internet access, so keep that in mind. Follow the steps:
For iOS: Swipe your screen to access the Control Center. Tap the airplane icon to activate Airplane Mode. Alternatively, go to Settings > Airplane Mode. Toggle the switch beside it On.

For Android: Swipe your screen to access the quick settings menu. Tap the airplane icon to enable Airplane Mode. Alternatively, go to Settings > Airplane Mode. Toggle the switch beside it On.
Method 5: Use a Burner Phone
While it may seem cumbersome, using a burner phone is a straightforward method to disable location sharing on Life360. Install Life360 on the burner phone using the same account. Connect it to the relevant WiFi, and then remove Life360 from your primary device.
### Method 6: Use a VPN ServiceUsing a VPN service alters your IP address, which can help spoof Life360 to show an inaccurate location. The approach is beneficial when you aim to conceal your location without entirely turning off location sharing. Remember, though, that it’s not foolproof and may not provide consistent results.
Conclusion
Life360 Ghost Mode, though not an official feature, provides a discreet way to enhance privacy within the app. While it’s a valuable tool for moments when you need personal space, be aware of its downsides. If Ghost Mode seems too risky, explore alternative methods.
The ease of enabling Ghost Mode on/off using Dr.Fone makes it a convenient option. Striking the right balance between connectivity and privacy in Life360 requires thoughtful consideration. Explore the dynamics of Ghost Mode in Life360 to decide if it aligns with your preferences and needs.
- Title: How To Pause Life360 Location Sharing For Vivo Y78 5G | Dr.fone
- Author: Abigail
- Created at : 2024-07-24 19:41:09
- Updated at : 2024-07-25 19:41:09
- Link: https://location-social.techidaily.com/how-to-pause-life360-location-sharing-for-vivo-y78-5g-drfone-by-drfone-virtual-android/
- License: This work is licensed under CC BY-NC-SA 4.0.