
How to Send and Fake Live Location on Facebook Messenger Of your Oppo A59 5G | Dr.fone
How to Send and Fake Live Location on Facebook Messenger Of your Oppo A59 5G
Do you want to learn how to fake a live location on Messenger? Here’s the perfect learning spot. These days, many situations can compel you to spoof location on Facebook Messenger. But as simple as it sounds, you might need to invest in a costly VPN. Facebook requests permission to track your actual GPS location when installing the app or creating an account. But fret not because you don’t even need a VPN service to change your Facebook location. This post will show you several shortcuts on how to send a fake location on Messenger.
Part 1: The Benefits of Changing Location on Facebook Messenger
There are numerous reasons to learn how to send fake locations on Messenger, just as initially said. Here are some of them:
- Business awareness
Sometimes, you might want your customers to believe that your products or offices are in a specific location. In that case, spoofing your live location on Messenger is a great idea.
- Prank friends and have fun
There’s nothing wrong with fooling your Facebook friends about your location. You can show them that you’re in a unique spot when you’re just around them.
- Hide identity
Your online security is paramount. And one way to protect yourself from online sniffers is by spoofing live locations on Facebook Messenger.
- Make new friends
Often, Facebook will tailor its friend suggestions to people close to your proximity, thanks to the “Nearby Friends” feature. But you can start getting new and refreshing tips from people in your new location.
Part 2: How to Change Location on Facebook Messenger
After learning some reasons to fake location on Messenger, let’s now know how to do that with easy steps. You don’t need third-party help to mock live locations on Messenger on Android or iPhone. That’s because the app boasts its inbuilt location feature. Follow me:
Step 1. Open Facebook Messenger and launch the conversation with which you want to share the fake location.
Step 2. Click the “four dots” at the bottom-left corner and tap Location.

Step 3. Now tap Allow Location and choose a new location on the world map that appears.
Step 4. After choosing a location, tap Send Location to share it with your selected friend. It’s that easy!

Part 3: How to Change a Live Location on Facebook Messenger [iOS & Android]
As you can see, sending a pinned location directly on Messenger is only good if you want to share the place with a specific contact. In other words, you can’t natively spoof the location of multiple contacts on Messenger. So, if you want to fake live location on Messenger on iOS and Android, using a robust option like Wondershare Dr.Fone is a good idea.
With this virtual location tool, you can change your GPS location anywhere. That makes it helpful if you want to brag about your actual location with some tangible proof. Another thing, you can simulate location movements by choosing a particular route or transport. In addition to Facebook, Dr.Fone also works with apps like Pokemon Go , Instagram , Facebook , etc., etc.
You can check out the this video for further instruction.
Here’s how to fake live location on Messenger with Dr.Fone:
Step 1. Download Dr.Fone and fire it up.

Start by downloading and installing Dr.Fone from the official website and launch the software on your Mac or Windows PC. Then, connect your smartphone to the PC using a USB wire. Please ensure to select the “Transfer Files” option.
Step 2. Launch the Virtual Location tool and enable USB debugging.

WPS Office Premium ( File Recovery, Photo Scanning, Convert PDF)–Yearly

On Dr.Fone’s home page, press the Virtual Location tab and click Get Started. Now enable USB debugging to connect your phone to Dr.Fone. On Android, click Additional Settings > Developer options >USB debugging. Also, remember to set Dr.Fone as the mock location app.
Step 3. Launch the map and choose a fake location for Messenger.

Once USB debugging is enabled, press Next to launch the map. Now enter your new location’s address or GPS coordinates and tap Move Here. And there is that!

Bonus tip: How to make your new Messenger location more believable
Want to make your new location more believable? Simple, Dr.Fone will help you with that. Just enter the new coordinates or location on Dr.Fone and take a screenshot of the new area. Of course, you can find dozens of free location pictures on Google. After that, open the image on Facebook and tap the “location” icon. Now search and select your new location and post the picture.
Up to this point, you shouldn’t have any qualms spoofing your live location on Facebook Messenger. For example, if you want to send a pinned GPS coordinate to a single contact on Messenger, then simply use the inbuilt function to change location. However, your new location might not be believable since your actual device location will remain the same. In other words, there’s no proof that you’re actually in that particular location.
So, use Dr.Fone to fake location on Messenger with unreal precision. This third-party location changer allows you to teleport your location to anywhere. You can even change Messenger location by walking, driving, or cycling. Then to make it more believable, you can share a post with a screenshot of your new location. Remember, your new location will be visible to all your Facebook friends.
Part 5. FAQ: What People Also Ask about Facebook Location Services

1. Why is my Facebook Messenger location wrong?
The issue of the wrong Facebook location is commonplace these days. Fortunately, it’s nothing complicated as it’s mainly about the incorrect GPS settings on your phone. So, go ahead and enable GPS tracking on your device.
Open Settings > Privacy > Location Services for iPhone users and then enable Location Services. On the other hand, Android users should click Settings > Security and Location > Locations > and enable Use Locations.
2. Can I fake my location on Facebook?
In a typical scenario, it’s impossible to lie about your location on Facebook. That’s because the app asks for permission to track your GPS location before you can use it. But as you’ve seen, Wondershare Dr.Fone makes it a cakewalk to a fake live location on Messenger.
3. How can I hide my location on Facebook?
As said earlier, the reason why Facebook gives the wrong location is because of disabled location settings. It’s the reverse! So, use this Settings feature to hide your actual location on Facebook.
 vMix HD - Software based live production. vMix HD includes everything in vMix Basic HD plus 1000 inputs, Video List, 4 Overlay Channels, and 1 vMix Call
Conclusion
Any queries regarding how to send a fake location on Messenger? Let us know if you have any. Meanwhile, use Messenger’s inbuilt location feature to share an artificial place with a friend or contact. But because this method only allows you to share fake locations with a single chat, use Wondershare Dr.Fone - Virtual Location instead. It’s simple, fast, and effective. Are you ready?
 safe & secure
How to Change Location on TikTok to See More Content On your Oppo A59 5G
TikTok is a famous entertainment application that shows exciting content worldwide. It is now a popular application with a recorded 3 billion downloads while surpassing the popularity of Facebook and Twitter in 2018. But, sadly, the application keeps on being the victim of restrictions and bans in different countries worldwide.
This limits content broadcast in different regions, making TikTok lovers deprived of entertainment. But, if you know how to change location on TikTok, you can surpass all these restrictions easily. The article will help you learn how to change your TikTok location by presenting the following aspects:
Part 1: How Does TikTok Detect your Location
According to the TikTok privacy policy, your location through TikTok is tracked based on your IP address, SIM card, and GPS. It happens right after you make your account on TikTok through your phone number. In this way, TikTok also happens to avoid scammers and fraudsters. In some cases, your location is also automatically tracked by giving a location tag to your posts.
The IP address and browsing history on the TikTok, time zone setting and mobile carrier are also collected by the TikTok as “Technical Information.” In case you want to know if TikTok ensures your safety as well? The answer is no. If you give your location access to TikTok, it increases the chances of getting hacked.
Your information becomes easily accessible to everyone. Moreover, it is also mentioned in the privacy statement of TikTok that they will share your details with public authorities, enforcement agencies, and other organizations. TikTok can share your sensitive information with governments and commercial parties.
If you don’t want to add your location on TikTok, you will have to deny the permissions on your phone. Hence, knowing how to change location on TikTok is necessary.
Part 2: Why We Need to Change Location on TikTok
We have discussed how TikTok gets to know about your location in the first part. Now, we will share why do we need to change location on TikTok:
- To Add Diversity to the Audience
The algorithm of TikTok is built so that it will only show the content of your region or country. Therefore, if you want to make money through your content on TikTok, it might not be possible for you. So, you may want to target the audience of another region that is willing to buy the content.
- Access Better Content
Even if TikTok offers exciting content that has made the app popular, you can only access the available content for your region. Therefore, if you want to enjoy more content from the other areas, you should change your location on TikTok to access unlimited content.
- Use the App without Hurdles
Countries like Afghanistan and India have banned the TikTok application, and Indonesia and Bangladesh have censored it. Moreover, the United States is also thinking of the same due to user privacy concerns and security threats. However, if your country has already banned TikTok, you can still access the content with a fake location if you know how to change location in TikTok.
- Protect your Privacy
If you are not using a VPN or any other way to change your location, TikTok can access your device easily. The organization behind TikTok can access the applications on your phone, your messages, and places you go to. So, when you change your location, it will remove the chances of being tracked.
Part 3: How to Change your Location in TikTok on Different Devices?
We have discussed why it is essential to know how to change the location of TikTok. Now, we will move forward and discuss the methods involved in changing the TikTok location on various devices:
1. For iOS and Android Devices
If you are interested in changing your location on your iOS and Android devices, the following methods are aligned for you:
Method 1: A tested way - Dr.Fone - Virtual location
Dr.Fone – Virtual Location is an application designed for Android and iOS devices. This application assists in teleporting the GPS location to any other location easily. With this location changer, you can fake your location and enjoy the content of different regions without having to travel anywhere. The following steps will guide you on how to change the TikTok country location with Dr.Fone – Virtual location:
 safe & secure
Step 1: Access the Location Changer
The first step demands you download Dr. Fone’s Virtual location and install it. Next, launch the program and click “Virtual location” from all the available options. Next, connect your Oppo A59 5G or iPhone through any USB cable with your PC and tap on “Get Started.”
Step 2: Access your Current Location
A new window will be opened, and your real location will be displayed on the Dr.Fone map. If you can’t see it, click on the “Center On” icon at the right sidebar to show the location.

Step 3: Activate the Teleport Mode
Now, click on “Teleport Mode” by pressing the first icon on the upper-right side. Now, provide the place you want to teleport to in the search bar. Next, press the “Go” button and press the “Move Here” button from the popup box.
 DLNow Video Downloader
Step 4: Your Location is Changed
Now, the location of your iOS or Android phone has been fixed to the given location. So you can now enjoy your fake location content on TikTok while bypassing all the restrictions efficiently.


Method 2: Changing Language on TikTok to Access Content from Other Regions
TikTok only shows the content of languages that are native to your region. Fortunately, you are allowed to change the language on TikTok and access the content of that region. However, this method only shows the content of the selected area.
Therefore, you can’t add the language of any such region which has banned the application. Instead, follow the given steps to change your language on TikTok and access the content peacefully:
Step 1: Open the TikTok application and select “Profile,” written on the lower right-hand corner of the interface.
 PearlMountain Image Converter
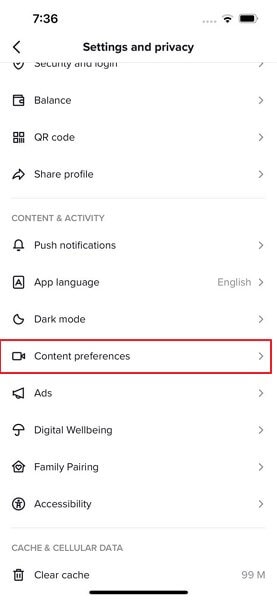
Step 2: Now, click on the three dots mentioned in the right-hand corner and access the “Settings and Privacy” of your TikTok account. Now, choose the “Content Preferences” option written under the “Content & Activity” section.
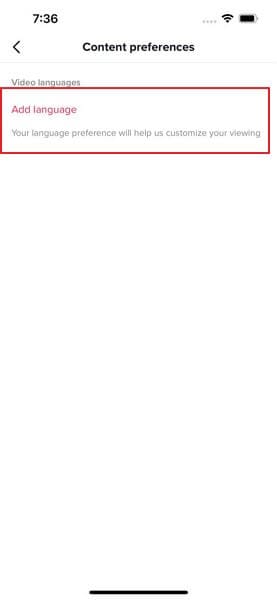
Step 3: Now, add the language that is native to your target region. Now, you will be able to access the content of the particular region.
Method 3: Changing your SIM Card to Change Location on Tiktok
TikTok uses the region code of your SIM card to display the content of your region on the feed. Therefore, it will be helpful if you buy a SIM card from another area and use it on Your Oppo A59 5G to watch that region’s content quickly. This process is as simple as choosing a fake location and buying a SIM card from that region.
You can do so by ordering an international SIM card through Amazon and putting your SIM in the mobile phone. Now, delete the cache and app data. Then, open TikTok and enjoy various content. Unfortunately, you will have to buy a phone with a dual SIM. Moreover, some SIM cards might not work in your region unless you buy a mobile plan.

2. For Computer
Now, let’s discuss how to change your location on TikTok from your Computer. For this, we have introduced a VPN service that fakes the location on TikTok and helps you access content from different regions.
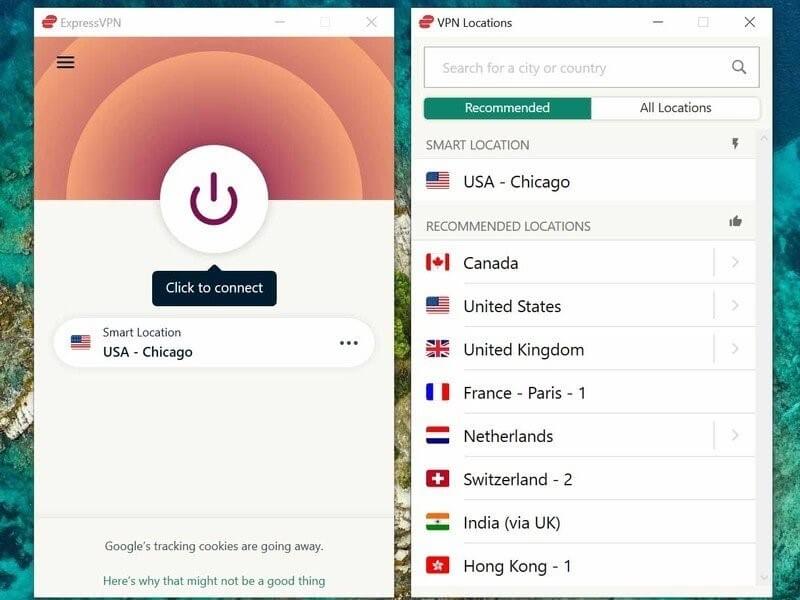
ExpressVPN
ExpressVPN is a top-notch VPN that provides blazing-fast speed for browsing, streaming, and playing games with unlimited bandwidth. You can connect to the service anywhere as the application’s high-speed servers work across 94 countries. In addition, it protects user data by offering the best security and encryption.
With the given following steps, you can set up ExpressVPN on your computer and access unlimited TikTok content:
Step 1: Launch the ExpressVPN software and tap on the “On” button to utilize the service. Now, press the “Smart Location” option.
Step 2: Select the VPN server location from the “All Location” tab or “Recommended” tab.
Step 3: Once you are connected, you will be able to use TikTok and watch content from the selected region with enhanced privacy and security.
 Software Update Pro - Check and update software installed on your computer.
Part 4: FAQs about TikTok Location
1. Is it not legal to change the TikTok location?
It is legal to do so unless you are not misusing the application and watching objectional content from the region.
2. How to turn off the GPS on TikTok?
For Android devices, open the “Settings: and reach the “Location” tab. Now, press on the “App Permission” option and search for TikTok. Now, click on “Don’t Allow.”
For the iOS device, open the “Settings” app and click on “Privacy.” Further, click on “Location Services” and find TikTok. Change the TikTok location setting to “Never.”

3. Is it safe to use TikTok with a VPN?
Yes, TikTok will not be able to detect that you are using a VPN. Therefore, you will not be banned from using the application. It is safe to access TikTok with a VPN because it hides your IP address and location.
Conclusion
We have extensively concluded different methods involved in How to change location on TikTok. For iOS and Android devices, you can do so with the help of Dr.Fone - Virtual Location . Besides, you can manually change your language or SIM card to access the content of the particular region. If you use a computer, you can use ExpressVPN and change the location of your device while hiding your IP address.
safe & secure
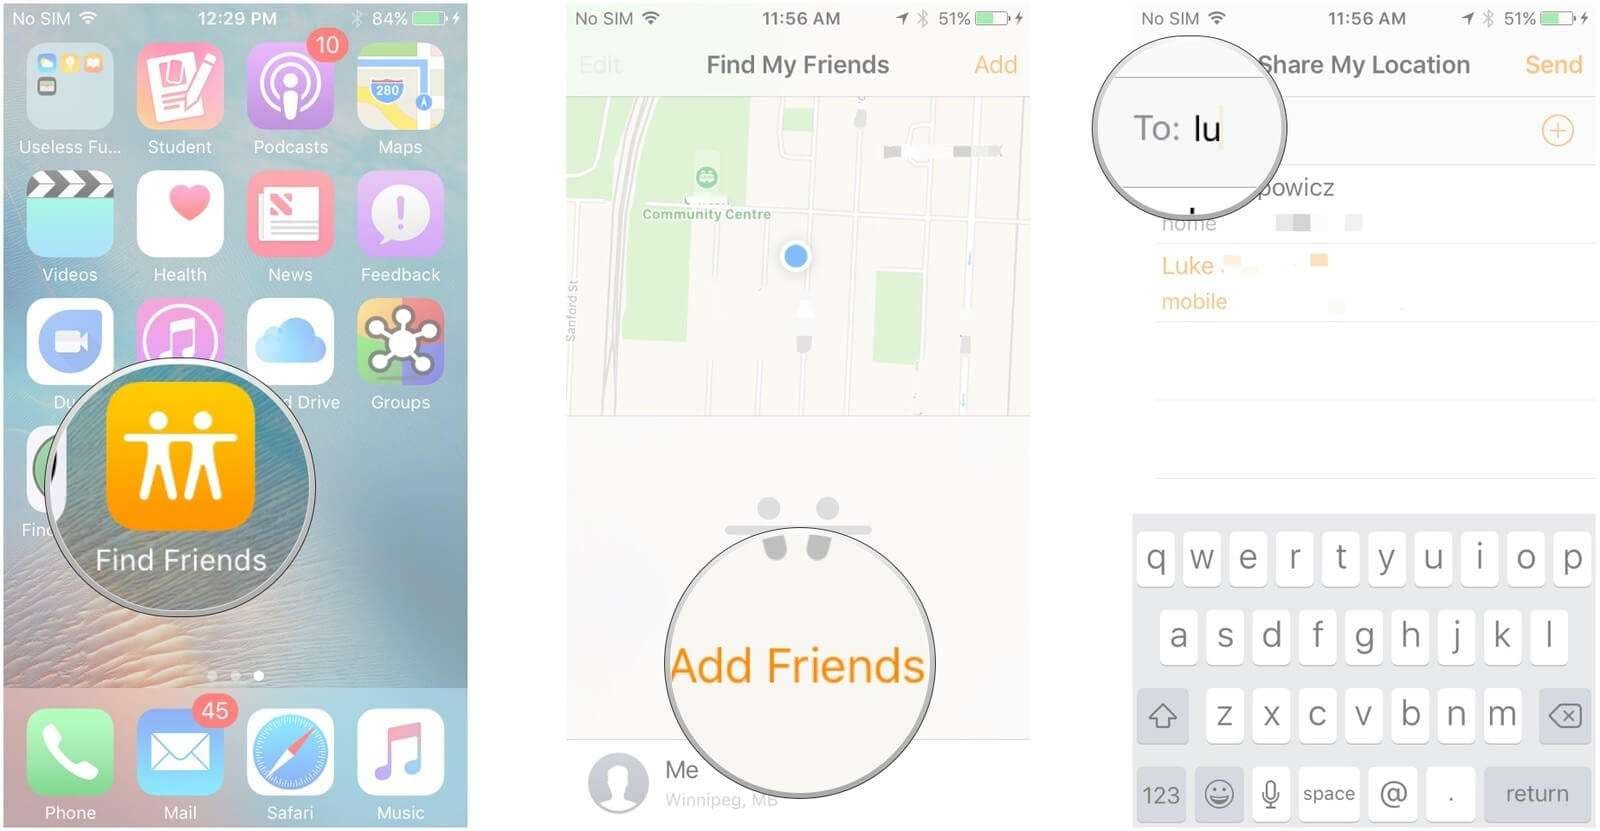
Does Oppo A59 5G Have Find My Friends?
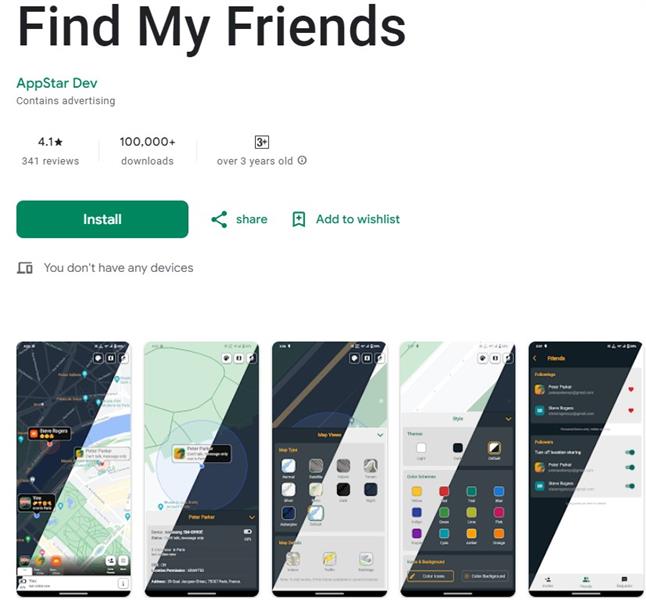
Yes, Find My Friends App is compatible with Oppo smartphones. This tracker App is exclusive for iPhone users and Android devices. Free for iPhone, iPad, and iPod Touch. When installed on your friends or one of our family member’s smartphone you can stay in touch with them and keep a tab on his/her location. All you require is to request- with whom you want to stay connected- to save your number as a contact on the Find My Friends app, and then you’ll be given access to their real-time geographical location. You can also find Oppo version of Find My Friends app if you are particularly looking for it.
There are several privacy controls with Find My Friend Oppo and iPhone App. This means if there are times when you don’t want family or friends to know your location, you can simply mute it with a few clicks. Find My Friends application is quite popular among families who worry about the safety of their loved ones.
Download from Google Play Store - https://play.google.com/store/apps/details?id=in.appstar.findfriends
Download from Apple Store - http://apps.apple.com/us/app/find-my-friends/id466122094
Part 1: Best Alternatives to Find My Friends App
Glympse

Glympse is amongst the most popular location Apps available on the Google Play Store. The central feature of this application is to quickly share your GPS location with family, friends, and employers. What makes this App unique from Find My Friends is that the recipient need not sign up to receive your real-time location. All they need is Internet connectivity.
This location sharing App also has a safety feature – all “Glympses” sending your whereabouts to your contacts, however, this automatically expires after a period of time. This means, accidentally you won’t end up broadcasting your location for hours. You can download the
Glympse App from Play Store for Free http://play.google.com/store/apps/details?id=com.glympse.android.glympse&hl=en_IN
Sygic Family Locator

Sygic is another top-rated application in the list of best alternatives to Oppo Find My Friends App for Android. This application is quite popular among moms those who want to keep abreast of their child’s whereabouts all the time.
Using this Oppo find friend App, you can see the real-time location of anyone in your family or friend circle. Sygic Family Locator App also has the in-built chat functionality that lets you contact all the other users like that of WhatsApp.
Most importantly, from a parent’s perspective, this app comes with an SOS button for guardians. When that button is pressed, this App will immediately locate your kid on the map. It’s a useful App to keep if your kid is prone to wander around on the streets or for family trips in large public spaces.
Further, the parents can easily add notifications when their kid reaches particular locations such as school or the guitar classes. And, not to mention, this family locator has the feature of setting up an unsafe zone, which means if your kid crosses that barrier, you’ll receive a notification.
Unlike the Glympse App, others must have this find my friends for Oppo and iPhone app installed on their smartphone to know their real-time whereabouts. You can download this Free application with in-App purchases from the
Google Play Store. http://play.google.com/store/apps/details?id=com.sygic.familywhere.android&hl=en_IN
GeoZilla


While, GeoZilla has all the features a typical location sharing has such as real-time tracking, geofencing, safety alerts, but it also compromises certain unique functionalities that help it to stand out in the crowd. This includes location-based errands, location history and sharing history.
You can easily set up a reminder when a friend or family member enters a specific area, such as a push notification telling them to pick-up French Fries when they are in proximity to a McDonald’s outlet.
With GeoZilla App, you have the freedom to keep an eye on the daily activities of the user you want to track via the location history. It’s also possible to easily check updates from Facebook so you’ll have a complete idea of what’s going on in the life of your kid or best pal.
This App is for free which you can download from the Google Play Store. http://play.google.com/store/apps/details?id=com.geozilla.family&hl=en_US
 Forex Robotron Gold Package
Part 2: The Find My Friends Lets You

- Find, chat and share your location on MapShare with your friends
- You can easily recommend and share updates on any news about a great restaurant opening or a store sale etc. for them to check out.
- Get Info on Eta, Exact Location, and directions for easy navigation.
- Supports 3D Touch
- You can use either your phone number or your email id to share exact location and can even invite your friends to share back.
- You can choose to share your location temporarily or permanently
- You can even hide your location to safeguard your privacy.
Requirements
Find My Friends Version 7.0 needs iOS 11 or later & iCloud. Create a free Apple ID to use with iCloud on your Mac, iPhone, iPod touch or iPad.
Here’s How to Set-Up Find My Friends App on Your iPhone Device
If your Oppo A59 5G or iPod using iOS via 12, the Find My Friends is already installed. On the other hand, if your Oppo A59 5G device is running on the iOS 8 version, then you can install this location tracker from the Apple Play Store for Free.
When you’ve signed in iCloud on your Oppo A59 5G device, you already have an ID on Find My Friends. You can also receive the Find My Friends notifications on your Apple watch, just need to do a little setting on the Apple Watch app on your Oppo A59 5G.
To track or share location with your friend or family member, make sure he/she has the Find My Friends App installed on their device.

3 Simple Steps
Step 1: Open the Find My Friends App
Step 2: There’s an Option Tab Add Click It
Step 3: Select a Friend or Enter His/her Email ID, then Tap Send/Done to Send the Request
Once your friend agrees to share his/her real-time location, you can see their current whereabouts in a list or on a map in this location sharing App or over iCloud.com.
 PDF application, powered by AI-based OCR, for unified workflows with both digital and scanned documents.
 Bonus Tip: What Do I Do If I Want to Fake a Location on Find My Friends?
Do you want to spoof your location so your friends can’t find you? For this purpose, you should use Wondershare Dr.Fone - Virtual Location to ensure privacy by spoofing location. With this tool, you can easily change location on your devices with just a blink of an eye. It can teleport your location and stimulate GPS movement with a route that you draw.
Thus, you can fake location with flexible GPS movement on the Find My Friends app. Moreover, with this location spoofer, you can fake your location on almost any app, such as Snapchat, Instagram, Tinder, and Find My iPhone. If you want to know more about this virtual location changer, delve into the details below.
Notable Features of Dr.Fone - Virtual Location
- This GPS location changer can spoof your location across apps to protect your privacy. You can even prank your friends on social media platforms and mock locations on dating apps.
- You can manually pick your favorite routes to access later in a single click. Besides, this software saves your visited location for quick re-selection and re-visit.
- It supports location spoofing on up to 5 iOS devices simultaneously on 1 PC/Mac. For this, you don’t need to jailbreak your Oppo A59 5G or face any other device complications.
Simplified Steps to Spoof Location on Find My Friends Using Dr.Fone - Virtual Location
While faking location across apps, you can move at different speeds, such as cycling, walking, or driving. As Dr.Fone - Virtual Location keeps you amazed, let’s learn how to use it to change location without hustle.
Step 1: Launch Dr.Fone and Set Up to Initiate the Process
Head to the main interface of Dr.Fone - Virtual Location by launching it on your Windows PC or MacBook. Connect your smartphone to the system and tap the “Get Started” button to proceed.

Step 2: Enable the Teleport Mode and Start Spoofing Your Location
Following this, confirm your actual location and move to activate the teleport mode. For this, move your cursor to the top right side and click the third icon of “Teleport Mode.” Now, set the location and hit the “Move Here” button so the system can start spoofing the location on the Find My Friends app.
 Allavsoft Batch Download Online Videos, Music Offline to MP4, MP3, MOV, etc format
Conclusion
Would you like to add an App to the above-mentioned list? Or want to share your first-hand experience with Find My Friends App? Have your say in the comment section of this blog post!
- Title: How to Send and Fake Live Location on Facebook Messenger Of your Oppo A59 5G | Dr.fone
- Author: Abigail
- Created at : 2024-07-24 18:43:18
- Updated at : 2024-07-25 18:43:18
- Link: https://location-social.techidaily.com/how-to-send-and-fake-live-location-on-facebook-messenger-of-your-oppo-a59-5g-drfone-by-drfone-virtual-android/
- License: This work is licensed under CC BY-NC-SA 4.0.