
In 2024, 4 Feasible Ways to Fake Location on Facebook For your Nokia C110 | Dr.fone
4 Feasible Ways to Fake Location on Facebook For your Nokia C110
There are many reasons to fake location on Facebook. For example, you may want to hide your ideal address and protect your safety. Also, you might want to change the Facebook location to get better search results for products, friends, groups, and so on. But whichever the case, creating a fake GPS on Facebook is relatively easy. So, in this post, I want to introduce you to several methods to spoof your Facebook location quickly and easily.
Method 1: Spoof Facebook Location on Computer
You can easily fake your Facebook location by spoofing the town or city in the profile settings. This way, anyone who views your profile bio will see your new Facebook location.
So, without wasting much time, here’s how to spoof Facebook location on PC:
Step 1. Launch the Facebook app on your web browser and tap your profile icon.
Step 2. Here, click Edit details under the Intro section. After that, you’ll land on the Posts window by default.
Step 3. Now tap the Pencil icon to change the current city/town. You can also change your hometown, relationship status, and when you joined Facebook.
Step 4. Finally, tap the Save button, and Facebook will automatically update your current location. To see if the changes have been applied, tap the About tab to see your new profile.

Note: Although you can successfully change your bio, Facebook will still access your actual location. Now this means your Facebook recommendations and adverts will still be based on your locality. So, keep reading to learn other reliable ways to spoof your Facebook location.

Method 2: Change Facebook Location on Android phone
Unlike the strict iPhones, Android allows you to install a third-party app to change the GPS location of your device and Facebook, to be precise. This means you don’t need to fork out some serious money for a VPN service. So, in this section, you’ll learn to fake a Facebook location on Android using the Fake GPS location app. It is a free program for teleporting your phone IP address to new places with a simple screen tap. Let’s see how to do that:
Step 1. Install and launch the Fake GPS location app on Android.
Step 2. Next, “allow mock locations” in your Android’s developer settings. To do that, open Settings >Additional Settings >Developer options. Then, click “Select mock location app“ before choosing Fake GPS.

Step 3. Now go to the Fake GPS location app and choose a new location for your device. If satisfied, tap Ok to save the added area you’d like your device to appear on.
Step 4. Finally, head to Facebook and change your location settings.

Method 3: Create A Fake Check-In Location on Facebook
Sometimes you might want to prank your Facebook friends with a new location announcement. In other words, you can make them believe that you’re in a particular location when in reality, you’re not. In that case, the Facebook Check-In feature will come in handy. It’s a simple but highly effective feature that adds your fake location to a Facebook post. Just think of it as a status update.
So, below is how to fake location on Facebook with the Check-In feature:
Step 1. Open Facebook on your favorite browser and tap the “What’s on your mind“ field.
Step 2. Next, tap the GPS icon. You’ll see all the locations near you. Or, key in a fake address and select it on the suggestions.

Step 3. Now write whatever is on your mind and add the location to your latest post. It’s that easy!

WPS Office Premium ( File Recovery, Photo Scanning, Convert PDF)–Yearly
Method 4: Fake Location for Facebook’s Nearby Friends via a Tool
While signing up on Facebook, you’ll be requested to allow the platform access to your actual GPS location. This will enable Facebook to correctly tailor adverts, friends, and other recommendations based on your location. But unfortunately, it can be challenging to change the actual location unless you’re willing to spend top dollar on a VPN service. Put, you’ll need to spoof your IP address to change the exact location.
For this reason, I recommend using a fake location tool like Dr.Fone - Virtual Location . It’s an all-in-one software that provides multiple solutions for your Nokia C110 or Android phone. It allows you to teleport your current location to anywhere in the world without jailbreaking your Nokia C110 or spending top dollar on a VPN service. This lets you take full advantage of the “Nearby Friends” Facebook feature that needs your actual GPS location.
Below are the key features:
- Transfer phone location to any place in the world.
- Intuitive and detailed zoom-in and zoom-out map.
- Compatible with all iOS and Android versions.
- Move to new locations on the map via different routes and means.
- Compatible with location-based apps like Telegram, Facebook, Twitter, etc.
Here is a video tutorial for you to learn and preview how to fake location on Facebook via Dr.Fone - Virtual Location
 safe & secure
Below is how to fake location on Facebook for Android and iPhone using Dr.Fone:
Step 1. Download and open Dr.Fone.

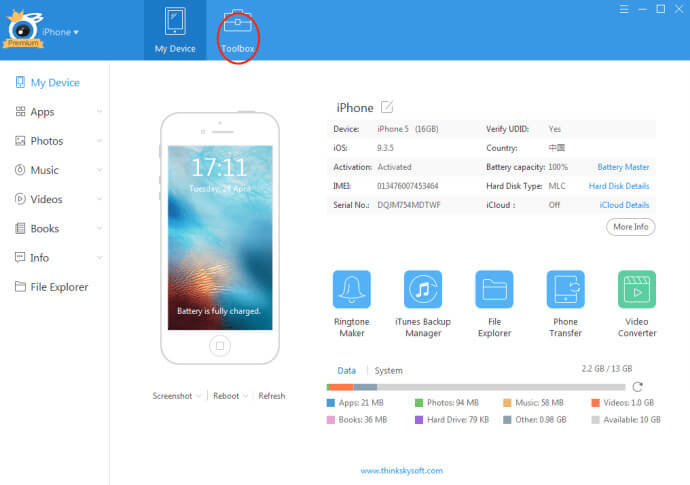
Install and run Dr.Fone on your Mac or Windows PC and then connect your phone to your computer using a USB cable. After that, select the file transfer option on your phone and then tap Virtual Location on Dr.Fone.
Step 2. Connect your phone to the software.

You’ll see a new Dr.Fone window, where you’ll click the Get Started button. Then, enable USB debugging on your phone before clicking Next.
Step 3. Choose a location and start moving.


The Virtual Location map will launch after successfully connecting your smartphone to Dr.Fone. Now enter and select a location you wish to move to and click Move Here. Alternatively, you can tap an area to move to on the map and choose whether to move by foot, bicycle, scooter, or car. Your iPhone and Android device will save your new location automatically.

Wrap it up
See, you don’t need an expensive VPN service to fake your GPS location on Facebook convincingly. With Dr.Fone, you can easily change your Nokia C110 or iPhone location, which will immediately reflect on apps like Facebook, Google Maps, Telegram, and so on. And guess what? There are a host of other phone management features to exploit. You should try it!
safe & secure
How To Leave a Life360 Group On Nokia C110 Without Anyone Knowing?
Do you keep asking yourself how do I leave a Life360 group? If so, you’re on the right page. In a world where connectivity is key, Life360 has emerged as a trusted family safety app. It provides a digital reach through its innovative location tracking “Circle.” However, sometimes, you might want to leave it without raising eyebrows.
Whether it’s a matter of privacy or a brief escape, the art of leaving a Life360 group unnoticed is subtle. The article will show you how to leave a Life360 Circle without anyone knowing. Read to learn more.


Part 1. How To Leave a Life360 Circle
Life360 has become a household name. It’s a digital haven for families to stay connected through its “Circle.” The Circle functions as a virtual space where family members’ locations are shared. While this can be beneficial, there are times when you wish to leave a Circle for personal reasons.
How To Leave a Life360 Circle You Created
The default method of leaving a Life360 Circle is straightforward but comes with a catch. All members within the Circle are notified when someone leaves. The notification serves as a built-in transparency feature. It keeps everyone aware of any changes in the group dynamics. Follow the steps on how to leave Circle in Life360 when you created it yourself:
- Step 1: Launch the Life360 app on your device and go to Settings. Tap on Circle Management and select the Circle you intend to exit.

- Step 2: Choose the option Leave Circle. If you were the admin, ensure that you designated a new admin before leaving. Apart from that, the process is straightforward. Follow the on-screen instructions.

How To Leave a Life360 Circle You’re a Part Of
Here’s how to leave a circle in Life360 that you’re a part of. Here are the detailed steps:
- Step 1: Open your Life360 on your smartphone. Log in if necessary. Tap the Circle Switcher located at the top of your screen. Choose the specific Circle you wish to exit. Afterward, access the Gear icon positioned in the upper left corner.

- Step 2: Choose Circle Management from the list. Tap on Leave Circle at the bottom of the screen. Confirm your decision by selecting Yes in the popup. You’ll no longer be associated with the Circle, and it won’t appear in your Circles list. If you wish to rejoin, you’ll need a new invitation from the Circle Admin.

Part 2. How To Leave a Life360 Circle Without Anyone Knowing
Leaving a Life360 Circle through the standard method may not align with your preference in certain scenarios. In such cases, there are many methods you can use to maintain your privacy without alerting fellow Circle members. Here are some strategic approaches:
Method 1: Using an App To Spoof Your Location
One of the most effective and safe ways to trick Life360 without triggering notifications is by using Wondershare Dr.Fone - Virtual Location. The tool offers a seamless solution for location spoofing with the following key features:
- **One-click location changer.**Change your location with one click.
- **Simulate GPS movement along your usual route.**Mimic your typical movements without being physically present.
- **Cross-platform compatibility.**Compatible with both iOS and Android devices.
- **Easy 3-step process.**Easy and intuitive steps for hassle-free location manipulation.
How To Spoof Your Life360 Circle Location Using Dr.Fone
Follow the steps below to learn how to leave a Life360 Circle without anyone knowing using Dr.Fone’s Virtual Location tool:
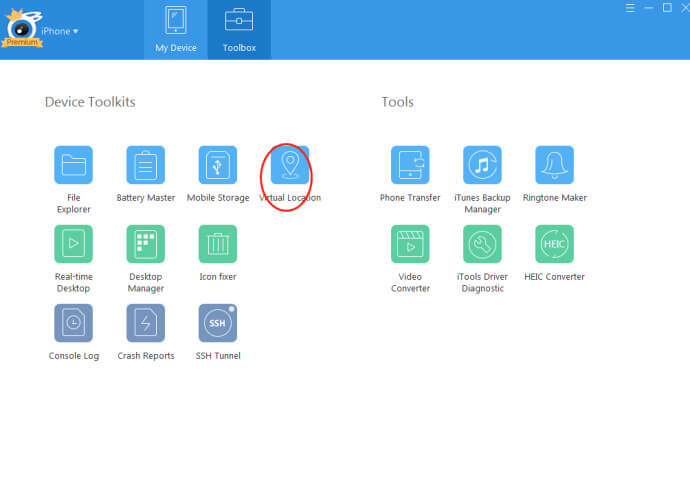
- Step 1: Download and install Dr.Fone, then connect your Nokia C110 via USB cable. Launch the tool from Toolbox > Virtual Location. Click Get Started to proceed.
- Step 2: Activate Developer Mode on your smartphone by following on-screen instructions in Settings > Privacy & Security > Developer Mode. Restart the Nokia C110 device, unlock it, and select Turn On. Enter your password.

- Step 3: On the map, enter the number of movements and select Round or Loop trip. Adjust the speed, then click Move Here to start the simulation. Pause or clear to revert.

- Step 4: To activate Teleport Mode, click the Search bar. Type a location and hit Enter. Click Move Here to change the smartphone location on the map. Verify on your smartphone’s maps application. Once done, you spoofed a Life360 circle without anyone knowing.


The next method can serve as a last resort if using Dr.Fone is impossible. Be aware that they come with the trade-off of notifying other Circle members. Maintaining open communication within the Circle is crucial. Do these alternatives only when it’s necessary for your privacy.
Method 2: Turning Off Mobile Data and Wi-Fi
If Dr.Fone is unavailable, a simple tactic is to disable both mobile data and Wi-Fi.
- Step 1: Open your device settings. Go to Connections or Network & Internet.
- Step 2: Disable both mobile data and Wi-Fi. Life360 will lose real-time tracking capability, but be cautious, as this may raise suspicion.
Method 3: Switching To Airplane Mode
Another option is to activate Airplane Mode, severing all connections, including location sharing. Again, this method may alert Circle members to your departure.
- Step 1: Access your device settings. Look for Connections or Network & Internet.

- Step 2: Toggle on Airplane Mode. The method severs all connections, including location sharing.
Method 4: Turning Off Your Nokia C110
A straightforward yet noticeable method involves turning off your device. While it suspends location tracking on Life360, frequent use may draw attention.
Method 5: Disabling Background App Refresh
In your device settings, disable Background App Refresh for Life360. Although this may impact location accuracy, it’s an option to consider if Dr.Fone isn’t accessible.
- Step 1: Go to your device Settings. Look for Apps or Application Manager.

- Step 2: Locate Life360 and disable Background App Refresh for the app. Alternatively, you can disable Background App Refresh as a whole.
Method 6: Enabling Battery Saving Mode
Switching to “Battery saving” or “Power saving” mode can affect the frequency of Life360 updates. While it offers a subtle way to limit location sharing, it may not provide foolproof privacy. Follow the steps:
- Step 1: Go to your device Settings. Look for the Battery option.

- Step 2: Enable Battery saving or Power saving mode.
Method 7: Getting a Burner Phone
Acquiring a secondary, inexpensive phone for Life360 use may be an alternative if all else fails. This method involves monetary considerations and may not be practical for everyone.
## Part 3. A Deep Dive on Life360’s Circle FeatureLife360’s Circle feature serves as the cornerstone of the app. It fosters connectivity and safety among its users. After diving into how to leave a Circle on Life360 in the above parts, it’s time to have a comprehensive look at essential aspects of the Circle feature:
Can You Remove Someone From a life360 Circle?
As the admin, you have the authority to remove someone from a Life360 Circle. The control ensures that you can manage the group dynamics and permissions.
How To Know if Someone Leaves the Circle?
Life360 notifies Circle members when someone leaves. The transparency feature aims to keep everyone informed about changes within the group.
 Nero Burning ROM:
The ultimate burning program for all your needs!
Can You Include Non-Family Members in a Circle?
While Life360 is designed for family safety, you can include non-family members in a Circle. The flexibility caters to scenarios where close friends or caregivers need to be part of the safety network.
Is Circle Place Alerts Really That Useful?
The Circle Place Alerts feature proves valuable for users. It allows predefined locations to trigger alerts when members enter or leave those areas. While useful for safety monitoring, its practicality may vary depending on individual preferences and needs.
### What if People in the Circle Feel Micromanaged?Knowing the feeling of being micromanaged, especially among kids and teens, Life360 introduces the Bubble feature. The Bubble feature allows users to set a custom safety zone. It balances monitoring and granting a sense of autonomy within a designated area.
 Project Manager - Asset Browser for 3Ds Max
Conclusion
Leaving a Life360 Circle can be achieved through the standard method. However, it alerts other members, which can be annoying. While alternative methods exist, they often trigger notifications. If you want to know how to leave a Life360 circle without anyone knowing, Dr.Fone is recommended as the optimal tool.
The platform is proficient in location spoofing without alerting the Circle. Whether addressing privacy concerns or aiming for a quick escape, Dr.Fone proves its worth. It’s the preferred choice if you google the question, “How do I leave a life360 group online.” Ensure a seamless alone time without notifying other members.

How to Fake Snapchat Location without Jailbreak On Nokia C110
Snapchat users are very fond of using custom filters when sharing content on the app. It is a great way to ensure that your images and videos are only viewed by the people that you target. However, a new feature called Geo-filters has brought a lot of mixed feelings amongst Snachatters.
The filter is location-based, which makes any content that you share to be seen by people who are within your geographic fence.
Imagine that you are standing at the Niagara Falls and want to share with people who are in Europe; you will not be able to do this and this is why the filters are problematic to people in the Snapchat community.
Thankfully, there are ways in which you can spoof our device, allowing you to access Geofilters anywhere in the world. Today, you learn several ways in which you can achieve this objective with ease.
Part 1: Benefits that faking Snapchat brings to us
Snapchat comes with a lot of filters, both sponsored and crowdsourced, which you can use to interact with different people. When Geofilters was introduced, it meant that you could only access filters that were designed for specific locations.
Sponsored filters generally tend to target people in certain areas, and this can limit how you disseminate your content on Snapchat.
The main benefit that you get from faking Snapchat is getting access to these filters without even moving an inch.
When you spoof your device, Snapchat thinks that you are actually in the area that you have spoofed to. This virtual location will then allow you to access the filters that are available in that area.
Part 2: A free but complicated way to fake Snapchat location no jailbreak
One of the best ways to fake Snapchat without jailbreak is to use XCode. This is an app on your Nokia C110 that allows you to tweak certain aspects of the apps that you have on your device, including Snapchat.
Get XCode on your device and then launch it. Start by using the locations that are found to setup XCode. You can download XCode from Apple App Store. You will need your Apple ID and password to use XCode.

Here are the steps that you have to follow:
Step 1: Start by creating a basic single-view application
Launch XCode and then create a new project
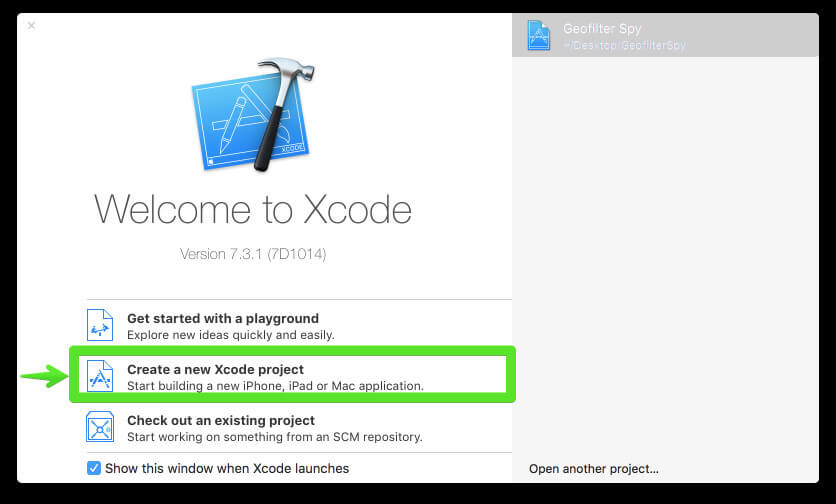
Then choose the option marked “Single View iOS application.

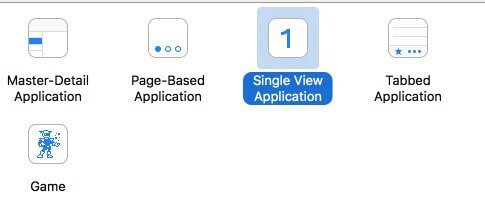
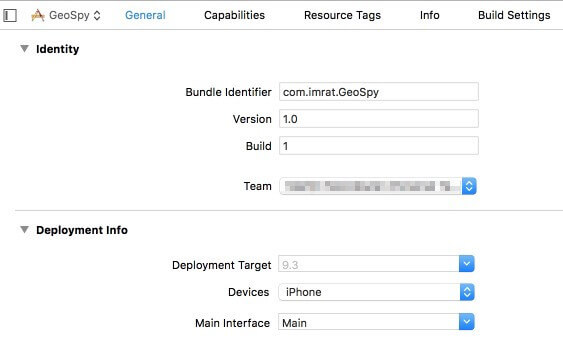
Now customize the project options and give it any name that you desire.

Now proceed and customize the Organization Name and the Identifier. The identifier works like a reverse domain name so you can use anything you desire.
Proceed and select swift as your preferred language and then click on “iPhone” as your device so the app will be small.
Any other options below this should be left in their default states.
Now go ahead and save the project to a location on your computer. Since the version control does not apply in this case, make sure that you uncheck the option before you save the app.
 PCDJ Karaoki is the complete professional karaoke software designed for KJs and karaoke venues. Karaoki includes an advanced automatic singer rotation list with singer history, key control, news ticker, next singers screen, a song book exporter and printer, a jukebox background music player and many other features designed so you can host karaoke shows faster and easier!
Step 2: transfer and run the created app on your iOS device
People who do not have the latest version of XCode will run into the error shown below.
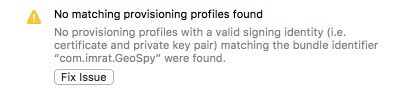
IMPORTANT: do NOT click on “Fix Issue” until you do the following tasks:
- Access the preferences on your XCode
- Choose the accounts tab
- Click on the add (+) icon at the bottom left side of your screen
- Now choose “Add Apple ID”.
- Type in your Apple ID and password
You should now have an accounts screen similar to the one shown in the image below.

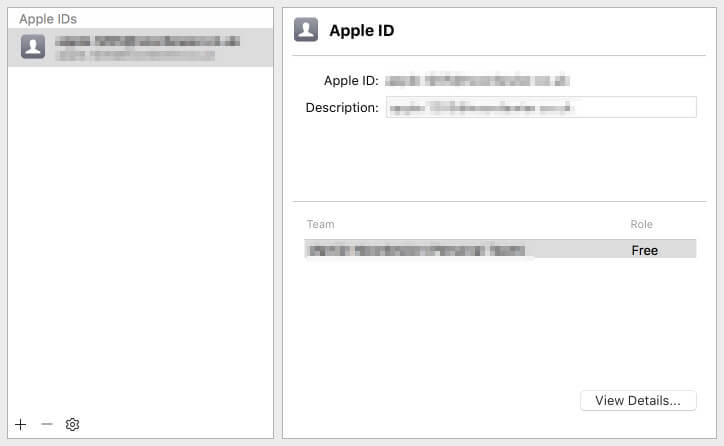
Now close the window and click on the “team” dropdown menu. You may now select the Apple ID that you just created.
Now you can go ahead and click on the “Fix Issue” button.
Now the error will be resolved and you should have a screen that is similar to the image below.
You may now run the app that you created before on your iOS device.
Use an original USB cable to connect the iOS device to your computer.
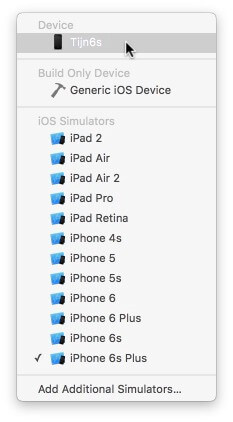
Towards the top right-hand corner of your screen, click on the button that is displaying your project name and then click on the iOS device.

Now your iOS device will be showing at the top. Select it and proceed.
 NeoDownloader - Fast and fully automatic image/video/music downloader.
Hit the “Play” icon that is found at the top left side of your screen.
Wait for the process to be complete. You might as well get a cup of coffee as this can take quite a while.


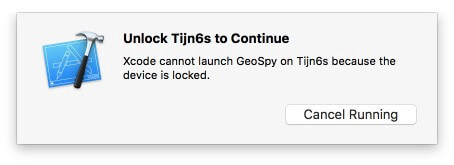
When the process is complete, XCode will install the app on your iOS device. You will get the following error if your device has not been unlocked; unlocking the iOS device will put off the error message.
 Glary Utilities PRO - Premium all-in-one utility to clean, speed up, maintain and protect your PC
Now you should be viewing a blank screen on your iOS device. Do not worry; your device has not been ruined. This is the app that you have just created and installed. Pressing the “Home” button will dismiss the blank screen.
Step 3: It’s time to spoof your location
Go to Google Maps or iOS maps which will now show your current location.
Go to XCode and then choose “Simulate Location” from the “Debug” menu and then select a different location to test.
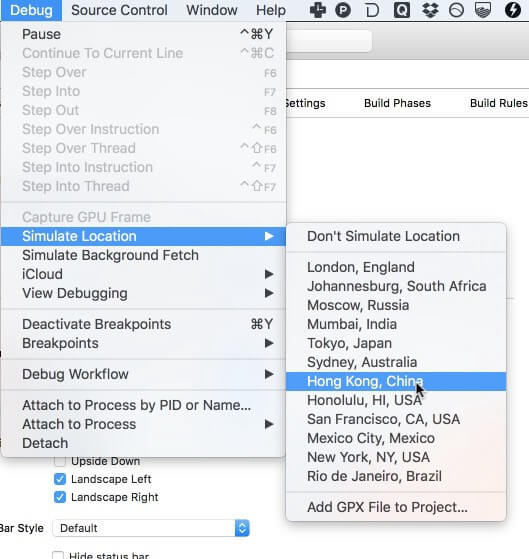
If you have done all that you need to do, then the location of your iOS device should instantly jump to the location that you have chosen.
Now you can proceed and see if you have access to Geo-filters in the new location.
Step 4: Spy Geo-Filters on Snapchat
Now you can launch Snapchat and then access the filters in the area that you have teleported to. Remember that you can move from one location to the next on XCode without having to close Snapchat. Just cancel the current snap after changing the location and create a new snap to see the filters in the new location. If this fails to respond, then go back to Google maps or iOS map app and then ensure that you are in the desired location. Once you have done so, close Snapchat and restart it again, and you will be in the new location once more.
Part 3: A paid but easy way to fake Snapchat location without jailbreak
You can also fake your Snapchat GPS location using a premium app such as iTools. This is a popular application, used to spoof many other apps that require geo-location data to work. Another point to note is that the latest iPhone models cannot be jailbroken. The iOS version today is very secure and you cannot tweak it like before.
Thankfully, you can use a premium, not free, iTools to change your virtual location without jailbreaking the Nokia C110 device. You can get iTools on a trial basis, but after the period expires, you will have to pay $30.95 to continue using it.
Step 1: Download and install iTools on your computer and then launch it. Connect your iOS device to your computer using the original USB cable that came with the Nokia C110 device.
Step 2: Go to the iTools panel and click on “toolbox”.
Step 3: Select the Virtual Location button within the Toolbox Panel
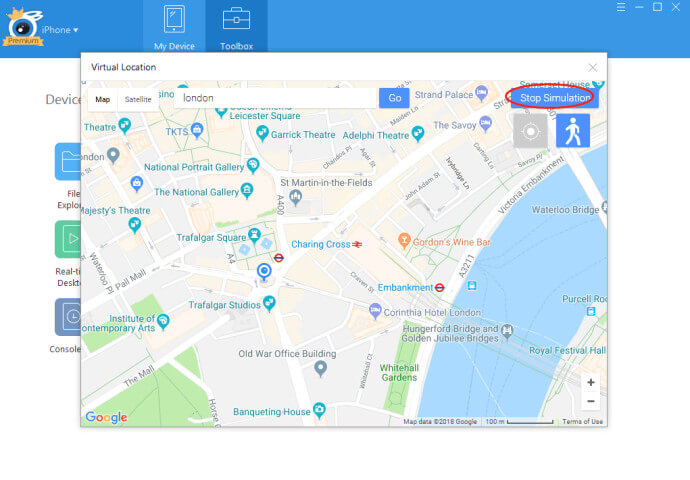
Step 4: Type in the location that you want to teleport to and then click on ‘Move Here”.
 SwifDoo PDF 2-Year Plan
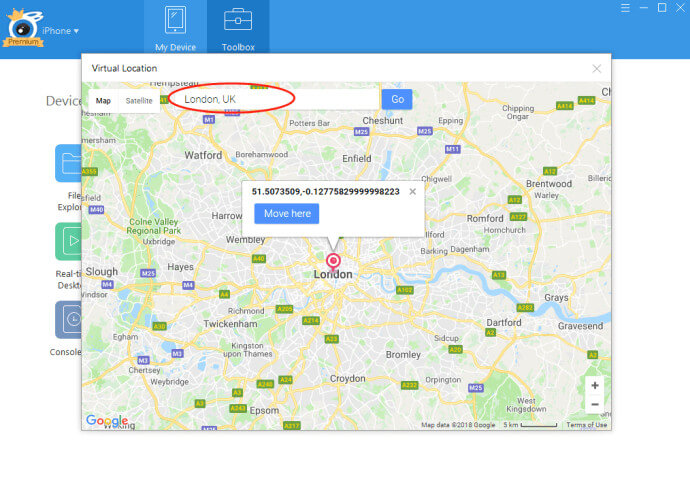
Step 5: Now open your Snapchat and you will be able to access the filters found in the location that you typed in.
Once you are finished with this spoofed location, you can simply select “Stop Simulation” in iTools. This is a premium tool, but very simple to use. It is the best tool to use, especially if you are having a device with the latest iOS version.

Part 4: A brief comparison of XCode vs. iTools to fake Snapchat GPS location
From the steps used in both methods, it is very clear that iTools is the best app to use to fake your Snapchat GPS location for several reasons. Here are some of them:
- Ease of use - Using XCode to fake your Snapchat GPS location is a long and complicated process, whereas using iTools is simple and clean.
- Price – Although XCode is free while iTools is not, the benefits of using iTools surpass the cost. This makes it less-costly when it comes to performance and convenience.
- Security – XCode may not be very secure, especially when it comes to avoiding detection by Snapchat. You may have to keep going back to XCode, and changing the location, switching off Snapchat, and restating it again. However, when using iTools, your location is fixed until you stop the simulation.
- Versatility – XCode cannot be used on the latest iOS devices without posing problems, while iTools is a simple and effective tool for all iOS versions.
In conclusion
When you want to spoof Snapchat to access Geo-Filters in any part of the world, you can use the complicated XCode or pay a fee and use the simpler iTools. There are various benefits that you gain from teleporting using these tools, with Geo-Filters access being the biggest benefit. If you want to use Snapchat all over the world without moving out of your home, then these are the ways that you can go about it.
- Title: In 2024, 4 Feasible Ways to Fake Location on Facebook For your Nokia C110 | Dr.fone
- Author: Abigail
- Created at : 2024-07-24 17:54:01
- Updated at : 2024-07-25 17:54:01
- Link: https://location-social.techidaily.com/in-2024-4-feasible-ways-to-fake-location-on-facebook-for-your-nokia-c110-drfone-by-drfone-virtual-android/
- License: This work is licensed under CC BY-NC-SA 4.0.