
In 2024, 4 Feasible Ways to Fake Location on Facebook For your Realme 12 5G | Dr.fone
4 Feasible Ways to Fake Location on Facebook For your Realme 12 5G
There are many reasons to fake location on Facebook. For example, you may want to hide your ideal address and protect your safety. Also, you might want to change the Facebook location to get better search results for products, friends, groups, and so on. But whichever the case, creating a fake GPS on Facebook is relatively easy. So, in this post, I want to introduce you to several methods to spoof your Facebook location quickly and easily.
Method 1: Spoof Facebook Location on Computer
You can easily fake your Facebook location by spoofing the town or city in the profile settings. This way, anyone who views your profile bio will see your new Facebook location.
So, without wasting much time, here’s how to spoof Facebook location on PC:
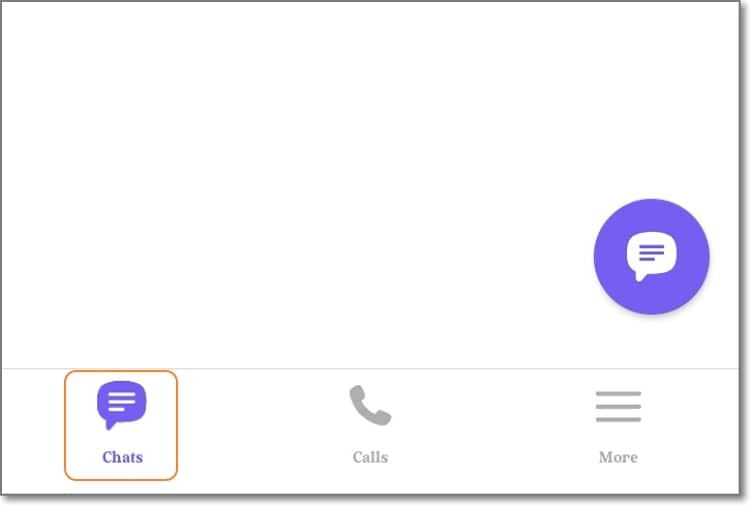
Step 1. Launch the Facebook app on your web browser and tap your profile icon.
Step 2. Here, click Edit details under the Intro section. After that, you’ll land on the Posts window by default.
Step 3. Now tap the Pencil icon to change the current city/town. You can also change your hometown, relationship status, and when you joined Facebook.
Step 4. Finally, tap the Save button, and Facebook will automatically update your current location. To see if the changes have been applied, tap the About tab to see your new profile.

Note: Although you can successfully change your bio, Facebook will still access your actual location. Now this means your Facebook recommendations and adverts will still be based on your locality. So, keep reading to learn other reliable ways to spoof your Facebook location.
Method 2: Change Facebook Location on Android phone
Unlike the strict iPhones, Android allows you to install a third-party app to change the GPS location of your device and Facebook, to be precise. This means you don’t need to fork out some serious money for a VPN service. So, in this section, you’ll learn to fake a Facebook location on Android using the Fake GPS location app. It is a free program for teleporting your phone IP address to new places with a simple screen tap. Let’s see how to do that:
Step 1. Install and launch the Fake GPS location app on Android.
Step 2. Next, “allow mock locations” in your Android’s developer settings. To do that, open Settings >Additional Settings >Developer options. Then, click “Select mock location app“ before choosing Fake GPS.

Step 3. Now go to the Fake GPS location app and choose a new location for your device. If satisfied, tap Ok to save the added area you’d like your device to appear on.
Step 4. Finally, head to Facebook and change your location settings.
Method 3: Create A Fake Check-In Location on Facebook
Sometimes you might want to prank your Facebook friends with a new location announcement. In other words, you can make them believe that you’re in a particular location when in reality, you’re not. In that case, the Facebook Check-In feature will come in handy. It’s a simple but highly effective feature that adds your fake location to a Facebook post. Just think of it as a status update.
So, below is how to fake location on Facebook with the Check-In feature:
Step 1. Open Facebook on your favorite browser and tap the “What’s on your mind“ field.
Step 2. Next, tap the GPS icon. You’ll see all the locations near you. Or, key in a fake address and select it on the suggestions.

Step 3. Now write whatever is on your mind and add the location to your latest post. It’s that easy!
Method 4: Fake Location for Facebook’s Nearby Friends via a Tool
While signing up on Facebook, you’ll be requested to allow the platform access to your actual GPS location. This will enable Facebook to correctly tailor adverts, friends, and other recommendations based on your location. But unfortunately, it can be challenging to change the actual location unless you’re willing to spend top dollar on a VPN service. Put, you’ll need to spoof your IP address to change the exact location.
For this reason, I recommend using a fake location tool like Dr.Fone - Virtual Location . It’s an all-in-one software that provides multiple solutions for your Realme 12 5G or Android phone. It allows you to teleport your current location to anywhere in the world without jailbreaking your Realme 12 5G or spending top dollar on a VPN service. This lets you take full advantage of the “Nearby Friends” Facebook feature that needs your actual GPS location.
Below are the key features:
- Transfer phone location to any place in the world.
- Intuitive and detailed zoom-in and zoom-out map.
- Compatible with all iOS and Android versions.
- Move to new locations on the map via different routes and means.
- Compatible with location-based apps like Telegram, Facebook, Twitter, etc.
Here is a video tutorial for you to learn and preview how to fake location on Facebook via Dr.Fone - Virtual Location
 safe & secure
Below is how to fake location on Facebook for Android and iPhone using Dr.Fone:
Step 1. Download and open Dr.Fone.

Install and run Dr.Fone on your Mac or Windows PC and then connect your phone to your computer using a USB cable. After that, select the file transfer option on your phone and then tap Virtual Location on Dr.Fone.
Step 2. Connect your phone to the software.

You’ll see a new Dr.Fone window, where you’ll click the Get Started button. Then, enable USB debugging on your phone before clicking Next.
Step 3. Choose a location and start moving.

The Virtual Location map will launch after successfully connecting your smartphone to Dr.Fone. Now enter and select a location you wish to move to and click Move Here. Alternatively, you can tap an area to move to on the map and choose whether to move by foot, bicycle, scooter, or car. Your iPhone and Android device will save your new location automatically.

Wrap it up
See, you don’t need an expensive VPN service to fake your GPS location on Facebook convincingly. With Dr.Fone, you can easily change your Realme 12 5G or iPhone location, which will immediately reflect on apps like Facebook, Google Maps, Telegram, and so on. And guess what? There are a host of other phone management features to exploit. You should try it!
safe & secure
Why Your WhatsApp Location is Not Updating and How to Fix On Realme 12 5G
WhatsApp is a free messaging app owned by Meta, initially Facebook. Currently, this platform boasts over two billion active users, even outshining Messenger and WeChat. One of the reasons WhatsApp is popular is letting users share their live location with individuals and group chats. However, sometimes you may experience the annoying WhatsApp location not updating issue. Luckily, this article has a solution to this problem. We’ll also address how to share my location on the WhatsApp issue. Let’s learn!
Part 1: Why is WhatsApp Live Location Not Updating?
First and foremost, let’s discuss some of the reasons why your WhatsApp live location is not updating on Android or iPhone. Below are some of them:
1. Weak internet connection
You should be conversant with the idea that WhatsApp can’t function without the internet. In other words, you can’t send or receive messages and calls without strong internet. And the same applies to updating your live location.
2. Disabled location feature
Here’s another reason why WhatsApp live location is not updating on iPhone or Android. While signing up, WhatsApp will request to access your phone’s GPS location. Therefore, disabling this feature by mistake can prevent WhatsApp from updating your location.
3. Inappropriate time and date
Although uncommon with modern phones, this can be another reason for a wrong live location on WhatsApp. Therefore, connect your phone to the internet to update your date and time. You might also want to restart your phone and see if it works.
Part 2. How to Fix WhatsApp Live Location Not Updating Problem?
Now that you already know why WhatsApp’s live location isn’t updating, it’s time to check out the solutions. Let’s go!
Step 1. Restart internet connection
Sometimes, it only takes a simple phone restart to get things back on track. Of course, this will also sort out any bugs in your WhatsApp app. Another thing, you can enable and disable “flight mode” to restart your data connection.
Step 2. Update the app and phone
When last did you update your system and apps? You should constantly update your apps and phone system to enjoy better performance and security. It is straightforward!
Step 3. Enable location service
You can also check if your location service is enabled on iPhone or Android settings. On iPhone, click Settings > Privacy > Location Service. It’s even easier on Android. Swipe down your screen, long-press the GPS button, and enable the Location toggle.
Step 4. Reset location service on iPhone
iPhone users can try to reset the Location & Service settings. To do that, open Settings > General > Reset > Reset Location & Privacy.
Step 5. Uninstall and reinstall WhatsApp
If all else fails, then it’s probably time to get handy. Simply uninstall your WhatsApp app and then get a newer version on Play Store or App Store. But often, this won’t be necessary after updating the app.
Part 3: [WhatsApp Tip] Fake WhatsApp Live Location with Unreal Accuracy
There have been multiple security concerns about WhatsApp before. But while the jury is still out, do yourself a favor and protect your live location from spyware and other users. Also, you might want to spoof WhatsApp location for business purposes and prank friends.
That said, learning to fake location on WhatsApp is super simple with Dr.Fone - Virtual Location . With this GPS app, you can teleport your WhatsApp live location to anywhere in the world. And to make your new location more believable, this program lets you simulate movements by foot, scooter, or car. Remember, it works with all iPhone/Android versions and other social media apps like Pokemon Go , Snapchat , Instagram , Facebook , etc.
Dr.Fone - Virtual Location
1-Click Location Changer for both iOS and Android
- Teleport GPS location to anywhere with one click.
- Simulate GPS movement along a route as you draw.
- Joystick to simulate GPS movement flexibly.
- Compatible with both iOS and Android systems.
- Work with location-based apps, like Pokemon Go , Snapchat , Instagram , Facebook , etc.
3981454 people have downloaded it
Below is how to spoof WhatsApp live location with Dr.Fone:
Step 1. Open the Virtual Location tool.
Install and launch Dr.Fone on PC, and then connect your phone to the PC with a USB firewire. Then, tap the Virtual Location button on the home page and click Get Started on the pop-up window.
Step 2. Connect your phone to Dr.Fone.
To connect your phone to this all-in-one software, enable “transfer files” instead of “charging” on your phone. Then, enable USB debugging under the settings tab. On Android, just click Settings >Additional Settings > Developer options > USB debugging.
Step 3. Choose a new WhatsApp live location to share.
After USB debugging is on, tap Next and enter the new location on the search field at the top-left corner. Now choose the area and tap Move Here. Interestingly, you can choose a movement route and customize the speed. And there is that!

Part 4. How to Send Live Location on WhatsApp?
Back in 2017, WhatsApp rolled out a brand-new feature that allows users to send their live location to family and friends. This location can come in handy if you want to meet up somewhere or let your friends and family know you’re safe and secure. And lest I forget, you can also use it to prank your friends.
Note, however, that WhatsApp only allows you to share your real-time location for 8 hours, 1 hour, or 15 minutes. In other words, this gives you control over how long users can see you on the map. Moreover, this information can’t be shared with anyone once you stop sharing.
So without wasting time, here’s how to send live location on WhatsApp for Android or iPhone:
Step 1. Enable the GPS service on your phone by clicking the GPS button on the control panel.
Step 2. Open WhatsApp and tap the group chat or individual chat with which you want to share the location.
Step 3. Now click the Attach button on the text field and click Location.

Step 3. Allow WhatsApp access to your device’s location and then press the Share Live Location button.

Step 3. Last but not least, set the duration your contact will view your location, add a comment, and tap the Send button. That’s it!
Note: As you can see, WhatsApp relies on your GPS location to share your actual location. So, use Wondershare Dr.Fone to change your device’s location and then share it on WhatsApp.
Part 5: How to Fix Common WhatsApp Issues on Android & iPhone
Wondershare Dr.Fone is the perfect tool to handle all your WhatsApp issues. Below are some common issues it can help you with:
- Lost Messages
Sometimes you might accidentally or intentionally delete WhatsApp chats or messages. Fortunately, Dr.Fone can help you dig out and recover those messages with a simple click. Just launch the Data Recovery tool, connect your phone to the software, and Dr.Fone will scan for all lost and current messages.
- Transfer WhatsApp data
Thanks to the fast-paced mobile technology, it’s inevitable to migrate to a new phone. But you’ll have to sacrifice all your WhatsApp data. Luckily, Dr.Fone allows you to backup, restore, and transfer all WhatsApp data.
- Backup WhatsApp Business chats
Having a WhatsApp Business account is vital if you’re an online marketer. Here, you can create a business profile and enjoy quick replies, automatic messaging, accurate statistics, etc. So, to avoid losing your invoices and other business chats, use Dr.Fone to back up and transfer your WhatsApp Business chats to a new phone.
Wrap it Up
See, there’s nothing complex about the WhatsApp live location not updating issue. Just update and restart the app or check your location settings if it’s enabled. And, of course, use Dr.Fone to share a fake location on WhatsApp and perform other WhatsApp tasks like backing up and transferring data. Thank me later!
How to Change/Fake Your Realme 12 5G Location on Viber
Viber is one of the most commonly used messenger apps. It allows you to send short messages like texts, videos, images, audio, and documents. Viber also has another exciting feature that will enable you to share your location. But sometimes, you might want to change location on Viber to prank your friends or for security purposes. So, read on to learn how to fake location on Viber with some simple solutions.
Part 1: What is the My Location feature on Viber?
If you’ve used WhatsApp’s location feature before, you’ll know what Viber’s “My Location” is all about. With this feature, you can share your live location for whatever reasons you may have. For example, you may want to share your live location with your kids or vice-versa. Or, you might simply want to share a fake location on Viber with your nosy friends.
But as good as it sounds, this live location feature is enabled by default on your Realme 12 5G/Android browser. Therefore, you can send a location on Viber without knowing. This can be advantageous to stalkers or even cause misunderstanding in your relationship. What’s worse, it shares your actual location with every text you send. But fret not because this post will help you disable or enable My Location on Viber according to your needs.
Part 2: How to disable or enable My Location on Viber?
So, without wasting too much time, let’s find out the steps to disable/enable Viber location-sharing feature. It’s straightforward.
Step 1. Fire up your Viber app on mobile or PC and tap the Chats button. Here, proceed to open a chat that you want to enable/disable location sharing.
Step 2. Next, tap the Ellipsis (three dots) icon at the top-right corner of the screen and choose Chat Info. Alternatively, simply swipe the screen to the left.
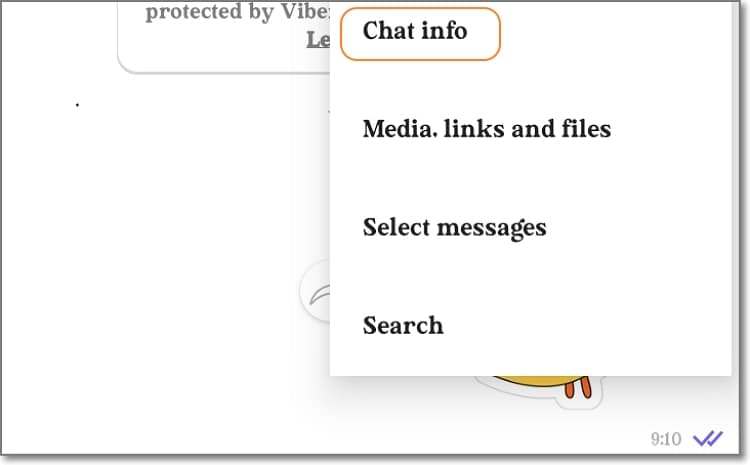
Step 3. On the Chat Info window, simply enable or disable the Attach location always toggle. It’s done!

Pro tip: You might be wondering how to share your actual Viber location with a chat or group. Again, this is very straightforward. Simply open the conversation and tap the three dots on the text field. Then, click the Share Location button and choose your location on the Google map. Lastly, tap Send location to share the Viber location with your selected contact.

Part 3: Can I send a fake location on Viber, and How?
So, is it possible to Viber’s fake location? Unfortunately, Viber doesn’t allow users to share a different place from the real one. That’s because the app asks to automatically access your actual location data using Wi-Fi or GPS while signing up. Therefore, based on the permission you set yourself, the answer is NO.
But nothing is impossible in the tech world. You can easily instruct Viber to share a different location using a third-party app or service like Dr.Fone - Virtual Location . With this professional GPS tool, you teleport your Viber location to anywhere in the world with a simple mouse click.
It’s compatible with Android/iOS devices and boasts a simple-to-understand map. Interestingly, you can walk or drive to your new location and even stop between destinations to make it more believable. It’s nothing complex!
You can check out the this video for further instruction.
Key features of Dr.Fone - Virtual Location:
- Compatible with all Android and iOS versions.
- Teleport Viber location to anywhere in the world.
- Walk or drive to your new Viber location.
- Simulate Viber movements with custom speed.
- Works with Pokemon Go , Facebook, Instagram , Snapchat , Viber, etc.
Steps to change Viber location with Dr.Fone:
Step 1. Launch Dr.Fone Virtual Location.
Install and run Wondershare Dr.Fone on your Windows/Mac computer, and then tap the Virtual Location tab on the Home page.
Step 2. Connect your phone to Dr.Fone with a USB cable.
Connect your smartphone to your PC using a USB wire and tap Get Started on the new Dr.Fone pop-up window. Remember to enable the “File Transfer” option on your smartphone instead of “Charging.”
Step 3. Link your phone to Dr.Fone via USB debugging
Press the Next button to begin connecting your phone to Dr.Fone. If the connection fails, enable USB debugging on your phone by following the on-screen instructions. On Android phones, tap Settings > Additional settings > Developer options > USB debugging. In addition, set Dr.Fone as the mock location app on your phone.
Step 4. Enter the GPS coordinates or location address.
If the connection is successful, the Virtual Location map will launch automatically on Dr.Fone. Now enter the coordinates or address in the location field at the top-left corner. After finding the exact location that you want, simply tap Move Here before sharing your new location on Viber. That is easy, right?
Dr.Fone - Virtual Location
1-Click Location Changer for both iOS and Android
- Teleport from one location to another across the world from the comfort of your home.
- With just a few selections on your computer, you can make members of your circle believe you’re anywhere you want.
- Stimulate and imitate movement and set the speed and stops you take along the way.
- Compatible with both iOS and Android systems.
- Work with location-based apps, like Pokemon Go , Snapchat , Instagram , Facebook , etc.
3981454 people have downloaded it
Part 4: Why send fake location on Viber?
Now that you know how to spoof location on Viber. Let’s discuss some reasons to spoof location on this messaging app. Below are some common ones:
- Protect your privacy
Many people don’t want other online users to have a clue of their actual whereabouts. If you’re one of them, use a third-party tool to spoof your Viber location on your Realme 12 5G or Android.
- Prank your friends
Do you want to show your friends that you’re in London or New York when you’re in some remote village/town somewhere in reality? Yes, that sounds cool!
- Improve sales
If you’re a digital marketer, you might want to convince your potential clients that the goods are from a specific region or city close to them. Believe it or not, this can lead to more sales closures.
Wrap it Up
You can share your live location on Viber just like you would on Facebook, WhatsApp, and other social media apps. But because most of these apps don’t allow you to share fake locations, I recommend Dr.Fone - Virtual Location change your area to anywhere in the world. Give it a try!
Also read:
- [New] SplitCam Review Does It Reign Supreme in Video Tech, In 2024
- [Updated] In 2024, YouTube Footage Enhancement Without Borders
- 11 Best Location Changers for Honor X50 GT | Dr.fone
- Cómo Capturar La Pantalla Con OBS Studio: Una Guía Detallada Para El Rendimiento Óptimo - Tutoriales De Movavi
- Connect With Snapchat Representative For User Support Needs
- Discovering FFmpeg's Potency in Original Sound Format Retention
- How To Bypass iCloud By Checkra1n Even On Apple iPhone SE (2022) If Youve Tried Everything
- In 2024, Does find my friends work on Poco M6 5G | Dr.fone
- In 2024, How to Change GPS Location on Poco M6 5G Easily & Safely | Dr.fone
- In 2024, How to Detect and Stop mSpy from Spying on Your Poco M6 5G | Dr.fone
- In 2024, How To Leave a Life360 Group On Poco M6 5G Without Anyone Knowing? | Dr.fone
- In 2024, How To Pause Life360 Location Sharing For Poco M6 5G | Dr.fone
- In 2024, Set Your Preferred Job Location on LinkedIn App of your Poco M6 5G | Dr.fone
- In 2024, Why Your WhatsApp Live Location is Not Updating and How to Fix on your Poco M6 5G | Dr.fone
- In 2024, Why Your WhatsApp Location is Not Updating and How to Fix On Poco M6 5G | Dr.fone
- Life360 Learn How Everything Works On Infinix Zero 5G 2023 Turbo | Dr.fone
- Premium Drones, Best Deals Today for 2024
- Title: In 2024, 4 Feasible Ways to Fake Location on Facebook For your Realme 12 5G | Dr.fone
- Author: Abigail
- Created at : 2024-12-25 00:55:20
- Updated at : 2024-12-29 04:08:04
- Link: https://location-social.techidaily.com/in-2024-4-feasible-ways-to-fake-location-on-facebook-for-your-realme-12-5g-drfone-by-drfone-virtual-android/
- License: This work is licensed under CC BY-NC-SA 4.0.