
In 2024, Does find my friends work on Nokia G310 | Dr.fone
Does find my friends work on Nokia G310
Find my friends app is becoming a norm for most people. The Smartphone and app developers are now aware of this. As a result, most Smartphone platforms are adding tools that allow users to share their whereabouts with others. Apple has its native Find my friends for their iPhone. The app works great for a group of iOS users, but you may need to share location with Android devices, which the built-in app can’t help you with. When you want to use the “find friends” app, they certainly need to add people from Android and iPhone users. And, you can’t dictate what people are choosing as their smartphone platform. While some prefer Android, many of us are dedicated to the iPhone too. Therefore, if you need to keep track of the real-time location of your family members or friends, you need the assistance of a third-party tool. These apps are the most logical way to create a link to find my friends app for Android and iPhone.
Part1: How to track friends using iPhone or Android
1.1 Tracking Friends using iPhone
As an Apple user, you might already know about the “Find my friends” app on your device. It is the most convenient way to share your location with your friends. You can also keep track of your peers with it. If you ever feel lost in a new area, you can use this app to notify your friends. You can use this app to create a route for all to meet in a selected location. If your friends are heading toward the destination, the app will notify you.
Let’s see how one can use the “find my friends” on the iPhone, shall we?
1.1.1 You will find the “Find Friend” on your Home screen. In IOS 13, you will have to launch the “Find MY” app.


1.1.2 Tap “Add Friends.”
1.1.3 Add a contact name from your list. You can add several contacts here.
1.1.4 Tap Send.

1.1.5 Now select a time option.
If you want to share your location, launch the app first. Then Tap “Me.” Then, keep your “Share My Location” switched on.

1.2 Tracking Friends Using Android
Android users can also use this find my friends app. Even if someone in your group does not use a smartphone (seriously?), you can track them. You can send an invite, and if they agree, you can find your friend anytime. Remember, iPhone or Android, whatever the platform, all the members of the group have to agree with location sharing; otherwise, you cannot track them.
You can use find my friends from iPhone to an android user via Google Maps. You need to download the app and activate location service by taping “Allow While Using App” Then you have to select” “Share your location” You can then send your location to your android user friend from the message icon of the Google map.

 WonderFox DVD Ripper Pro
Part2: 3 best find my friends apps compatible both Android and iPhone
You have the preliminary idea of how one can find their friends using an iPhone or Android. But, how to keep track of all of your friends, while some of them are die-hard apple fanatics and others are android geeks? Well, you do not need to tell others about those anymore, as we are going to talk about three fabulous cross-platform apps for finding friends.
2.1 Find my friends
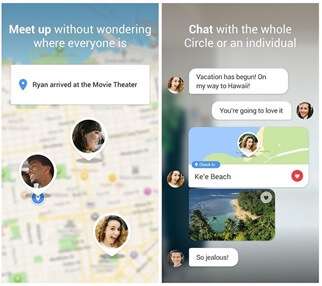
This app is straightforward and pretty simple to use. You can look at the map and find your friends at any time. Your friends also can keep track of you. SO, if security is your concern,” “Find my friend” is perfect for you. You can also chat with friends while they are on route.
You can also issue an alert to your friends whenever you are in an emergency. All your loved ones will get the address details, current time, and the remaining battery life. If your group has a mix of Android, iOS, and Blackberry, this app is excellent for you.

2.2 Familo
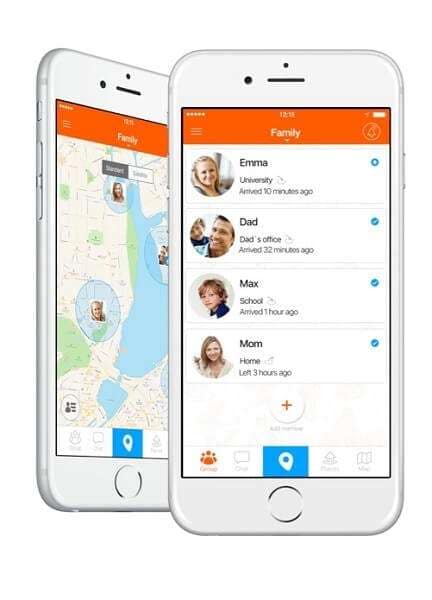
Familo is the best working “finding friend” app. The app is regularly updated, and you can sign up with a phone number. You don’t need Facebook or any username to use this app. You have to create a group and invite others. If they sign up, you will get their location details at any time of the day. Of course, they have to approve it first!
2.3 Glympse
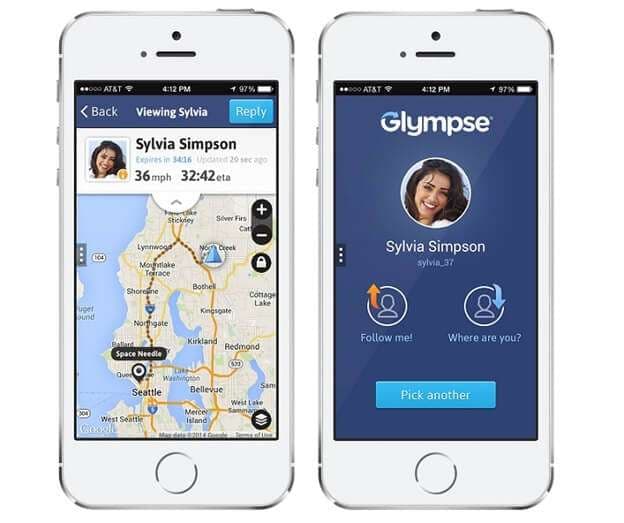
What makes Glympse different from others is the fact that you don’t even need to sign up here! You can set up a group for a specific time, and share your location to anyone you want to. You can even share your places via the web. If you wish to track your friends temporarily or contact someone for a specific period, Glympse is the right choice for you. And, if someone is not comfortable with the idea of location sharing, you can send your location via the web. They can use the shared link to know your area without ever installing the app. But, if you want to check up on your loved ones continually, then Glympse cannot satisfy your demand. As a temporary service, your location sharing link will be activated for four hours at most.
 NeoDownloader - Fast and fully automatic image/video/music downloader.
 LYRX is an easy-to-use karaoke software with the professional features karaoke hosts need to perform with precision. LYRX is karaoke show hosting software that supports all standard karaoke file types as well as HD video formats, and it’s truly fun to use.
Conclusion
Remember, there are several other find my friends apps in the app store, which can entice you. Some of them have pretty neat features. But, they can drain your battery too fast; others can be pretty limited on their free version. And, many of find my friends apps are partial to either iPhone or Android. But, why not try them out yourself? Everybody’s needs and tastes are different. Give my three favorite find my friend apps for Android and iPhone a try, if they suit you, great. If not, there are more options. Find one for you and keep a “leash” on your loved ones!
How to Detect and Stop mSpy from Spying on Your Nokia G310
In this era of smartphones and smart gadgets, our lives have been stored inside these devices. Privacy gets more important and urgent when so many apps can spy on you easily. Being concerned about your privacy is a very important thing to consider. We care about your privacy, and we have the tools to take proper measures for the mSpy parental control app.
There are many apps like mSpy that normal users can’t detect due to their stealth behavior. If you want to know how to detect and stop mSpy from spying on you, then you are in the right place. This article will show you how to detect and remove mSpy on Android and iPhone devices without being tech-savvy. Read all the guidelines below on removing mSpy from Android and iPhone without hassle.
Part 1: What is mSpy, and is mSpy detectable on Your Nokia G310?
In this increasingly cynical world, people are using all sorts of monitoring software to monitor the phone activities of kids and employees. One such software is mSpy. Technically, mSpy is made as a business and parental monitoring app at first. But now, it is also used as a spy app that lets you look into someone else’s mobile phone or device.
Spying should not be misunderstood here as this app focuses mainly on checking employees’ devices or kids’ phones. It could be hard to discover since mSpy secretly works in the background. It monitors messages, phone calls, location, social media activity, and other device usages. Different features offered by mSpy are mSpy parental control, mSpy Instagram tracker, mSpy WhatsApp tracker, etc.
The process of detecting mSpy varies from different phone systems, Android or iPhone. Moreover, mSpy is a background app, so you can not normally see if it is installed on your phone or not. But don’t worry, we will help you out with how to detect mSpy. Below we have listed the two detection methods separately.
How to Detect mSpy on Android Devices
For detecting mSpy on an Android phone, that’ll be more direct if you check Update Service through the phone settings. Follow these steps:

- Step 1: Go to your Nokia G310 phone settings.
- Step 2: Select Security.
- Step 3: Go to Device Administrators or Device Admin apps.
- Step 4: Navigate to Update Service (the name mSpy uses to run undetected). See if this service is enabled or disabled. If it is, you have spying software installed on your Nokia G310s.
How to Detect mSpy on iPhone Devices
Apple users don’t have a way to tell for sure if mSpy is installed compared to Android users. But, there are some ways to tell if their devices are monitored.
1. Download history on the App Store
Certain apps masquerade as unharmful but turn out to be spyware. Recently, the malware was found in an app called System Update. That app was installed outside of App Store. After installation, the app hid and exfiltrated data from the users’ devices to the operators’ servers. It’s important to note which apps every user is hiding in their phone. Go to the App Store and download the history. This will help you figure out which apps have recently been downloaded on your Nokia G310.
2. Unusually High Data Usage
There is a big sign that spyware is running in the background. To check the mobile data on your Nokia G310, you need to go to Settings and click on Mobile Data. You will be to see your overall data usage. Scroll down to know how much mobile data individual apps are using. Suppose any user’s average internet usage is around 200 MB per day, and suddenly it increases rapidly to about 800MB per day with the exact usage of the internet. In that case, the user has to be aware as something is fishy.
3. Have Access to Your Device’s Microphone or Camera
When an app uses the microphone on iPhones, you will see an orange dot at the top of your screen and, similarly, a green dot for the camera. On Android phones, when an app starts, you will see a microphone or camera icon popup in the top right corner, which then turns into a green dot. These are healthy indicators that you should not ignore. Also, go to the list of apps that are allowed to access your Nokia G310’s camera or microphone. If you see mSpy there, that means your phone is being spied on.
4. Increased Device Shut Down Time
If the Nokia G310 device fails to turn off properly or takes an unusually long time to do so, it can point to the presence of spyware, or if the phone reboot without your command, then maybe someone is controlling your phone.
5. Jailbreak your own iPhone and download apps from untrusted sources
If you detect the presence of an app named Cydia, then consider it an alarm bell. This advanced package tool will further install apps from untrusted sources. To find out if your Nokia G310 is jailbroken or not:
- Step 1: Drag your finger downward from the center of the iOS home screen.
- Step 2: Type “Cydia” in the Search field.
- Step 3: If you find Cydia, then your Nokia G310 is jailbroken.
Some signs can come in handy when you want to ensure if someone is spying on you or not
Part 2: How to Stop Somebody Spying Using mSpy on the phone?
When you figure out that somebody is spying on your device, the first thing that comes to your mind is how to stop it. If someone has installed mSpy on your device, you can easily control the process. This section will mention the complete process of stopping mSpy on your device. Like the spying app detection process, the spying app removal process is also different in the case of iPhone and Android devices. Below we have mentioned the complete processes of removing mSpy from your Nokia G310 and iPhone device. There are two ways that you can use to remove this app from your devices
Method 1: Prevent mSpy from Spying via Phone Settings App
To remove mSpy from your Nokia G310 manually, one needs to activate two-factor authentication and change your iCloud password.

- Step 1: To change the password, you have to go to Settings.
- Step 2: Click on Profile.
- Step 3: Select Password & Security.
- Step 4: Change password and activate two-factor authentication.
For Android users, you can refer to the following steps to follow:
- Step 1: Go to your Nokia G310 Settings.
- Step 2: Select Security.
- Step 3: Go to Device Administrators or Device admin apps.
- Step 4: Navigate to Update Service (the name mSpy uses to run undetected).
- Step 5: Select Deactivate.
- Step 6: Go back to Settings.
- Step 7: Select Apps.
- Step 8: Uninstall Update Service.
Method 2: Play Protect Feature on Google Play Store [Android only]
Another trick for removing mSpy from your device is by taking help from the Play Protect feature on Google Play Store. But one limitation of this method is that it does not work for iPhone. It is only useful for Android devices.

- Step 1: You can also go to the Google Play store.
- Step 2: Select your Profile.
- Step 3: Select Play Protect.
- Step 4: If it detects any harmful app, select Uninstall it.
- Step 5: Or scan the Nokia G310 device for any harmful apps.
- Step 6: It will notify you if any risky app is found.
Method 3: Spoof Location to Prevent mSpy from Location Tracking [Recommended]
You can use one more method to remove the mSpy app from your device. This method works for both Android as well as iPhone devices. This method spoofs location to prevent the mSpy app from tracking your location. If you feel that someone is tracking your location, you can use third-party app software that helps fake your location. One such app is Dr.Fone - Virtual Location . It is a full mobile device solution for both Android and iPhone devices. It helps solve a wide range of problems ranging from data loss and system breakdowns to phone transfer and whatnot. Dr.Fone Virtual Location is a great thing that allows you to change and fake your location. It also lets you trick the location-based apps and mock GPS locations with customized speed.
Features of Dr.Fone - Virtual Location
- Teleport GPS location with one click to anywhere.
- For stimulation of GPS movement flexibility, the joystick is available.
- Export or import GPX files for saving created routes.
- Offers perfect gaming stability with no crashing risks.
- Support location-based and social media-sharing apps without jailbreak.
Take a look at the video below to quickly learn how to spoof location to stop mSpy from tracking you.
 safe & secure
Step-by-step Guideline to Spoof Location via Dr.Fone Virtual Location
Step 1: Download Dr. Fone and launch the program.

Step 2: Select “Virtual Location” among all the options.

Step 3: Connect your Nokia G310/Android to your computer and click “Get Started”****.

Step 4: You will find your actual location on the map in the new window. If the spot is not inaccurate, tap the “Centre On” icon in the lower right to display the accurate location.

Step 5: Activate the “teleport mode” by touching the icon in the upper right corner. Enter the place you would like to teleport to in the upper corner left field, and tap on “Go.” Set Rome in Italy as an example.

Step 6: Click “Move Here” in the popup box.

Step 7: The location is fixed to Rome, Italy, whether you tap the “Centre On” icon or try to locate yourself on your Nokia G310 or Android phone. It will be the exact location in your location-based app as well.


Method 4: Your Last Resort: Do a Factory Reset
Check phone settings app-reset options and clear out all the data from your phones if nothing works from all the above options, one last option is left, factory reset. For that,

- Step 1: Go to phone Settings.
- Step 2: Select System.
- Step 3: Chose Reset options.
- Step 4: Click on factory reset.
Or you can also make use of a third-party app - Dr.Fone - Data Eraser to wipe out data in some clicks
Dr.Fone - Data Eraser
Stop mSpy from Spying on You by Factory Reset
- Permanently erase all data, such as photos, videos, etc from your iOS device.
- It let you uninstall or delete useless applications from your device in batch.
- You can preview data before erasing it.
- Easy and click through the erase process.
- Provide support to all iOS versions and devices, which include the iPhone and iPad.
4,008,671 people have downloaded it
Not even professional identity thieves will be able to access your private data on iPhone or Android devices again. With the help of a third-party app, Dr.Fone – Data Eraser, you can erase all data permanently. This data eraser helps you render your data wholly unreadable and then cleans up the whole disk. It is a one-click solution to wipe all personal data like photos, contacts, messages, call logs, social app data, etc.
 Jet Profiler for MySQL, Enterprise Version: Jet Profiler for MySQL is real-time query performance and diagnostics tool for the MySQL database server. Its detailed query information, graphical interface and ease of use makes this a great tool for finding performance bottlenecks in your MySQL databases.
 Part 3: How to Tell if Your Cell Phone is Being Tracked FAQ
Q1: Is it possible if someone remotely install surveillance software on My Nokia G310?
Basically, it could be extremely hard to remotely install phone surveillance software on an iPhone or Android smartphone without having physical access to the Nokia G310 device in advance. Some remote spying apps will allow you to track the location of an iPhone, but you’d require the user’s iCloud login and password to enable the tracking of the Nokia G310 device. Anything more than that, and you’d need physical access.
Q2: Can Someone Spy on You When your Phone is Off?
Sadly yes. According to What Whistleblower Edward Snowden has said in a 2014 interview that the NSA could listen to and spy on conversations using the microphone on a smartphone, even if you turn off your devices. It makes it by using spyware that prevents your smartphone from actually turning off.
 Project Manager - Asset Browser for 3Ds Max
Q3: Can Someone Read My WhatsApp Chats on My Cell Phone?
Sadly, yes. While it isn’t possible on iOS devices, apps can intercept your WhatsApp messages on Android devices due to the operating system’s sandboxing security.
 Simple and intuitive video editing
Q4: What Other Forms of Spyware Are There?
Other forms of Spyware include keyboard loggers, Adware, browser hijackers, and modem hijackers.
To Wrap it up
In the 21st century, when the world is connected through one device, almost everybody shares an undercurrent of worry. That is, is someone spying on me through my devices or not? And as much risky and fatal as this can be for a person who does not know if he is being tracked or not, there are solutions one can employ to safeguard himself. This article was all about how to detect and how to remove mSpy on iPhone and Android. Hopefully, now you are well aware of the different methods with their steps. With the help of Dr.Fone - Virtual Location , you can easily spoof or fake your location to hide the real one.
 dotConnect for Oracle is an ADO.NET data provider for Oracle with Entity Framework Support.
 safe & secure

How to Change Location on TikTok to See More Content On your Nokia G310
TikTok is a famous entertainment application that shows exciting content worldwide. It is now a popular application with a recorded 3 billion downloads while surpassing the popularity of Facebook and Twitter in 2018. But, sadly, the application keeps on being the victim of restrictions and bans in different countries worldwide.
This limits content broadcast in different regions, making TikTok lovers deprived of entertainment. But, if you know how to change location on TikTok, you can surpass all these restrictions easily. The article will help you learn how to change your TikTok location by presenting the following aspects:
Part 1: How Does TikTok Detect your Location
According to the TikTok privacy policy, your location through TikTok is tracked based on your IP address, SIM card, and GPS. It happens right after you make your account on TikTok through your phone number. In this way, TikTok also happens to avoid scammers and fraudsters. In some cases, your location is also automatically tracked by giving a location tag to your posts.
The IP address and browsing history on the TikTok, time zone setting and mobile carrier are also collected by the TikTok as “Technical Information.” In case you want to know if TikTok ensures your safety as well? The answer is no. If you give your location access to TikTok, it increases the chances of getting hacked.
Your information becomes easily accessible to everyone. Moreover, it is also mentioned in the privacy statement of TikTok that they will share your details with public authorities, enforcement agencies, and other organizations. TikTok can share your sensitive information with governments and commercial parties.
If you don’t want to add your location on TikTok, you will have to deny the permissions on your phone. Hence, knowing how to change location on TikTok is necessary.
Part 2: Why We Need to Change Location on TikTok
We have discussed how TikTok gets to know about your location in the first part. Now, we will share why do we need to change location on TikTok:
- To Add Diversity to the Audience
The algorithm of TikTok is built so that it will only show the content of your region or country. Therefore, if you want to make money through your content on TikTok, it might not be possible for you. So, you may want to target the audience of another region that is willing to buy the content.
- Access Better Content
Even if TikTok offers exciting content that has made the app popular, you can only access the available content for your region. Therefore, if you want to enjoy more content from the other areas, you should change your location on TikTok to access unlimited content.
- Use the App without Hurdles
Countries like Afghanistan and India have banned the TikTok application, and Indonesia and Bangladesh have censored it. Moreover, the United States is also thinking of the same due to user privacy concerns and security threats. However, if your country has already banned TikTok, you can still access the content with a fake location if you know how to change location in TikTok.
- Protect your Privacy
If you are not using a VPN or any other way to change your location, TikTok can access your device easily. The organization behind TikTok can access the applications on your phone, your messages, and places you go to. So, when you change your location, it will remove the chances of being tracked.

Part 3: How to Change your Location in TikTok on Different Devices?
We have discussed why it is essential to know how to change the location of TikTok. Now, we will move forward and discuss the methods involved in changing the TikTok location on various devices:

1. For iOS and Android Devices
If you are interested in changing your location on your iOS and Android devices, the following methods are aligned for you:
Method 1: A tested way - Dr.Fone - Virtual location
Dr.Fone – Virtual Location is an application designed for Android and iOS devices. This application assists in teleporting the GPS location to any other location easily. With this location changer, you can fake your location and enjoy the content of different regions without having to travel anywhere. The following steps will guide you on how to change the TikTok country location with Dr.Fone – Virtual location:
safe & secure
Step 1: Access the Location Changer
The first step demands you download Dr. Fone’s Virtual location and install it. Next, launch the program and click “Virtual location” from all the available options. Next, connect your Nokia G310 or iPhone through any USB cable with your PC and tap on “Get Started.”
Step 2: Access your Current Location
A new window will be opened, and your real location will be displayed on the Dr.Fone map. If you can’t see it, click on the “Center On” icon at the right sidebar to show the location.

Step 3: Activate the Teleport Mode
Now, click on “Teleport Mode” by pressing the first icon on the upper-right side. Now, provide the place you want to teleport to in the search bar. Next, press the “Go” button and press the “Move Here” button from the popup box.
Step 4: Your Location is Changed
Now, the location of your iOS or Android phone has been fixed to the given location. So you can now enjoy your fake location content on TikTok while bypassing all the restrictions efficiently.


Method 2: Changing Language on TikTok to Access Content from Other Regions
TikTok only shows the content of languages that are native to your region. Fortunately, you are allowed to change the language on TikTok and access the content of that region. However, this method only shows the content of the selected area.
Therefore, you can’t add the language of any such region which has banned the application. Instead, follow the given steps to change your language on TikTok and access the content peacefully:
Step 1: Open the TikTok application and select “Profile,” written on the lower right-hand corner of the interface.

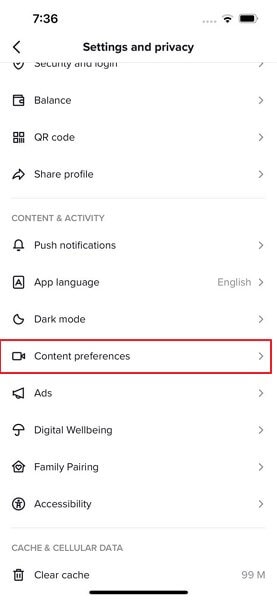
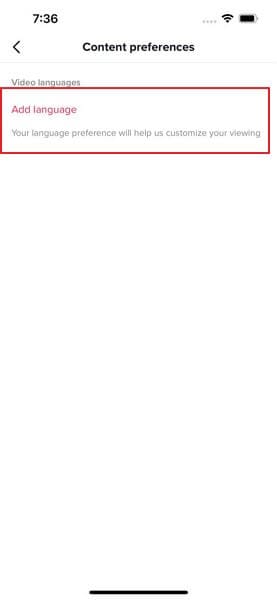
Step 2: Now, click on the three dots mentioned in the right-hand corner and access the “Settings and Privacy” of your TikTok account. Now, choose the “Content Preferences” option written under the “Content & Activity” section.

Step 3: Now, add the language that is native to your target region. Now, you will be able to access the content of the particular region.
Method 3: Changing your SIM Card to Change Location on Tiktok
TikTok uses the region code of your SIM card to display the content of your region on the feed. Therefore, it will be helpful if you buy a SIM card from another area and use it on Your Nokia G310 to watch that region’s content quickly. This process is as simple as choosing a fake location and buying a SIM card from that region.
You can do so by ordering an international SIM card through Amazon and putting your SIM in the mobile phone. Now, delete the cache and app data. Then, open TikTok and enjoy various content. Unfortunately, you will have to buy a phone with a dual SIM. Moreover, some SIM cards might not work in your region unless you buy a mobile plan.
2. For Computer
Now, let’s discuss how to change your location on TikTok from your Computer. For this, we have introduced a VPN service that fakes the location on TikTok and helps you access content from different regions.
ExpressVPN
ExpressVPN is a top-notch VPN that provides blazing-fast speed for browsing, streaming, and playing games with unlimited bandwidth. You can connect to the service anywhere as the application’s high-speed servers work across 94 countries. In addition, it protects user data by offering the best security and encryption.
With the given following steps, you can set up ExpressVPN on your computer and access unlimited TikTok content:
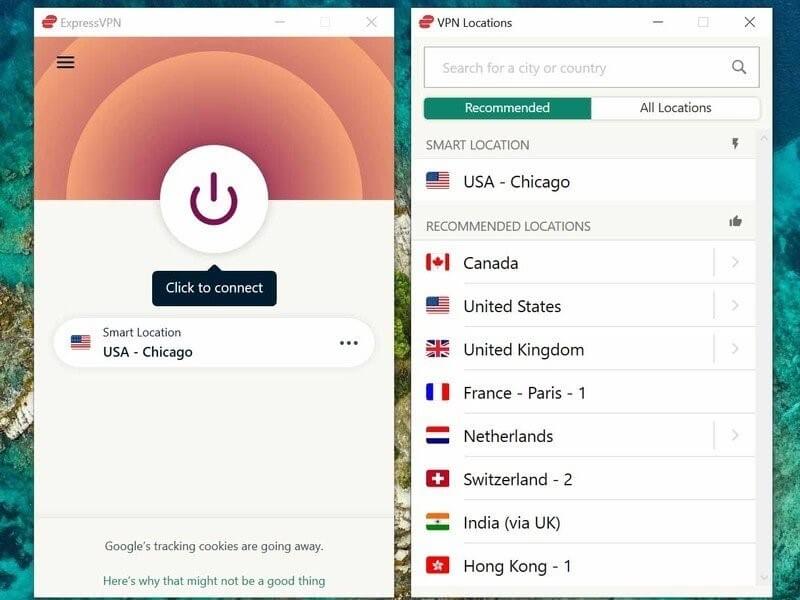
Step 1: Launch the ExpressVPN software and tap on the “On” button to utilize the service. Now, press the “Smart Location” option.
Step 2: Select the VPN server location from the “All Location” tab or “Recommended” tab.
Step 3: Once you are connected, you will be able to use TikTok and watch content from the selected region with enhanced privacy and security.
Parental Control Software
 Allavsoft Batch Download Online Videos, Music Offline to MP4, MP3, MOV, etc format
Part 4: FAQs about TikTok Location
1. Is it not legal to change the TikTok location?
It is legal to do so unless you are not misusing the application and watching objectional content from the region.
2. How to turn off the GPS on TikTok?
For Android devices, open the “Settings: and reach the “Location” tab. Now, press on the “App Permission” option and search for TikTok. Now, click on “Don’t Allow.”
For the iOS device, open the “Settings” app and click on “Privacy.” Further, click on “Location Services” and find TikTok. Change the TikTok location setting to “Never.”
3. Is it safe to use TikTok with a VPN?
Yes, TikTok will not be able to detect that you are using a VPN. Therefore, you will not be banned from using the application. It is safe to access TikTok with a VPN because it hides your IP address and location.
Conclusion
We have extensively concluded different methods involved in How to change location on TikTok. For iOS and Android devices, you can do so with the help of Dr.Fone - Virtual Location . Besides, you can manually change your language or SIM card to access the content of the particular region. If you use a computer, you can use ExpressVPN and change the location of your device while hiding your IP address.
 ZoneAlarm Pro Antivirus + Firewall NextGen
safe & secure
- Title: In 2024, Does find my friends work on Nokia G310 | Dr.fone
- Author: Abigail
- Created at : 2024-07-24 18:00:31
- Updated at : 2024-07-25 18:00:31
- Link: https://location-social.techidaily.com/in-2024-does-find-my-friends-work-on-nokia-g310-drfone-by-drfone-virtual-android/
- License: This work is licensed under CC BY-NC-SA 4.0.