
In 2024, How To Activate and Use Life360 Ghost Mode On Motorola Moto E13 | Dr.fone
How To Activate and Use Life360 Ghost Mode On Motorola Moto E13
Life360 is a popular location-sharing app among families and friends. The platform enables real-time tracking of loved ones’ whereabouts on smartphones. But there are moments when you might want to disable it for privacy.
If you’re intrigued by maintaining privacy on Life360, read on further. Learn how to activate the Life360 Ghost Mode. It’s a valuable feature when you need personal space without alerting your family or friends. Uncover the steps to use Ghost Mode in Life360 through a location-sharing app. Enjoy a balance between staying connected and maintaining your privacy.
 Screensaver Factory, Create stunning professional screensavers within minutes. Create screensavers for yourself, for marketing or unlimited royalty-free commercial distribution. Make screensavers from images, video and swf flash, add background music and smooth sprite and transition effects. Screensaver Factory is very easy to use, and it enables you to make self-installing screensaver files and CDs for easy setup and distribution. Screensaver Factory is the most advanced software of its kind.
Part 1. What Does Life360 Ghost Mode Mean?
Life360 Ghost Mode is a workaround and not an official feature. It’s an unofficial term for those who hide or spoof their GPS location within the Life360 platform.
- Ghost Mode is activated using external tools to conceal or manipulate your GPS location within the Life360 app.
- It’s a workaround to gain an added layer of privacy. It allows you to control the visibility of your real-time location on the Life360 map.
- Unlike turning off the internet or your phone, Ghost Mode involves more nuanced methods. It ensures discreet location management.
- Turning off the internet or the phone displays a clear “No Network” or “Phone Off” message. Ghost Mode provides a different status indication to make your Life360 look normal.
Now that you know all of Life360 Ghost Mode updates and their significance, let’s explore the steps to enable it. Learn how to activate Ghost Mode within the Life360 app by using a dedicated tool.


Part 2. How To Activate Ghost Mode on Life360
Wondershare Dr.Fone - Virtual Location is a versatile tool for enhancing privacy. With its key features, you can activate Life360’s Ghost Mode. It offers great control over your GPS location. Here are the key features of Dr.Fone to maximize Ghost Mode.

- Spoof your location without leaving home
Dr.Fone allows you to manipulate your GPS location without moving. It provides a seamless way to activate Ghost Mode on Life360.
- Automatic movement (change directions in real-time)
The tool enables automatic movement. It allows you to alter your location in real-time, simulating authentic movements.
- 360-degree directions
Dr.Fone offers the flexibility of 360-degree directions. It gives you precise control over your virtual location within the Life360 app.
- Keyboard control
The keyboard control feature allows for effortless navigation, making it user-friendly for both novices and experienced users.
Activate Ghost Mode With Dr.Fone - Virtual Location
Follow these step-by-step instructions to activate Ghost Mode on Life360 using Dr.Fone - Virtual Location:
- Step 1: Download and install Dr.Fone on your computer. Launch the app and connect your smartphone. Next, click on Toolbox > Virtual Location. Click Get Started and tick the I am aware of the disclaimer box.
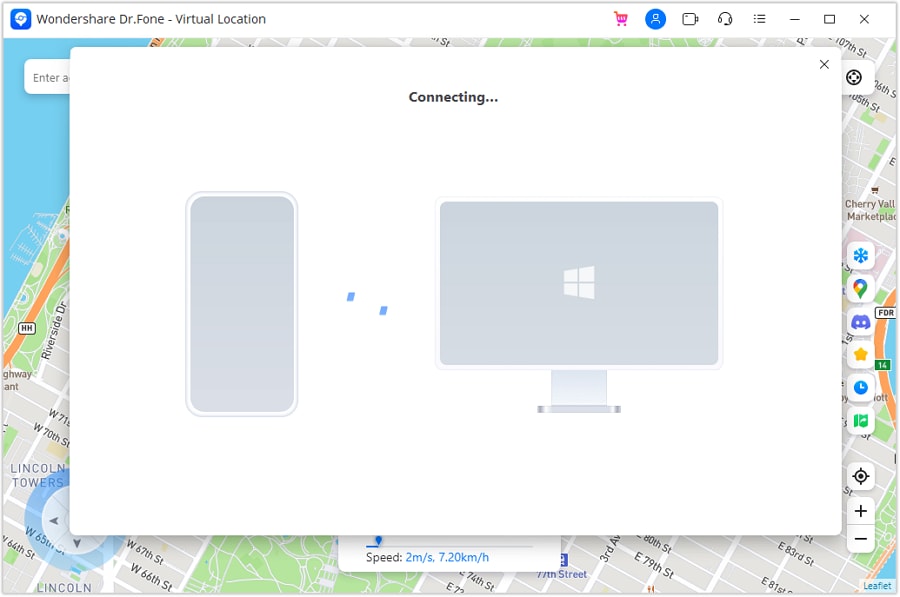
- Step 2: Follow the on-screen instructions. Once connected, click Manage Device to control your location without moving. Choose the “One-Stop Route” function from the top right. Tap anywhere on the map to set your destination.
 Greeting Card Builder
- Step 3: Input the number of movements, and select Round or Loop trip. Adjust the walking speed and click Move Here to start the simulation. You can Pause or Clear at any point to start again.

- Step 4: Activate Teleport Mode by choosing the first icon in the top-right. Enter your desired location in the Search bar, press Enter, and confirm on the map. Click Move Here to change your smartphone’s location. Ensure alignment with the spoofed location on your computer. You are now under Life360 Ghost Mode.


Part 3. Will Others Know if Ghost Mode Is Activated on Life360?
Activating Ghost Mode on Life360 through a virtual location changer presents both advantages and potential drawbacks.
- Enhanced privacy
Ghost Mode provides an added layer of privacy. It allows you to move without being tracked by family or friends.
- Risk of miscommunication
Others won’t know your location, potentially leading to miscommunication or emergency concerns.
- Potential for sneaking out
You can engage in activities like sneaking out without being monitored by their Life360 circle.
Pros of Ghost Mode Activation
Here are the pros of using Ghost Mode on Life360.
- **Discreet movements.**Enables you sers to move discreetly, maintaining confidentiality.
- **Freedom of movement.**Offers freedom in activities without constant location tracking.
- Privacy control. You have control over when and how you share your location information.
Cons of Ghost Mode Activation
Here are some unwanted scenarios if you’re under Life360 Ghost Mode.
- Emergency concerns. Others won’t be aware of your actual location, posing risks in emergencies.
- **Accident risk.**Lack of real-time tracking may hinder quick assistance in case of accidents.
- Communication challenges. Potential for miscommunication as your true whereabouts remain undisclosed.
Part 4. Other Methods To Turn Off Location on Life360
When Ghost Mode feels too troublesome, alternative methods exist to turn off location sharing on Life360 temporarily. Here’s a guide on six different approaches:

Method 1: Turning Off WiFi and Data
Disabling WiFi and data on Life360 is a common method to prevent location tracking. Here’s a step-by-step guide:
- Step 1: Launch Life360 on your phone. Turn off WiFi and data; you can specifically disable them on iPhones for the Life360 app.

- Step 2: In Settings, locate Life360 Disable Cellular Data, Background Refresh, and Motion & Fitness. Once done, the Life360 location will then remain static at the current position.
Method 2: Dsiable Location Services for Life360
Disabling location services provides an effective solution for pausing Life360 without detection, The method applies to both Android and iOS devices. Here’s how:
- Step 1 (iOS): Go to Settings > Privacy > Location Services. Scroll and find Life360.
- Step 1 (Android): Go to Settings > Apps > Life360.


- Step 2 (Android): Tap Permissions > Location. Choose Deny or Ask every time to deactivate location access for Life360.
- Step 2 (iOS): Tap on it and opt for Never to turn off location access for Life360.
Method 3: Low Data Mode
Disabling WiFi and Data on Life360 might trigger notifications, alerting anyone to your offline status. An alternative method to deactivate Life360 awareness is by using Low Data Mode:
For iOS: Open the Settings app on your Motorola Moto E13 or iPad. Tap on Wi-Fi. Select the i icon beside the connected Wi-Fi network. Toggle on the Low Data Mode switch.

For Android: Open the Settings app. Scroll and tap on Cellular or Mobile Data. Tap on Cellular Data Options or Mobile Data Options. Toggle on the Low Data Mode switch.
Method 4: Turn on Airplane Mode
Activating Airplane Mode deactivates all network connections. It includes GPS, offering a swift solution to cease location sharing on Life360. The action also suspends calls, texts, and internet access, so keep that in mind. Follow the steps:
For iOS: Swipe your screen to access the Control Center. Tap the airplane icon to activate Airplane Mode. Alternatively, go to Settings > Airplane Mode. Toggle the switch beside it On.

For Android: Swipe your screen to access the quick settings menu. Tap the airplane icon to enable Airplane Mode. Alternatively, go to Settings > Airplane Mode. Toggle the switch beside it On.
Method 5: Use a Burner Phone
While it may seem cumbersome, using a burner phone is a straightforward method to disable location sharing on Life360. Install Life360 on the burner phone using the same account. Connect it to the relevant WiFi, and then remove Life360 from your primary device.
 Easy and Safe Partition Software & Hard Disk Manager
Method 6: Use a VPN Service
Using a VPN service alters your IP address, which can help spoof Life360 to show an inaccurate location. The approach is beneficial when you aim to conceal your location without entirely turning off location sharing. Remember, though, that it’s not foolproof and may not provide consistent results.
Conclusion
Life360 Ghost Mode, though not an official feature, provides a discreet way to enhance privacy within the app. While it’s a valuable tool for moments when you need personal space, be aware of its downsides. If Ghost Mode seems too risky, explore alternative methods.
The ease of enabling Ghost Mode on/off using Dr.Fone makes it a convenient option. Striking the right balance between connectivity and privacy in Life360 requires thoughtful consideration. Explore the dynamics of Ghost Mode in Life360 to decide if it aligns with your preferences and needs.

WPS Office Premium ( File Recovery, Photo Scanning, Convert PDF)–Yearly
How to Hide/Fake Snapchat Location on Your Motorola Moto E13
The GPS functionality is very prominent these days. Especially when various apps or websites are making use of your geological location to deliver more relevant content. Be it, social networking apps or gaming apps, for instance, Snapchat, and Pokemon Go respectively.
Talking about Snapchat, this app offers you different badges and filters depending upon your Geographical location. It actually utilizes the GPS feature of your device to determine where you are located. This can sometimes be annoying as you may wish to access a filter or badge that is not available at your Geological location. Now, this is where you need the Snapchat spoof location app. You not only can hide your actual location from Snapchat. Instead, cast a fake location on Snapchat map, and eventually, you can easily access the badges/filters at your convenience!
Sounds interesting, right? Let’s understand more about the tutorials on how to hide/fake location on Snapchat map.
Part 1. What Snapchat is using your location for?
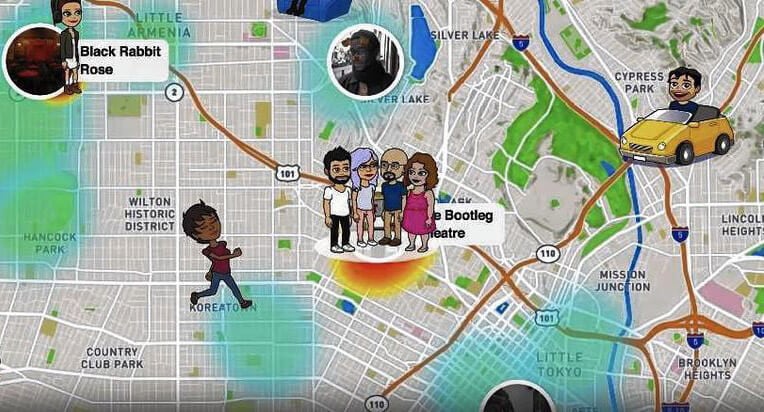
Snapchat basically utilizes your location for the SnapMap feature that furnishes the location-based filters etc. over your device. This SnapMap feature was unveiled in 2017. If you haven’t deliberately enabled it yet or you’re unaware of this feature, implies that you’re still “off the grid”. If you wish to enable this feature, you literally need to authorize Snapchat “3x times” and the last, fourth one to authorize your device.
With the SnapMap feature enabled, you can easily get to know about the whereabouts of your friends, and in turn, there’re allowed to know yours. As long as the Snapchat app is running over your screen, the SnapMap location of your Bitmoji gets updated dynamically. But as soon as you quit the app, the last known location of your Bitmoji is displayed over the SnapMap.

Part 2. Why people want to hide/fake location on Snapchat?
When it comes to fake Snapchat location there can be several reasons behind that. Here are some scenarios where people do wish to hide/fake location on Snapchat. Let’s explore.
- Sometimes, you may wish to utilize the cute filter that you saw your favorite celebrity putting up when he/she was in Sydney, Australia (or any other location).
- Or, you may wish to simply spoof location Snapchat for fun and be popular among your friends that you know some really cool tricks.
- Perhaps, you wish to stay ahead one step ahead in the dating game. For instance, you’re planning to move to a location a hundred miles away, and wish to have a person to spend quality time with when you reach there.
- Another reason is that is absolutely fun to trick people into believing that you’re spending your leisure time on an expensive tour. For instance, you can check in to a classy restaurant (you’ve never been to in real) in Dubai by mocking the GPS location.
- Even better for the kids who wish to fake GPS location to hide their real location over the location-sharing SnapMap feature from their parents, family, or friends.
Part 3. How to hide location on Snapchat
When it comes to disabling or hiding the location on Snapchat, the tutorial is extremely easy. Snapchat itself offers you a setting called Ghost mode. You just need to enable it. Here’s how to get it done.
First, get into the Snapchat app and then visit either the Discover screen or the Camera or Friends. Next, tap on the magnifying glass and hit on Map.
As soon as the SnapMap screen loads up, you need to access the settings by hitting the Gear icon on the top right corner.
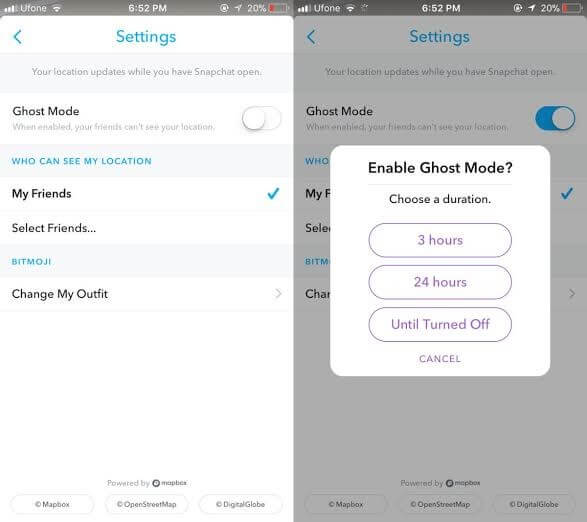
Then, make use of the settings to set up your privacy and hit on the “Ghost Mode” toggle switch to turn it on. A pop-up window will appear with 3 different settings:
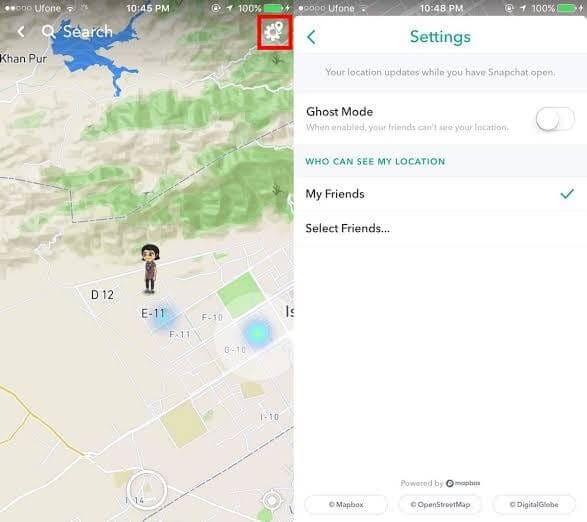
- 3 hours : Ghost mode is turned on for 3 straight hours.
- 24 hours : Ghost mode is turned on for 24 straight hours.
- Until Turned Off : Ghost mode is turned on until you manually turn it off.
Selecting either of the aforementioned settings will hide your location from SnapMap. Implies, other than you no one will be able to locate you over SnapMap.
Part 4. How to fake Snapchat location on iPhone
4.1. Change Snapchat location to anywhere using a Smart Tool (easy)
You can easily spoof location on Snapchat using the tool Dr.Fone - Virtual Location (iOS) . This tool is easy to operate and works perfectly when it comes to spoofing any location. Here is how to fake GPS Snapchat iPhone without jailbreak.
Step 1: To begin with this Snapchat location spoofer, simply head to the official website of Dr.Fone – Virtual Location (iOS). Download the software package from there and then install it afterwards.

Step 2: After successful downloading, open the tool. Now, you need to opt for the “Virtual Location” module from the main interface. Post doing this, click on the “Get Started” button.
Step 3: You can notice your current virtual location on the map in the next window. If you can’t, simply go to the “Current Virtual Location” icon available on the lower right side of the screen. Click on it and it will show your current virtual location.

Step 4: It’s time to activate the “Teleport Mode”. To do this, all you need is to click on the first icon given on the upper right side. After this, you need to enter the location where you desire to teleport in the blank field given on the upper left. Hit on “Go” when you’re done.

Step 5: A few moments later, the system will perceive the desired location you have entered. A pop-up box will come up where the distance will be shown. Click on the “Move Here” option in the box.
Step 6: This is it! The location has been changed to the desired one now. Now, whenever you click the “Current Virtual Location” icon, you will see the new location.

Also, on your iOS device, you can now Fake Snapchat location or in any other location-based app.


4.2. Change Snapchat Location using Xcode (complex)
Now, if we talk about fake location for Snapchat map on iPhone, it’s not as easy as it looks. You need to be an extremely tech-savvy person to fake Snapchat location without jailbreaking your Motorola Moto E13. You simply can’t download a Snapchat location spoofer app over your Motorola Moto E13 and fake it. But fret not, we’re glad to bring you a detailed tutorial with which you can easily perform location spoofing on Snapchat and that too, without jailbreaking your Motorola Moto E13.
Step 1: Install Xcode and Set up a Dummy app
- Grab your Mac computer first and then head over to the App Store. Now, look for the Xcode application and get it installed on your computer.
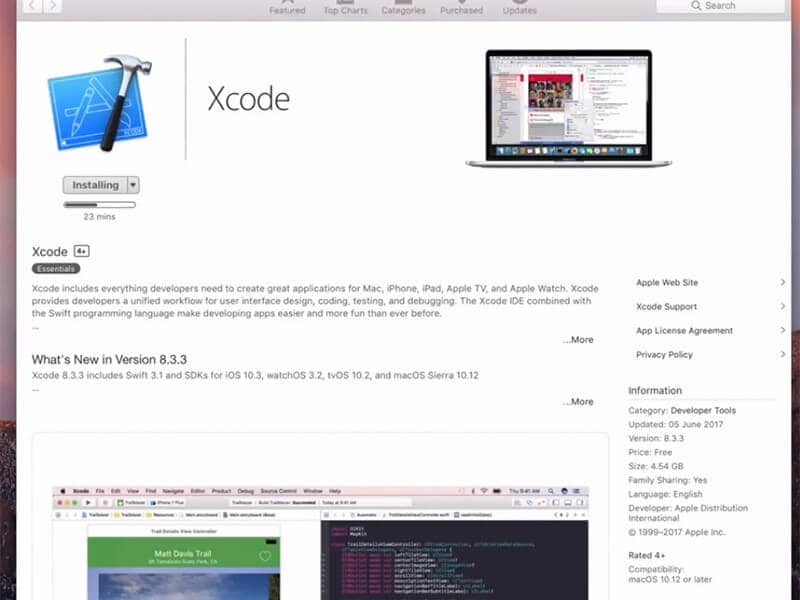
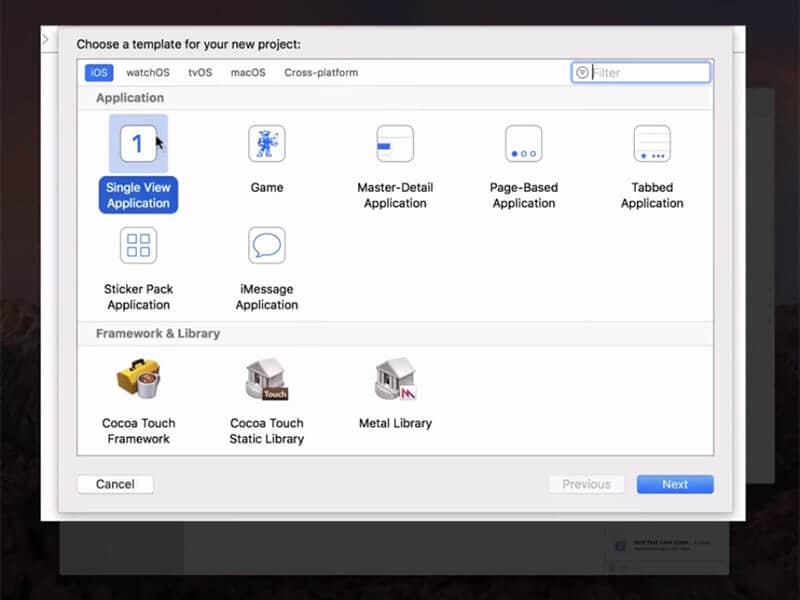
Once the application is installed, launch it over. The Xcode window will come up over your screen. Now, set up a new project and select “single view application” followed by hitting “Next”.
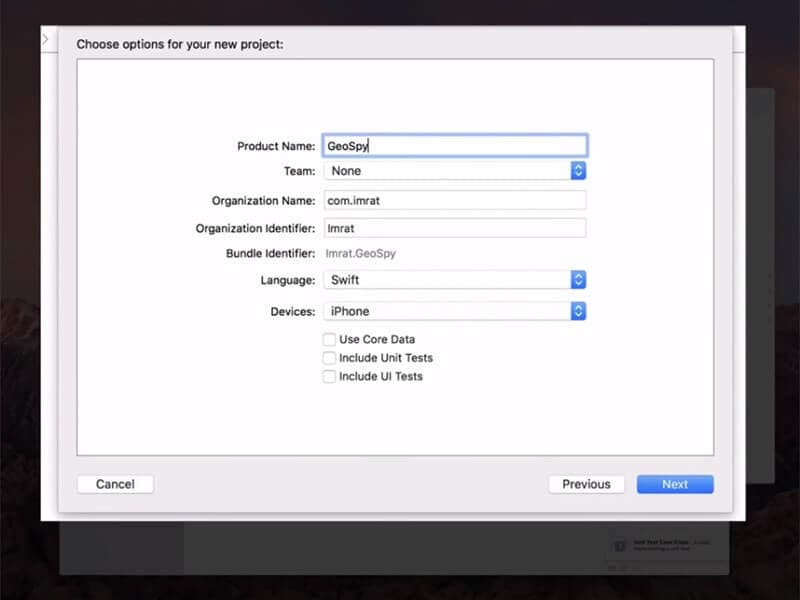
Then, give a name to your project, for instance, “GeoSpy” and hit on the “Next” button.

Step 2: Setup GIT on Xcode
- On the upcoming screen, Xcode will throw up a pop-up message stating “Please tell me who you are” and some GIT commands that you need to execute.
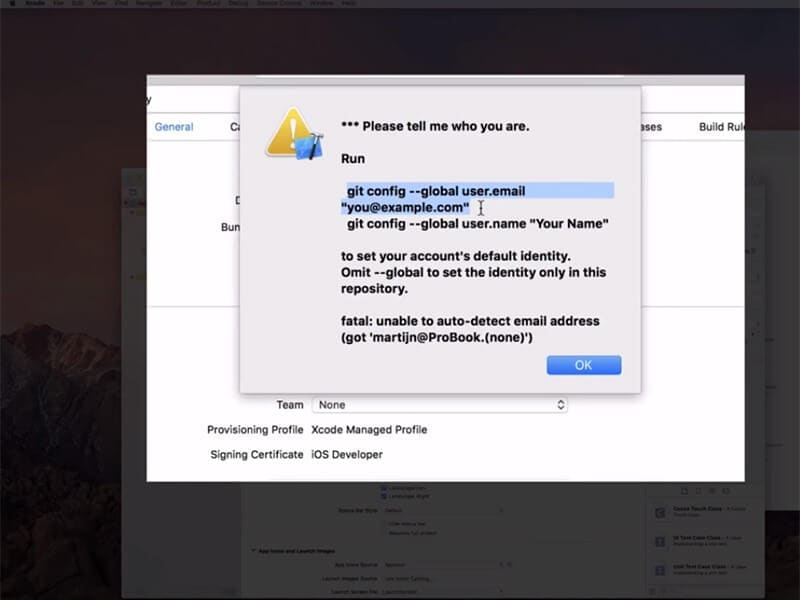
- For this, fire up the “Terminal”over your Mac and then execute the commands as follows:
- git config –global user.email “you@example.com “
- git config –global user.name “your name”
Note: Change the values for “you@example.com ”and “your name” with your information.

WPS Office Premium ( File Recovery, Photo Scanning, Convert PDF)–Yearly

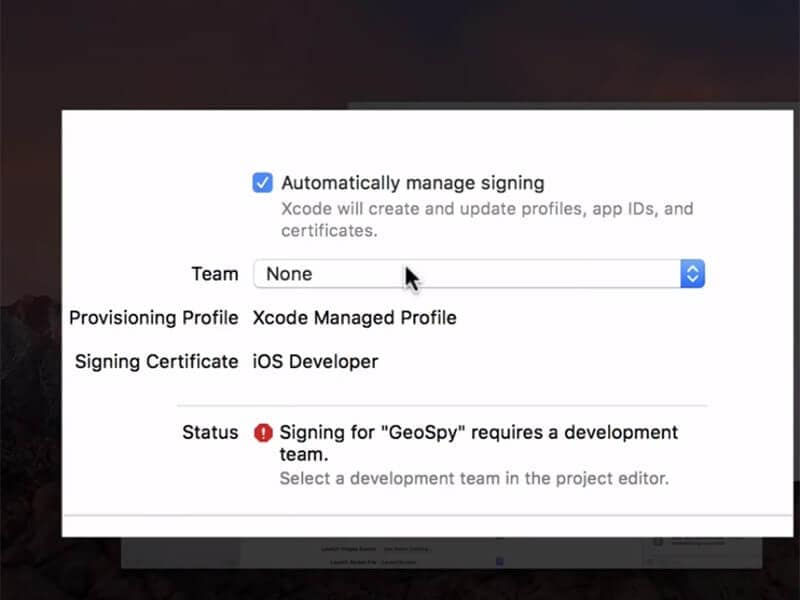
Next, you need to make sure that to set up a development team and meanwhile, connect your Motorola Moto E13 to your Mac computer.
Once done, opt it in as the build device and while you do it, ensure to keep it unlocked.
Lastly, if everything is performed correctly, Xcode will now process some symbol files, please be patient and wait for it to complete.
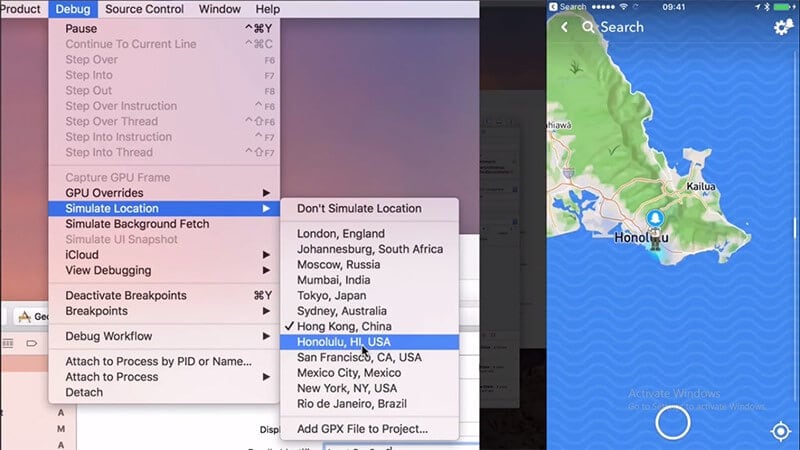
Step 3: Move Bitmoji
Now, you’re all set to fake location for Snapchat map. For this, simply hit on the “Debug” menu and then opt for “Simulate Location” from the drop-down window. Lastly, select the location from the list as per your preference and you’re done.
Part 5. How to fake Snapchat location on Android
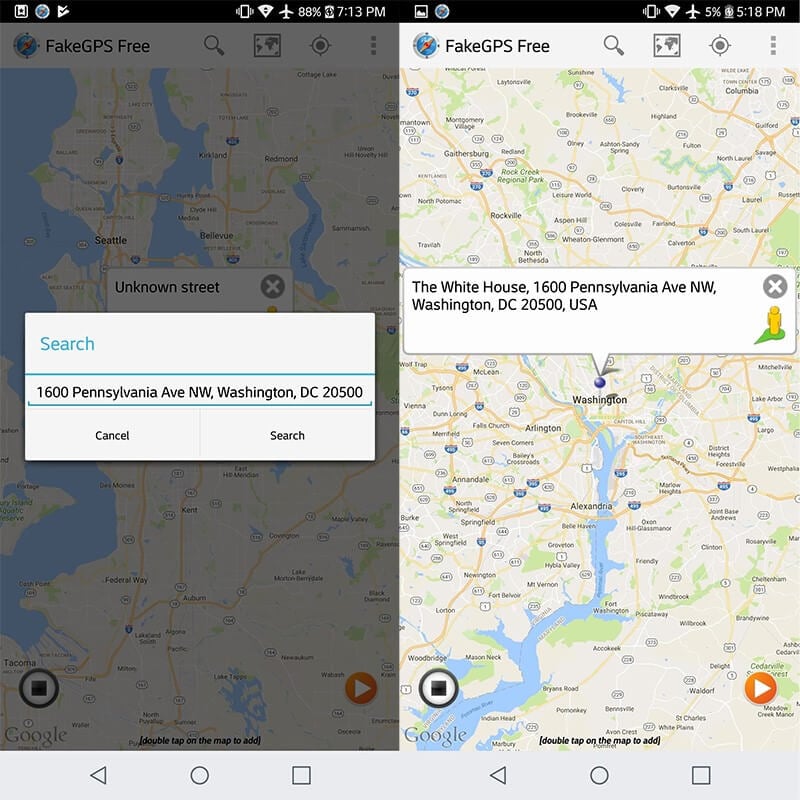
Last but not least, the next method to fake Snapchat location is for Android devices. For this, you need to download a Snapchat spoof app (easily available over Google Play Store) on your Motorola Moto E13. Here’s all that you need to do.
Head to the Google Play Store and then look for the “fake GPS” app. You may be provided with several similar options, be it free or paid. If you get along with any other app, it may require your Motorola Moto E13 to be rooted.
You need to opt for the “Fakegps free” app for Snapchat. This app doesn’t require you to root your Android. But ensure that you are running on Android version 6.0 or higher.
Install the Fake GPS Free app for Snapchat and then launch it afterwards. On the main screen, you’ll be asked to“ENABLE MOCK LOCATIONS”. Hit on it and you’ll be redirected to the“Developer options” screen.
Here, you need to simply tap on the “Select Mock Location App” option and opt for “FakeGPS Free” from the list of options appearing.

Note: You may need to enable the “Developer options” first to access these settings. For this, head to the “Settings”>“About Phone”> hit on “Build Number” – x7 times.
Once done with enabling mock location, hit the back button on your touch screen to retreat back to the Fake GPS Free app.
Now, hit on the “Search” icon over the top to find the desired location. Or, simply double tap over the map on your desired location to drop the pin.
Lastly, hit the “play” button available over the right bottom of your screen to activate the fake GPS location for Snapchat.
Final Words
While reaching towards the end of the article, we are pretty sure that you now fully understand what it takes to fake Snapchat location on Android or iPhone. The aforementioned ways are fully tested and work even without rooting or jailbreaking your devices respectively. Happy Spoofing!
How to Change Your Motorola Moto E13 Location on life360 Without Anyone Knowing?
“**Can you change your location on Life360 without anyone knowing?**” This question pops up often, especially with the increasing focus on privacy and personal location tracking. And this might resonate with you as well. Perhaps you’re a spouse wanting to surprise your partner or a friend planning a secret celebration. Or a gamer playing geolocation-based video games. And hopefully, it’s for good intentions.
Understanding this question is crucial. Here, we’ll break down the possibility of changing your location on Life360. You’ll also learn in this article how to spoof or fake your location, suitable for various purposes. But before getting into the answer, let’s first understand what Life360 is and what it does.

Part 1: What Is Life360 and What Does It Do?
Life360 is a popular family safety app that allows users to share their real-time location with others they trust. Think of it as a digital family map where everyone can see where everyone else is. It’s popular with families who want to stay connected and ensure everyone’s safety.
How Does It Work?
Each member of a Circle installs the app on their phone. Life360 uses GPS and cellular data/WiFi to pinpoint the location of users who have joined a “Circle” within the app. Additionally, features like:
- **Place alerts:**Notifies when someone arrives or leaves a designated location (school, home, etc.).
- **Crash detection:**Automatically alerts emergency services and contacts if a car crash is detected.
- **Family messaging:**Allows members to chat within the app, plus read receipts.

What Does Life360 Track About You?
Life360 tracks a variety of things, including:
- **Location:**The core feature is real-time location sharing within a Circle.
- **Places visited:**You can see where family members have been. It helps you understand their daily routines and ensure they’re in safe areas.
- **Driving habits:**Life360 tracks speed, braking, and other driving behaviors. It provides insights into how safely family members drive.

Benefits
Life360 offers various benefits, such as:
- Coordination
- Increased safety
- The basic version of Life360 is free to use. There are also paid plans that offer additional features, such as unlimited place alerts and roadside assistance.
Privacy Concerns and Considerations
Life360 raises the following privacy concerns:
- Sharing your location 24/7 can feel intrusive and limit your sense of privacy.
- Others could misuse your location data. It includes stalkers or unauthorized third parties.
- Constant monitoring can create trust issues within relationships.
Privacy concerns arise, especially regarding the questions by its users. “**Can you fake your location on Life360 without anyone knowing?**”
You need to be aware of what the app can and can’t do. It balances convenience and privacy when using tracking services like Life360. So, here’s the deal – always think twice before faking, hiding, or changing your location. Now, let’s explore whether you can bypass these concerns and keep your location hidden or fake on Life360.
Part 2: Can You Change Your Location on Life360 Without Anyone Knowing?
Yes, you can change your location on Life360 without anyone knowing. But it doesn’t have that built-in feature. The best way to fake your location on Life360 without anyone knowing is to use spoofing apps on your device, such as Wondershare Dr.Fone. This tool can change your real-time location on several apps, including Life360, whether you have an iOS or Android device.

The question of hiding or changing your location on Life360 might be discreetly on your mind. You’re not alone in this. If you’re a teenager, maybe you seek a bit of freedom without constant oversight. As a working professional, you might be figuring out how to balance work and life while keeping things private. Perhaps you aim to lessen your digital footprint. Or to gain an advantage in competitive play.
In different scenarios, the same question – “**Can you change your location on Life360 without anyone knowing?**” Let’s explore this together. No matter what your reasons are, as long as you have good intentions, keep reading. In the next section, you’ll learn more about Dr.Fone and its one-click virtual location changer feature.
Part 3: Changing/Faking Location With Dr.Fone – Virtual Location
Wondershare Dr.Fone - Virtual Location can be a playful tool for the digitally adventurous. Want to impress your Instagram followers with Parisian sunsets without leaving your couch? Dr.Fone can transport you there with a click. For the romantics, Dr.Fone can also help you spark connections on dating apps by setting your location to a city or a scenic getaway.
It’s also a game-changer for location-based apps, letting you hatch Pokemon eggs without leaving your room. Beyond gaming, Dr.Fone can also change your location on real-time tracking apps like Life360. Use it to maintain privacy without needing to explain your actual location.
But use Dr.Fone responsibly and creatively. It opens up endless possibilities for fun, as long as you have imagination and a WiFi connection. Here are some of its key features:
- **Teleport Instantly:**Change your phone’s GPS location to anywhere globally with a single click. It works with the latest Android 14 and iOS 17.
- **Realistic Movement:**Choose from three modes - One-stop, Multi-stop, and Jump teleport
- **Share Virtually:**Post virtual location updates on Facebook, Instagram, Snapchat, and more.
- **Works on Dating Apps:**Create connections on Bumble, Tinder, Grindr, and other dating apps by setting your preferred location.
- **Bypass Geo-restrictions:**Access geo-restricted content on apps like Life360 and Find My iPhone.
- **Easy Setup:**Get started quickly and effortlessly; no technical expertise is required.
- **No Jailbreak Needed:**Change your real-time location without compromising your phone’s security.
How To Use Dr.Fone To Change/Fake Location on Life360?
Give yourself some breathing room on Life360. Dr.Fone Virtual Location helps you spoof location sharing on your terms without raising eyebrows. Here’s how to change your location on the Life360 app without anyone knowing:
- Step 1: Connect your smartphone to your desktop using a USB cable after downloading Dr.Fone. Once installed, launch it and select Virtual Location from the Toolbox homepage to continue with the feature.
- Step 2: Click Get Started and select the checkbox to acknowledge the disclaimer.
- Step 3: Click No Device on the upper right side of the map.

- Step 4: Choose the iOS or Android device to connect, then click Next. Wait while your device connects to your computer.

- Step 5: Follow the on-screen steps to put your device in the Developer mode and wait for the Dr.Fone app to detect it.

- Step 6: Select the travel mode you want from the top-right side and set your destination on the map.

- Step 7: Choose your route type, adjust speed, and click Move Here to launch the simulation.
- Step 8: Simulation initiated. Track your movement on the map at your set speed. You can click Pause or Clear to control the flow.
Part 4: Other Ways for Responsible Location Sharing on Life360
Life360 is a valuable tool for staying connected with loved ones and ensuring safety. However, concerns about privacy and changing your location on Life360 are valid. Doing so might seem tempting, but it can undermine the app’s purpose. Here are alternatives for safety and communication without compromising privacy.
Designated Safe Zones
Set up safe zones such as home, school, or work, where location sharing is on. You can change your location on Life360 outside these zones. And turn off sharing for privacy while providing reassurance during crucial times.
Time-Based Sharing
Opt for temporary location sharing during activities or outings. That way, your loved ones can track your whereabouts without constant monitoring. You can also set a timer for location sharing to deactivate after the activity, so you don’t have to fake your location.
Location Bubble
Some Life360 plans offer location Bubble. It shares your general vicinity without revealing your exact coordinates. This provides a sense of security while maintaining a degree of privacy.
 Forex Robotron Basic Package
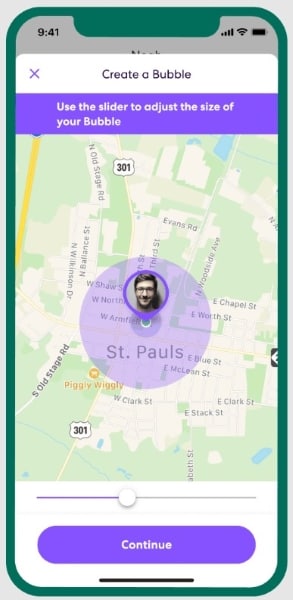
Open Communication
Talk with your family about your concerns about location sharing. Explain your desire for more privacy while emphasizing your commitment to safety. Discuss boundaries and compromise on situations where location sharing feels necessary.
Consider Alternatives
Explore apps with granular privacy controls. Some focus on user privacy and allow for more customized sharing settings. Change your location on Life360 responsibly to balance safety and privacy.
Conclusion
So, let’s go back to the main question. Can you change your location on Life360 without anyone knowing? Yes, it is possible to fake your location using spoofing apps for Android and iOS. But it’s crucial to value trust in relationships. Instead of resorting to faking your location, consider responsible alternatives.
But of course, there are certain situations in which you will need to fake your location. In such cases, Dr. Fone’s Virtual Location changer is a responsible solution. This tool enables temporary location modifications with precise control and ethical features. Use them responsibly and prioritize genuine communication for healthy, secure connections.
- Title: In 2024, How To Activate and Use Life360 Ghost Mode On Motorola Moto E13 | Dr.fone
- Author: Abigail
- Created at : 2024-07-24 17:14:59
- Updated at : 2024-07-25 17:14:59
- Link: https://location-social.techidaily.com/in-2024-how-to-activate-and-use-life360-ghost-mode-on-motorola-moto-e13-drfone-by-drfone-virtual-android/
- License: This work is licensed under CC BY-NC-SA 4.0.