
In 2024, How to Change Location on TikTok to See More Content On your Realme 11 5G | Dr.fone
How to Change Location on TikTok to See More Content On your Realme 11 5G
TikTok is a famous entertainment application that shows exciting content worldwide. It is now a popular application with a recorded 3 billion downloads while surpassing the popularity of Facebook and Twitter in 2018. But, sadly, the application keeps on being the victim of restrictions and bans in different countries worldwide.
This limits content broadcast in different regions, making TikTok lovers deprived of entertainment. But, if you know how to change location on TikTok, you can surpass all these restrictions easily. The article will help you learn how to change your TikTok location by presenting the following aspects:
Part 1: How Does TikTok Detect your Location
According to the TikTok privacy policy, your location through TikTok is tracked based on your IP address, SIM card, and GPS. It happens right after you make your account on TikTok through your phone number. In this way, TikTok also happens to avoid scammers and fraudsters. In some cases, your location is also automatically tracked by giving a location tag to your posts.
The IP address and browsing history on the TikTok, time zone setting and mobile carrier are also collected by the TikTok as “Technical Information.” In case you want to know if TikTok ensures your safety as well? The answer is no. If you give your location access to TikTok, it increases the chances of getting hacked.
Your information becomes easily accessible to everyone. Moreover, it is also mentioned in the privacy statement of TikTok that they will share your details with public authorities, enforcement agencies, and other organizations. TikTok can share your sensitive information with governments and commercial parties.
If you don’t want to add your location on TikTok, you will have to deny the permissions on your phone. Hence, knowing how to change location on TikTok is necessary.
Part 2: Why We Need to Change Location on TikTok
We have discussed how TikTok gets to know about your location in the first part. Now, we will share why do we need to change location on TikTok:
- To Add Diversity to the Audience
The algorithm of TikTok is built so that it will only show the content of your region or country. Therefore, if you want to make money through your content on TikTok, it might not be possible for you. So, you may want to target the audience of another region that is willing to buy the content.
- Access Better Content
Even if TikTok offers exciting content that has made the app popular, you can only access the available content for your region. Therefore, if you want to enjoy more content from the other areas, you should change your location on TikTok to access unlimited content.
- Use the App without Hurdles
Countries like Afghanistan and India have banned the TikTok application, and Indonesia and Bangladesh have censored it. Moreover, the United States is also thinking of the same due to user privacy concerns and security threats. However, if your country has already banned TikTok, you can still access the content with a fake location if you know how to change location in TikTok.
- Protect your Privacy
If you are not using a VPN or any other way to change your location, TikTok can access your device easily. The organization behind TikTok can access the applications on your phone, your messages, and places you go to. So, when you change your location, it will remove the chances of being tracked.
Part 3: How to Change your Location in TikTok on Different Devices?
We have discussed why it is essential to know how to change the location of TikTok. Now, we will move forward and discuss the methods involved in changing the TikTok location on various devices:
1. For iOS and Android Devices
If you are interested in changing your location on your iOS and Android devices, the following methods are aligned for you:
Method 1: A tested way - Dr.Fone - Virtual location
Dr.Fone – Virtual Location is an application designed for Android and iOS devices. This application assists in teleporting the GPS location to any other location easily. With this location changer, you can fake your location and enjoy the content of different regions without having to travel anywhere. The following steps will guide you on how to change the TikTok country location with Dr.Fone – Virtual location:
 safe & secure
Step 1: Access the Location Changer
The first step demands you download Dr. Fone’s Virtual location and install it. Next, launch the program and click “Virtual location” from all the available options. Next, connect your Realme 11 5G or iPhone through any USB cable with your PC and tap on “Get Started.”

Step 2: Access your Current Location
A new window will be opened, and your real location will be displayed on the Dr.Fone map. If you can’t see it, click on the “Center On” icon at the right sidebar to show the location.

Step 3: Activate the Teleport Mode
Now, click on “Teleport Mode” by pressing the first icon on the upper-right side. Now, provide the place you want to teleport to in the search bar. Next, press the “Go” button and press the “Move Here” button from the popup box.

Step 4: Your Location is Changed
Now, the location of your iOS or Android phone has been fixed to the given location. So you can now enjoy your fake location content on TikTok while bypassing all the restrictions efficiently.

Method 2: Changing Language on TikTok to Access Content from Other Regions
TikTok only shows the content of languages that are native to your region. Fortunately, you are allowed to change the language on TikTok and access the content of that region. However, this method only shows the content of the selected area.
Therefore, you can’t add the language of any such region which has banned the application. Instead, follow the given steps to change your language on TikTok and access the content peacefully:
Step 1: Open the TikTok application and select “Profile,” written on the lower right-hand corner of the interface.

Step 2: Now, click on the three dots mentioned in the right-hand corner and access the “Settings and Privacy” of your TikTok account. Now, choose the “Content Preferences” option written under the “Content & Activity” section.
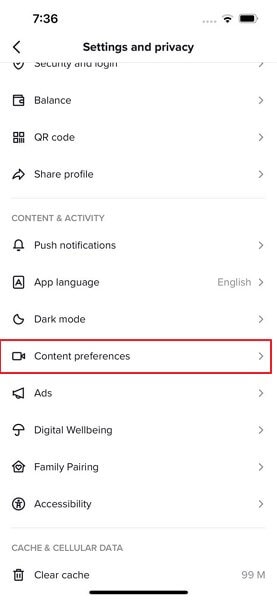
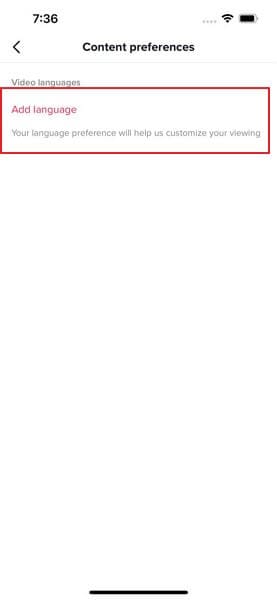
Step 3: Now, add the language that is native to your target region. Now, you will be able to access the content of the particular region.
Method 3: Changing your SIM Card to Change Location on Tiktok
TikTok uses the region code of your SIM card to display the content of your region on the feed. Therefore, it will be helpful if you buy a SIM card from another area and use it on Your Realme 11 5G to watch that region’s content quickly. This process is as simple as choosing a fake location and buying a SIM card from that region.
You can do so by ordering an international SIM card through Amazon and putting your SIM in the mobile phone. Now, delete the cache and app data. Then, open TikTok and enjoy various content. Unfortunately, you will have to buy a phone with a dual SIM. Moreover, some SIM cards might not work in your region unless you buy a mobile plan.
2. For Computer
Now, let’s discuss how to change your location on TikTok from your Computer. For this, we have introduced a VPN service that fakes the location on TikTok and helps you access content from different regions.
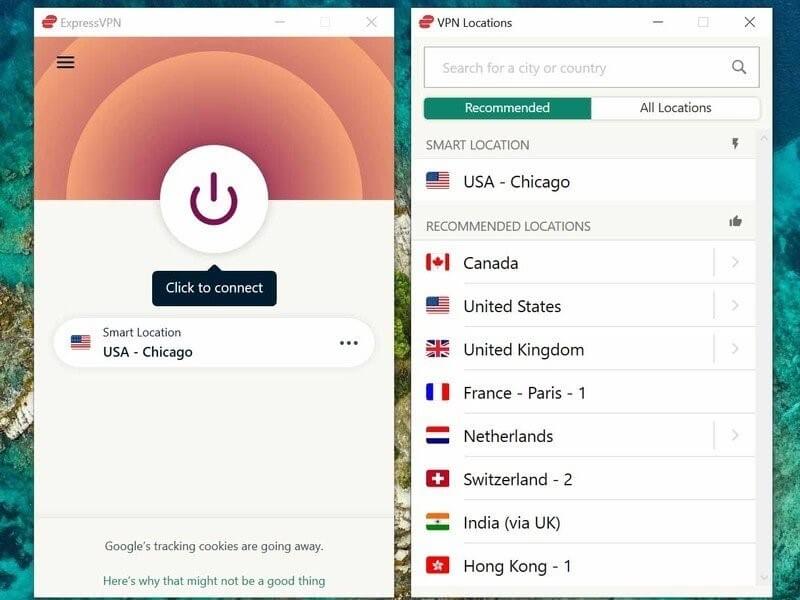
ExpressVPN
ExpressVPN is a top-notch VPN that provides blazing-fast speed for browsing, streaming, and playing games with unlimited bandwidth. You can connect to the service anywhere as the application’s high-speed servers work across 94 countries. In addition, it protects user data by offering the best security and encryption.
With the given following steps, you can set up ExpressVPN on your computer and access unlimited TikTok content:
Step 1: Launch the ExpressVPN software and tap on the “On” button to utilize the service. Now, press the “Smart Location” option.
Step 2: Select the VPN server location from the “All Location” tab or “Recommended” tab.
Step 3: Once you are connected, you will be able to use TikTok and watch content from the selected region with enhanced privacy and security.
Part 4: FAQs about TikTok Location
1. Is it not legal to change the TikTok location?
It is legal to do so unless you are not misusing the application and watching objectional content from the region.
2. How to turn off the GPS on TikTok?
For Android devices, open the “Settings: and reach the “Location” tab. Now, press on the “App Permission” option and search for TikTok. Now, click on “Don’t Allow.”
For the iOS device, open the “Settings” app and click on “Privacy.” Further, click on “Location Services” and find TikTok. Change the TikTok location setting to “Never.”
3. Is it safe to use TikTok with a VPN?
Yes, TikTok will not be able to detect that you are using a VPN. Therefore, you will not be banned from using the application. It is safe to access TikTok with a VPN because it hides your IP address and location.
Conclusion
We have extensively concluded different methods involved in How to change location on TikTok. For iOS and Android devices, you can do so with the help of Dr.Fone - Virtual Location . Besides, you can manually change your language or SIM card to access the content of the particular region. If you use a computer, you can use ExpressVPN and change the location of your device while hiding your IP address.
safe & secure
Why Your WhatsApp Location is Not Updating and How to Fix On Realme 11 5G
WhatsApp is a free messaging app owned by Meta, initially Facebook. Currently, this platform boasts over two billion active users, even outshining Messenger and WeChat. One of the reasons WhatsApp is popular is letting users share their live location with individuals and group chats. However, sometimes you may experience the annoying WhatsApp location not updating issue. Luckily, this article has a solution to this problem. We’ll also address how to share my location on the WhatsApp issue. Let’s learn!
Part 1: Why is WhatsApp Live Location Not Updating?
First and foremost, let’s discuss some of the reasons why your WhatsApp live location is not updating on Android or iPhone. Below are some of them:
1. Weak internet connection
You should be conversant with the idea that WhatsApp can’t function without the internet. In other words, you can’t send or receive messages and calls without strong internet. And the same applies to updating your live location.
2. Disabled location feature
Here’s another reason why WhatsApp live location is not updating on iPhone or Android. While signing up, WhatsApp will request to access your phone’s GPS location. Therefore, disabling this feature by mistake can prevent WhatsApp from updating your location.
3. Inappropriate time and date
Although uncommon with modern phones, this can be another reason for a wrong live location on WhatsApp. Therefore, connect your phone to the internet to update your date and time. You might also want to restart your phone and see if it works.
Part 2. How to Fix WhatsApp Live Location Not Updating Problem?
Now that you already know why WhatsApp’s live location isn’t updating, it’s time to check out the solutions. Let’s go!
Step 1. Restart internet connection
Sometimes, it only takes a simple phone restart to get things back on track. Of course, this will also sort out any bugs in your WhatsApp app. Another thing, you can enable and disable “flight mode” to restart your data connection.
Step 2. Update the app and phone
When last did you update your system and apps? You should constantly update your apps and phone system to enjoy better performance and security. It is straightforward!
Step 3. Enable location service
You can also check if your location service is enabled on iPhone or Android settings. On iPhone, click Settings > Privacy > Location Service. It’s even easier on Android. Swipe down your screen, long-press the GPS button, and enable the Location toggle.
Step 4. Reset location service on iPhone
iPhone users can try to reset the Location & Service settings. To do that, open Settings > General > Reset > Reset Location & Privacy.
Step 5. Uninstall and reinstall WhatsApp
If all else fails, then it’s probably time to get handy. Simply uninstall your WhatsApp app and then get a newer version on Play Store or App Store. But often, this won’t be necessary after updating the app.
Part 3: [WhatsApp Tip] Fake WhatsApp Live Location with Unreal Accuracy
There have been multiple security concerns about WhatsApp before. But while the jury is still out, do yourself a favor and protect your live location from spyware and other users. Also, you might want to spoof WhatsApp location for business purposes and prank friends.
That said, learning to fake location on WhatsApp is super simple with Dr.Fone - Virtual Location . With this GPS app, you can teleport your WhatsApp live location to anywhere in the world. And to make your new location more believable, this program lets you simulate movements by foot, scooter, or car. Remember, it works with all iPhone/Android versions and other social media apps like Pokemon Go , Snapchat , Instagram , Facebook , etc.
Dr.Fone - Virtual Location
1-Click Location Changer for both iOS and Android
- Teleport GPS location to anywhere with one click.
- Simulate GPS movement along a route as you draw.
- Joystick to simulate GPS movement flexibly.
- Compatible with both iOS and Android systems.
- Work with location-based apps, like Pokemon Go , Snapchat , Instagram , Facebook , etc.
3981454 people have downloaded it
Below is how to spoof WhatsApp live location with Dr.Fone:
Step 1. Open the Virtual Location tool.

Install and launch Dr.Fone on PC, and then connect your phone to the PC with a USB firewire. Then, tap the Virtual Location button on the home page and click Get Started on the pop-up window.
Step 2. Connect your phone to Dr.Fone.

To connect your phone to this all-in-one software, enable “transfer files” instead of “charging” on your phone. Then, enable USB debugging under the settings tab. On Android, just click Settings >Additional Settings > Developer options > USB debugging.
Step 3. Choose a new WhatsApp live location to share.

After USB debugging is on, tap Next and enter the new location on the search field at the top-left corner. Now choose the area and tap Move Here. Interestingly, you can choose a movement route and customize the speed. And there is that!
Part 4. How to Send Live Location on WhatsApp?
Back in 2017, WhatsApp rolled out a brand-new feature that allows users to send their live location to family and friends. This location can come in handy if you want to meet up somewhere or let your friends and family know you’re safe and secure. And lest I forget, you can also use it to prank your friends.
Note, however, that WhatsApp only allows you to share your real-time location for 8 hours, 1 hour, or 15 minutes. In other words, this gives you control over how long users can see you on the map. Moreover, this information can’t be shared with anyone once you stop sharing.
So without wasting time, here’s how to send live location on WhatsApp for Android or iPhone:
Step 1. Enable the GPS service on your phone by clicking the GPS button on the control panel.
Step 2. Open WhatsApp and tap the group chat or individual chat with which you want to share the location.
Step 3. Now click the Attach button on the text field and click Location.

Step 3. Allow WhatsApp access to your device’s location and then press the Share Live Location button.

Step 3. Last but not least, set the duration your contact will view your location, add a comment, and tap the Send button. That’s it!
Note: As you can see, WhatsApp relies on your GPS location to share your actual location. So, use Wondershare Dr.Fone to change your device’s location and then share it on WhatsApp.
Part 5: How to Fix Common WhatsApp Issues on Android & iPhone
Wondershare Dr.Fone is the perfect tool to handle all your WhatsApp issues. Below are some common issues it can help you with:
- Lost Messages
Sometimes you might accidentally or intentionally delete WhatsApp chats or messages. Fortunately, Dr.Fone can help you dig out and recover those messages with a simple click. Just launch the Data Recovery tool, connect your phone to the software, and Dr.Fone will scan for all lost and current messages.
- Transfer WhatsApp data
Thanks to the fast-paced mobile technology, it’s inevitable to migrate to a new phone. But you’ll have to sacrifice all your WhatsApp data. Luckily, Dr.Fone allows you to backup, restore, and transfer all WhatsApp data.
- Backup WhatsApp Business chats
Having a WhatsApp Business account is vital if you’re an online marketer. Here, you can create a business profile and enjoy quick replies, automatic messaging, accurate statistics, etc. So, to avoid losing your invoices and other business chats, use Dr.Fone to back up and transfer your WhatsApp Business chats to a new phone.
Wrap it Up
See, there’s nothing complex about the WhatsApp live location not updating issue. Just update and restart the app or check your location settings if it’s enabled. And, of course, use Dr.Fone to share a fake location on WhatsApp and perform other WhatsApp tasks like backing up and transferring data. Thank me later!
Does find my friends work on Realme 11 5G
Find my friends app is becoming a norm for most people. The Smartphone and app developers are now aware of this. As a result, most Smartphone platforms are adding tools that allow users to share their whereabouts with others. Apple has its native Find my friends for their iPhone. The app works great for a group of iOS users, but you may need to share location with Android devices, which the built-in app can’t help you with. When you want to use the “find friends” app, they certainly need to add people from Android and iPhone users. And, you can’t dictate what people are choosing as their smartphone platform. While some prefer Android, many of us are dedicated to the iPhone too. Therefore, if you need to keep track of the real-time location of your family members or friends, you need the assistance of a third-party tool. These apps are the most logical way to create a link to find my friends app for Android and iPhone.
Part1: How to track friends using iPhone or Android
1.1 Tracking Friends using iPhone
As an Apple user, you might already know about the “Find my friends” app on your device. It is the most convenient way to share your location with your friends. You can also keep track of your peers with it. If you ever feel lost in a new area, you can use this app to notify your friends. You can use this app to create a route for all to meet in a selected location. If your friends are heading toward the destination, the app will notify you.
Let’s see how one can use the “find my friends” on the iPhone, shall we?
1.1.1 You will find the “Find Friend” on your Home screen. In IOS 13, you will have to launch the “Find MY” app.

1.1.2 Tap “Add Friends.”
1.1.3 Add a contact name from your list. You can add several contacts here.
1.1.4 Tap Send.

1.1.5 Now select a time option.
If you want to share your location, launch the app first. Then Tap “Me.” Then, keep your “Share My Location” switched on.

1.2 Tracking Friends Using Android
Android users can also use this find my friends app. Even if someone in your group does not use a smartphone (seriously?), you can track them. You can send an invite, and if they agree, you can find your friend anytime. Remember, iPhone or Android, whatever the platform, all the members of the group have to agree with location sharing; otherwise, you cannot track them.
You can use find my friends from iPhone to an android user via Google Maps. You need to download the app and activate location service by taping “Allow While Using App” Then you have to select” “Share your location” You can then send your location to your android user friend from the message icon of the Google map.

Part2: 3 best find my friends apps compatible both Android and iPhone
You have the preliminary idea of how one can find their friends using an iPhone or Android. But, how to keep track of all of your friends, while some of them are die-hard apple fanatics and others are android geeks? Well, you do not need to tell others about those anymore, as we are going to talk about three fabulous cross-platform apps for finding friends.
2.1 Find my friends
This app is straightforward and pretty simple to use. You can look at the map and find your friends at any time. Your friends also can keep track of you. SO, if security is your concern,” “Find my friend” is perfect for you. You can also chat with friends while they are on route.
You can also issue an alert to your friends whenever you are in an emergency. All your loved ones will get the address details, current time, and the remaining battery life. If your group has a mix of Android, iOS, and Blackberry, this app is excellent for you.

2.2 Familo
Familo is the best working “finding friend” app. The app is regularly updated, and you can sign up with a phone number. You don’t need Facebook or any username to use this app. You have to create a group and invite others. If they sign up, you will get their location details at any time of the day. Of course, they have to approve it first!
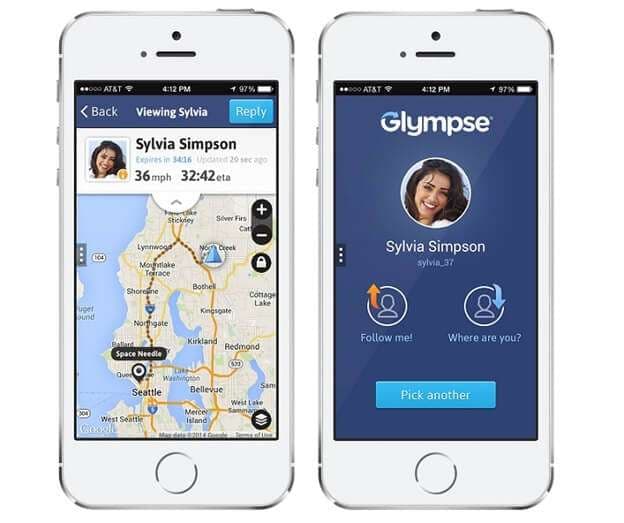
2.3 Glympse
What makes Glympse different from others is the fact that you don’t even need to sign up here! You can set up a group for a specific time, and share your location to anyone you want to. You can even share your places via the web. If you wish to track your friends temporarily or contact someone for a specific period, Glympse is the right choice for you. And, if someone is not comfortable with the idea of location sharing, you can send your location via the web. They can use the shared link to know your area without ever installing the app. But, if you want to check up on your loved ones continually, then Glympse cannot satisfy your demand. As a temporary service, your location sharing link will be activated for four hours at most.
Conclusion
Remember, there are several other find my friends apps in the app store, which can entice you. Some of them have pretty neat features. But, they can drain your battery too fast; others can be pretty limited on their free version. And, many of find my friends apps are partial to either iPhone or Android. But, why not try them out yourself? Everybody’s needs and tastes are different. Give my three favorite find my friend apps for Android and iPhone a try, if they suit you, great. If not, there are more options. Find one for you and keep a “leash” on your loved ones!
Also read:
- [New] 2024 Approved Digital Footprint How to Share Your Short Videos on Computers & Phones
- [New] Charting the Path to Previous Imagery A Facebook-Centric Guide
- [New] Unlocking Growth Medical Ad Tricks on Social Media for 2024
- 4 Feasible Ways to Fake Location on Facebook For your Motorola Moto G84 5G | Dr.fone
- Crafting Engaging Music Reactions The YouTube Enthusiast's Blueprint for 2024
- Discover the Cutest 10 Video Compressors Available on Google Play
- Edit and Send Fake Location on Telegram For your Motorola Moto G84 5G in 3 Ways | Dr.fone
- Hard Resetting an Samsung Galaxy S24 Ultra Device Made Easy | Dr.fone
- How to Fake Snapchat Location on Motorola Moto G84 5G | Dr.fone
- How to Fake Snapchat Location without Jailbreak On Motorola Moto G84 5G | Dr.fone
- How to Hide/Fake Snapchat Location on Your Motorola Moto G84 5G | Dr.fone
- How to Share/Fake Location on WhatsApp for Motorola Moto G84 5G | Dr.fone
- In 2024, How to share/fake gps on Uber for Itel P55 5G | Dr.fone
- In 2024, Professional Screen Grabber for Modern Win11
- In 2024, Unleash Video Potential Key Tactics for Backlink Creation
- Title: In 2024, How to Change Location on TikTok to See More Content On your Realme 11 5G | Dr.fone
- Author: Abigail
- Created at : 2025-01-15 16:17:40
- Updated at : 2025-01-20 20:24:33
- Link: https://location-social.techidaily.com/in-2024-how-to-change-location-on-tiktok-to-see-more-content-on-your-realme-11-5g-drfone-by-drfone-virtual-android/
- License: This work is licensed under CC BY-NC-SA 4.0.