
In 2024, How to Change Oppo A1 5G Location on Skout | Dr.fone
How to Change Oppo A1 5G Location on Skout
When it comes to dating application or website, Skout has made its appearance in this regard a long way back. The app was founded in 2007 and offers a platform to help you get connected with the people. You can use Skout either on your Oppo A1 5G or an iOS device. The main function of the app is that it takes help of your device’s global positioning system (GPS) and lets you find the users in a specific radius where you are.
Since it is a location-based app, many times you might have questioned like “how can I change my location on Skout”. If yes, this article is what just you need. We will assist you how to change location on Skout on Android as well as iOS devices. Scroll down and get to know more!

Part 1: 2 Solutions to Change Skout Location on iOS
1.1 Change Skout Location on iOS using a GPS Simulator
When you are an iPhone user, the best way to change Skout location is using dr.fone – Virtual Location (iOS) . This tool performs way better than any other in the market when you want to change iOS location. With the help of this, you can easily teleport anywhere across the world. Moreover, you can fake routes and show moving from various places. It is completely safe to use and a user-friendly one. Here is how you can do Skout location change on PC using this tool.
Step 1: Get the Software
From the original website of dr.fone – Virtual Location (iOS), download it on your computer and then install it. When you do the installation process completely, you are required to launch the program. After launching, choose “Virtual Location” tab from the first page.

Step 2: Plug iPhone to PC
Take your iOS device and get the original lightening cord as well. Make a secure connection between the computer and the iPhone using it. When it gets detected by the program, click on “Get Started” button.


Step 3: Activate Teleport Mode
You will see a map window now. Here, what you firstly need to do is to find the actual location of yours. If you can’t find the accurate location, go to the icon at the lower right part which is “Center On” icon. This will bring the accurate location.

Now, from the three icons available at the upper right side of the page, click on the 3rd one. This will enable the “Teleport Mode”. Once done, enter the name of the place in the field given and hit on “Go”.

Step 4: Spoof Location
The program will no longer take time and easily understand the location. It will display a pop-up from where you need to click on the “Move Here” button. The location will be successfully changed now. You can now see the changed or spoofed location on your Oppo A1 5G easily.

Dr.Fone - Virtual Location
1-Click Location Changer for both iOS and Android
- Teleport from one location to another across the world from the comfort of your home.
- With just a few selections on your computer, you can make members of your circle believe you’re anywhere you want.
- Stimulate and imitate movement and set the speed and stops you take along the way.
- Compatible with both iOS and Android systems.
- Work with location-based apps, like Pokemon Go , Snapchat , Instagram , Facebook , etc.
3981454 people have downloaded it
1.2 Change Skout Location on iOS using Cydia
Another way to get the Skout location changed is through Cydia. Cydia is basically a platform that allows you to install the applications that are not validated by Apple. However, you will need to jailbreak your device in order to go ahead.
Limitations:
- As we have mentioned above, one of the biggest disadvantages of using this way is that you will have to get your device jailbroken. And no doubt the other limitations will also be related to this.
- While using this method, your device may end up getting bricked. So, be sure if you really wish to use this method.
- Lastly, the method can make your device vulnerable to malware and other malicious apps.
If you are still comfortable using Cydia to change Skout location, let us move on the steps.

Step by Step Guide on how to change location on Skout app
Step 1: Open CYdia in the first place and search for “FakeLocation”.
Step 2: Tap on “Modify” and get back to the Homescreen.

Step 3: Look for the FakeLocation app icon now and tap on it. Once you open it, tap on “Choose my fake location.

Step 4: Use the map to adjust at the location you want to spoof.
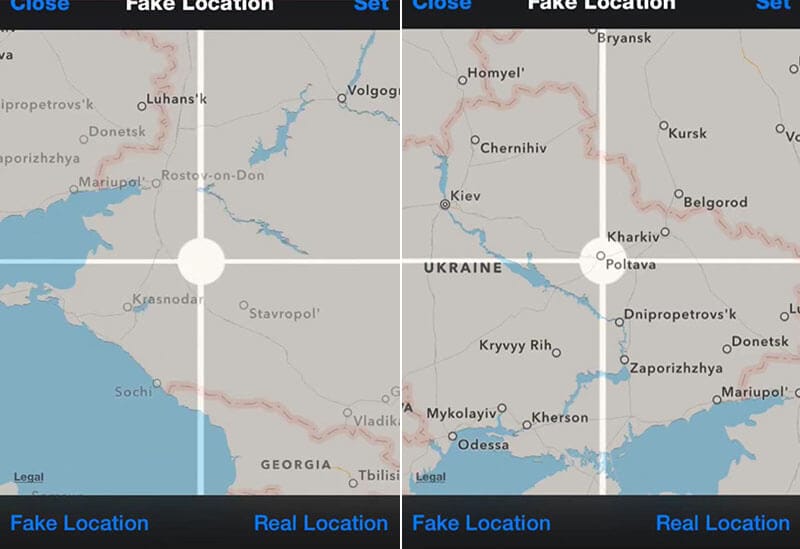
Step 5: Now, you are done. Just open Skout and enjoy the new location.

Part 2: Change Skout Location on Android with a Spoofer App
If you are an Android user and wondering how to change your location on Skout, all you need is a spoofer app. You can get a lot of options from Play Store. However, one of the popular apps that can be relied upon is Fake GPS GO Location Spoofer Free. This app doesn’t require rooting if your device is having Android version 6 and more. You can easily create routes with this app. Let us know how this works.
Step by Step Guide to change Skout location via FakeGPS Go
Step 1: Before you get the app installed it is important to turn on the developer options firstly. And to do this, all you need is to go to the “Settings” in your device and tap on “About Phone”.
Step 2: You will see a “Software Info” option. Tap on it and scroll to the build number. Tap on it 7 times and you will see the developer options getting enabled on your device.
Step 3: As we are using Android, you need to head to the Google Play Store and look for the app on it. Now, install and then open it to proceed.
Step 4: While the app is launched, tap on the “ENABLE” option located at the bottom.


Step 5: Now, you will be directed to the Developer options page. Here, choose “Select mock location app” and tap on “FakeGPS Free” subsequently.

Step 6: Now, get back to the Fake GPS app and the look for the route that you want to spoof. Press on the Play button and you are good to go. Your location will be changed on Skout.
Limitations:
- No matter spoofing is fun, but you need to be a little careful. In case it gets detected by the company, your account may get banned as this is against the policy of any app.
- The process of using the spoofer app to change Skout location can seem to be difficult and complex.
- Some apps require you to root your device in order to let you proceed with spoofing properly.
- When you spoof your location with the app too frequently, this may make your profile under suspicious activity monitoring.
 KoolReport Pro is an advanced solution for creating data reports and dashboards in PHP. Equipped with all extended packages , KoolReport Pro is able to connect to various datasources, perform advanced data analysis, construct stunning charts and graphs and export your beautiful work to PDF, Excel, JPG or other formats. Plus, it includes powerful built-in reports such as pivot report and drill-down report which will save your time in building ones.
 It will help you to write dynamic data reports easily, to construct intuitive dashboards or to build a whole business intelligence cockpit.
KoolReport Pro package goes with Full Source Code, Royal Free, ONE (1) Year Priority Support, ONE (1) Year Free Upgrade and 30-Days Money Back Guarantee.
Developer License allows Single Developer to create Unlimited Reports, deploy on Unlimited Servers and able deliver the work to Unlimited Clients.
Part 3: Use Tinder instead
Tinder has its own popularity among today’s generation and it has revolutionized the way of dating. If you are interested in faking location on a dating app, using Tinder will be our next suggestion. Unlike Skout, Tinder offers it own Tinder + feature in order to assist you in changing the location of your device. The condition is to subscribe the plan for Tinder +.
However, when you use Tinder +, you may feel it to be an expensive deal. On the other hand Skout is free to sign up. You need to be having a Facebook account in order to join Tinder whereas Skout doesn’t want any such requirement. Moreover, on Skout, you can have the meet tab with which you are allowed to see the photos of people and know the age.
Here are the detailed steps on how you can change location.
Step 1: Launch the Tinder in your Oppo A1 5G as the first step. Upon launching it successfully, go to your profile icon and tap on it. You will find it at the top of the screen.
Step 2: Look for the “Settings” option now and then choose “Get Tinder Plus” or “Tinder Gold”. You can now subscribe a plan and then Tinder + will be yours.
Step 3: Now, again open the Tinder app followed by tapping on the profile icon.
Step 4: Choose “Settings” and hit on “Swiping in” option. Next, tap on “Add a new location” and then you know what to do.

3 Things You Must Know about Fake Snapchat Location On Oppo A1 5G
You must know that many social media platforms could track your location. And Snapchat is one of the social media platforms that easily tracks your location and use this information to improve its features and services. But many people concern about their privacy when using social media apps. If in case if you do not want Snapchat to track our location, then a fake Snapchat location could perfectly meet your needs.

Part 1: Do you really know Snapchat?
Snapchat comes with many effective and best features that could perfectly meet your needs. Some of the best features of Snapchat are Snap Ads, filters, lenses, audio, tune performance, video streaming, instant messaging, and much more. Snapchat is the most lending application for Android and iOS apps. The best thing about this application is that it includes some useful features that you ought to incorporate when creating a Snapchat clone for your business. These features contain both photos and video options.
Best features of Snapchat:
- Snap
Snap is the best feature that is loved by all, and it is the core feature of Snapchat. With this useful feature, you could click snaps and share your pictures easily and quickly.

- Lenses
The lens features are also included in the Snapchat feature. This feature is a combination of machine learning and artificial intelligence, as it allows you to see your younger and older version. This feature helps you to boost your engagement on your application.

- Voice and video calls
Snapchat includes the voice and video call feature that could help you to connect your friends and family globally easily.

- Story
The story feature that Snapchat includes is best as it could help you to broadcast your latest snap. The story format only lasts for twenty-four hours. This story features allow you to connect and effectively engage your users easily.
- Filters
Snapchat comes with an amazing feature that is called as filters. It includes many best filters that you must check to get the best results. These effective filters could be used to increase usage and connect with the audience effectively.

 Power Tools add-on for Google Sheets, 12-month subscription
Part 2: Ways to Fake Snapchat Location
There are many effective ways of fake Snapchat locations without jailbreak. And some of the effective ways are mentioned below:
Method 1: Using Fake Location Apps
- iOS version: Dr.Fone-Virtual Location
If you are an iOS user and wish to fake location for a Snapchat map, Dr.Fone-Virtual Location is one of the best fake location apps that could be used on Snapchat. This iOS location changer is best for privacy keeping and more. With this effective app, you could teleport iPhone GPS anywhere in the world. It also allows you to simulate GPS movement along real roads or paths you draw and support five devices location management. To use this tool, you must follow the steps as mentioned below:
Step 1: You must download this Dr.Fone-Virtual Location tool from its official website and install it. After you have installed the tool, you must opt for the virtual location module from the main interface
Step 2: Connect your Oppo A1 5G to the PC using the lightening cord and click on the “Get Started” option.

Step 3: Now, you will be able to check your current actual location of yours on the map. After this, you need to activate the “Teleport mode”. This will be the third icon located on the right side of the screen.
Now, enter the location that you desire to teleport and click on the “Go” option.
Step 4: The program will analyze the place that you have entered, and it will show you the distance for that place in a pop-up window. Hit on “Move Here”.
 Easy GIF Animator is a powerful animated GIF editor and the top tool for creating animated pictures, banners, buttons and GIF videos. You get extensive animation editing features, animation effects, unmatched image quality and optimization for the web. No other GIF animation software matches our features and ease of use, that’s why Easy GIF Animator is so popular.
You will now be able to check the new location whenever you click the “Center On.”
- Android version: FGL pro
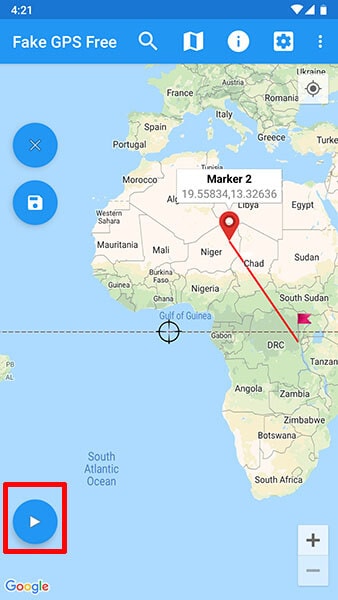
For Android people, many fake GPS apps can help them. Since dr.fone doesn’t support Android devices for now, we will help the users with a well-known Android app to serve the purpose, and it is FGL Pro. This app is free to download as well as works in a hassle-free way. However, if we talk about the steps, you will be a bit disappointed as the steps are lengthy for this as you will require downgrading Google Play services. Let us know what exactly we need to do.
Step 1: As mentioned, firstly, downgrade the Google Play services. Then, install the app in your Oppo A1 5G.
Step 2: Once installed, make sure to disable the “Find My Device” option. You can do this by “Settings” > “Security” > “Device Administrations” and turn off the option.


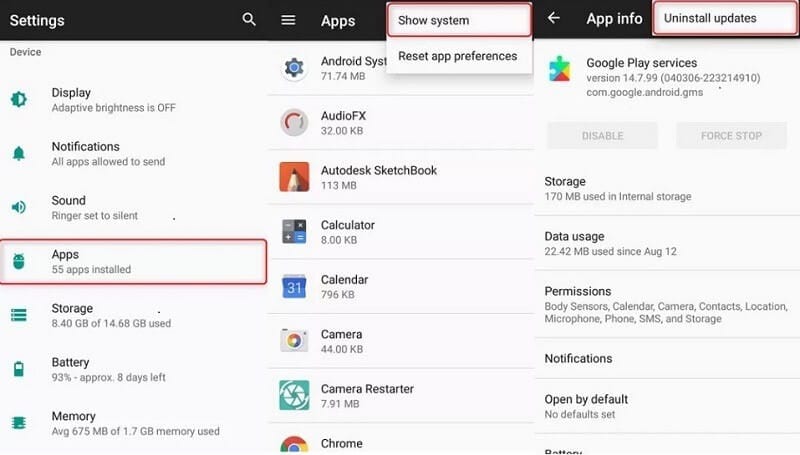
Step 3: Another thing to be noted after downgrading Google Play services is to uninstall the updates. Simply head to “Settings” > “Apps” > “menu” > “Show System” > “Google Play Services” > “Uninstall Updates”.
Step 4: Now, install the older Google Play Services version that you downgraded earlier. Head to “File Explorer” > “Downloads” and click apk file of Google Play Services. Tap “Install”.


Step 5: Now, go to “Settings” > “Apps” and tap the menu. Choose “Show System” > “Google Play Store” and disable it.
Step 6: Now, you need to set the FGL Pro as a mock location app. Please make sure to enable Developer options first. Then, in the menu of Developer Options, select “Select mock location app” > “FGL Pro”.

Step 7: Open the app now and set the desired location. Tap on the “Play” button, and you’re good to go.

Method 2: Using VPN
The second effective method to Snapchat fake location is through the help of a VPN. There are a lot of options when it comes to VPN. However, you can choose Surshark if you can’t decide whether it is one of the best VPN that comes with build-in fake GPS tech. It is the cheapest and the VPN that provides you with the perfect way to enhance your Snapchat experience.
 TubeDigger - online video downloader from mostly any site

Method 3: Using Xcode
The third method of fake GPS for Snapchat includes Xcode. Through Xcode, you could easily change the Snapchat location. Steps to a fake location with Xcode includes:
Step 1: In the first step, you must install Xcode from the Macs app store.

Step 2: Launch it and set up a project. Choose “Single View Application” and click “Next”.

Step 3: Provide a name to the project and hit “Next”.

Step 4: Now, you must set up GIT on Xcode. You will notice a screen showing “Please tell me where you are” and the commands.
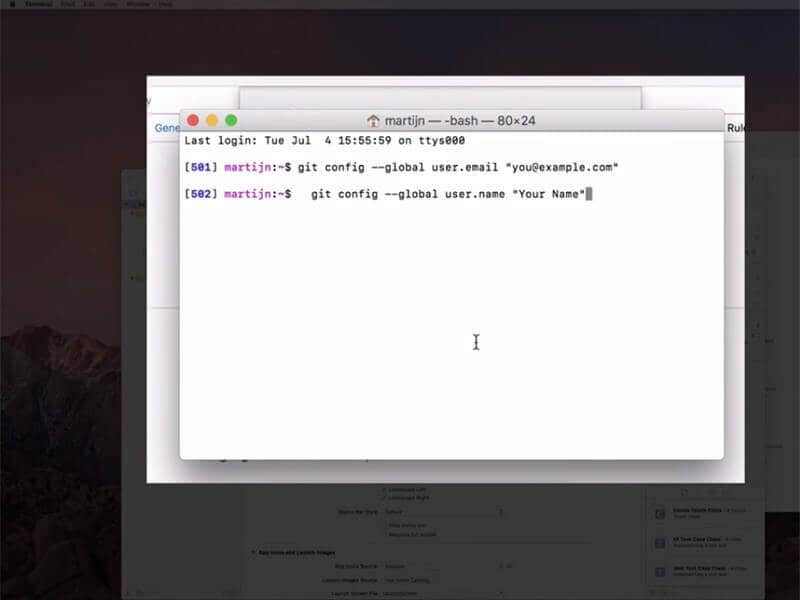
You are required to enter the commands in “Terminal”. Open it and type the following:
- git config –global user.email “you@example.com “
- git config –global user.name “your name”
Please note: “you@example.com ” and “your name” should be changed with your info.
Step 5: Connect your Oppo A1 5G to Mac and wait as Xcode will begin to process some files.
Step 6: You can now click on “Debug” menu and choose “Simulate Location”. Choose the desired location now and fake GPS.

Part 3: What to pay attention to while faking Snapchat location?
There is a certain risk that you may face while using a fake GPS Snapchat map, so you must pay attention while faking Snapchat location. Some of the fake location tools could simulate latitude and longitude perfectly but do not simulate altitude, which may sometime ban your account in Snapchat. Hence you must choose the best tool that could spoof any location without any range limitation.
Some of the Snapchat spoof does not work immediately and may also provide you with some difficulty. Hence here you must wait for some time or restart the Oppo A1 5G device and recheck it.

Conclusion
Many different tools could help you to spoof Snapchat. But you must always prefer to choose the right one that could perfectly meet your needs. And it could provide you with the best experience of using Snapchat without any difficulty.
Dr.Fone - Virtual Location
1-Click Location Changer for both iOS and Android
- Teleport from one location to another across the world from the comfort of your home.
- With just a few selections on your computer, you can make members of your circle believe you’re anywhere you want.
- Stimulate and imitate movement and set the speed and stops you take along the way.
- Compatible with both iOS and Android systems.
- Work with location-based apps, like Pokemon Go , Snapchat , Instagram , Facebook , etc.
3981454 people have downloaded it
How to Send and Fake Live Location on Facebook Messenger Of your Oppo A1 5G
Do you want to learn how to fake a live location on Messenger? Here’s the perfect learning spot. These days, many situations can compel you to spoof location on Facebook Messenger. But as simple as it sounds, you might need to invest in a costly VPN. Facebook requests permission to track your actual GPS location when installing the app or creating an account. But fret not because you don’t even need a VPN service to change your Facebook location. This post will show you several shortcuts on how to send a fake location on Messenger.
Part 1: The Benefits of Changing Location on Facebook Messenger
There are numerous reasons to learn how to send fake locations on Messenger, just as initially said. Here are some of them:
- Business awareness
Sometimes, you might want your customers to believe that your products or offices are in a specific location. In that case, spoofing your live location on Messenger is a great idea.
- Prank friends and have fun
There’s nothing wrong with fooling your Facebook friends about your location. You can show them that you’re in a unique spot when you’re just around them.
- Hide identity
Your online security is paramount. And one way to protect yourself from online sniffers is by spoofing live locations on Facebook Messenger.
- Make new friends
Often, Facebook will tailor its friend suggestions to people close to your proximity, thanks to the “Nearby Friends” feature. But you can start getting new and refreshing tips from people in your new location.
Part 2: How to Change Location on Facebook Messenger
After learning some reasons to fake location on Messenger, let’s now know how to do that with easy steps. You don’t need third-party help to mock live locations on Messenger on Android or iPhone. That’s because the app boasts its inbuilt location feature. Follow me:
Step 1. Open Facebook Messenger and launch the conversation with which you want to share the fake location.
Step 2. Click the “four dots” at the bottom-left corner and tap Location.


Step 3. Now tap Allow Location and choose a new location on the world map that appears.
Step 4. After choosing a location, tap Send Location to share it with your selected friend. It’s that easy!
Part 3: How to Change a Live Location on Facebook Messenger [iOS & Android]
As you can see, sending a pinned location directly on Messenger is only good if you want to share the place with a specific contact. In other words, you can’t natively spoof the location of multiple contacts on Messenger. So, if you want to fake live location on Messenger on iOS and Android, using a robust option like Wondershare Dr.Fone is a good idea.
With this virtual location tool, you can change your GPS location anywhere. That makes it helpful if you want to brag about your actual location with some tangible proof. Another thing, you can simulate location movements by choosing a particular route or transport. In addition to Facebook, Dr.Fone also works with apps like Pokemon Go , Instagram , Facebook , etc., etc.
You can check out the this video for further instruction.
Here’s how to fake live location on Messenger with Dr.Fone:
Step 1. Download Dr.Fone and fire it up.
Start by downloading and installing Dr.Fone from the official website and launch the software on your Mac or Windows PC. Then, connect your smartphone to the PC using a USB wire. Please ensure to select the “Transfer Files” option.
Step 2. Launch the Virtual Location tool and enable USB debugging.

On Dr.Fone’s home page, press the Virtual Location tab and click Get Started. Now enable USB debugging to connect your phone to Dr.Fone. On Android, click Additional Settings > Developer options >USB debugging. Also, remember to set Dr.Fone as the mock location app.
Step 3. Launch the map and choose a fake location for Messenger.

Once USB debugging is enabled, press Next to launch the map. Now enter your new location’s address or GPS coordinates and tap Move Here. And there is that!
Bonus tip: How to make your new Messenger location more believable
Want to make your new location more believable? Simple, Dr.Fone will help you with that. Just enter the new coordinates or location on Dr.Fone and take a screenshot of the new area. Of course, you can find dozens of free location pictures on Google. After that, open the image on Facebook and tap the “location” icon. Now search and select your new location and post the picture.
Up to this point, you shouldn’t have any qualms spoofing your live location on Facebook Messenger. For example, if you want to send a pinned GPS coordinate to a single contact on Messenger, then simply use the inbuilt function to change location. However, your new location might not be believable since your actual device location will remain the same. In other words, there’s no proof that you’re actually in that particular location.
So, use Dr.Fone to fake location on Messenger with unreal precision. This third-party location changer allows you to teleport your location to anywhere. You can even change Messenger location by walking, driving, or cycling. Then to make it more believable, you can share a post with a screenshot of your new location. Remember, your new location will be visible to all your Facebook friends.
Part 5. FAQ: What People Also Ask about Facebook Location Services
1. Why is my Facebook Messenger location wrong?
The issue of the wrong Facebook location is commonplace these days. Fortunately, it’s nothing complicated as it’s mainly about the incorrect GPS settings on your phone. So, go ahead and enable GPS tracking on your device.
Open Settings > Privacy > Location Services for iPhone users and then enable Location Services. On the other hand, Android users should click Settings > Security and Location > Locations > and enable Use Locations.
 PaperScan Professional: PaperScan Scanner Software is a powerful TWAIN & WIA scanning application centered on one idea: making document acquisition an unparalleled easy task for anyone.
2. Can I fake my location on Facebook?
In a typical scenario, it’s impossible to lie about your location on Facebook. That’s because the app asks for permission to track your GPS location before you can use it. But as you’ve seen, Wondershare Dr.Fone makes it a cakewalk to a fake live location on Messenger.
3. How can I hide my location on Facebook?
As said earlier, the reason why Facebook gives the wrong location is because of disabled location settings. It’s the reverse! So, use this Settings feature to hide your actual location on Facebook.
 DLNow Video Downloader
Conclusion
Any queries regarding how to send a fake location on Messenger? Let us know if you have any. Meanwhile, use Messenger’s inbuilt location feature to share an artificial place with a friend or contact. But because this method only allows you to share fake locations with a single chat, use Wondershare Dr.Fone - Virtual Location instead. It’s simple, fast, and effective. Are you ready?
 PCDJ Karaoki is the complete professional karaoke software designed for KJs and karaoke venues. Karaoki includes an advanced automatic singer rotation list with singer history, key control, news ticker, next singers screen, a song book exporter and printer, a jukebox background music player and many other features designed so you can host karaoke shows faster and easier!
 safe & secure
- Title: In 2024, How to Change Oppo A1 5G Location on Skout | Dr.fone
- Author: Abigail
- Created at : 2024-07-24 18:25:48
- Updated at : 2024-07-25 18:25:48
- Link: https://location-social.techidaily.com/in-2024-how-to-change-oppo-a1-5g-location-on-skout-drfone-by-drfone-virtual-android/
- License: This work is licensed under CC BY-NC-SA 4.0.