
In 2024, How To Leave a Life360 Group On Realme 11X 5G Without Anyone Knowing? | Dr.fone
How To Leave a Life360 Group On Realme 11X 5G Without Anyone Knowing?
Do you keep asking yourself how do I leave a Life360 group? If so, you’re on the right page. In a world where connectivity is key, Life360 has emerged as a trusted family safety app. It provides a digital reach through its innovative location tracking “Circle.” However, sometimes, you might want to leave it without raising eyebrows.
Whether it’s a matter of privacy or a brief escape, the art of leaving a Life360 group unnoticed is subtle. The article will show you how to leave a Life360 Circle without anyone knowing. Read to learn more.

Part 1. How To Leave a Life360 Circle
Life360 has become a household name. It’s a digital haven for families to stay connected through its “Circle.” The Circle functions as a virtual space where family members’ locations are shared. While this can be beneficial, there are times when you wish to leave a Circle for personal reasons.
How To Leave a Life360 Circle You Created
The default method of leaving a Life360 Circle is straightforward but comes with a catch. All members within the Circle are notified when someone leaves. The notification serves as a built-in transparency feature. It keeps everyone aware of any changes in the group dynamics. Follow the steps on how to leave Circle in Life360 when you created it yourself:
- Step 1: Launch the Life360 app on your device and go to Settings. Tap on Circle Management and select the Circle you intend to exit.

- Step 2: Choose the option Leave Circle. If you were the admin, ensure that you designated a new admin before leaving. Apart from that, the process is straightforward. Follow the on-screen instructions.

How To Leave a Life360 Circle You’re a Part Of
Here’s how to leave a circle in Life360 that you’re a part of. Here are the detailed steps:
- Step 1: Open your Life360 on your smartphone. Log in if necessary. Tap the Circle Switcher located at the top of your screen. Choose the specific Circle you wish to exit. Afterward, access the Gear icon positioned in the upper left corner.

- Step 2: Choose Circle Management from the list. Tap on Leave Circle at the bottom of the screen. Confirm your decision by selecting Yes in the popup. You’ll no longer be associated with the Circle, and it won’t appear in your Circles list. If you wish to rejoin, you’ll need a new invitation from the Circle Admin.

Part 2. How To Leave a Life360 Circle Without Anyone Knowing
Leaving a Life360 Circle through the standard method may not align with your preference in certain scenarios. In such cases, there are many methods you can use to maintain your privacy without alerting fellow Circle members. Here are some strategic approaches:
Method 1: Using an App To Spoof Your Location
One of the most effective and safe ways to trick Life360 without triggering notifications is by using Wondershare Dr.Fone - Virtual Location. The tool offers a seamless solution for location spoofing with the following key features:
- **One-click location changer.**Change your location with one click.
- **Simulate GPS movement along your usual route.**Mimic your typical movements without being physically present.
- **Cross-platform compatibility.**Compatible with both iOS and Android devices.
- **Easy 3-step process.**Easy and intuitive steps for hassle-free location manipulation.

How To Spoof Your Life360 Circle Location Using Dr.Fone
Follow the steps below to learn how to leave a Life360 Circle without anyone knowing using Dr.Fone’s Virtual Location tool:
- Step 1: Download and install Dr.Fone, then connect your Realme 11X 5G via USB cable. Launch the tool from Toolbox > Virtual Location. Click Get Started to proceed.

- Step 2: Activate Developer Mode on your smartphone by following on-screen instructions in Settings > Privacy & Security > Developer Mode. Restart the Realme 11X 5G device, unlock it, and select Turn On. Enter your password.

- Step 3: On the map, enter the number of movements and select Round or Loop trip. Adjust the speed, then click Move Here to start the simulation. Pause or clear to revert.

- Step 4: To activate Teleport Mode, click the Search bar. Type a location and hit Enter. Click Move Here to change the smartphone location on the map. Verify on your smartphone’s maps application. Once done, you spoofed a Life360 circle without anyone knowing.

The next method can serve as a last resort if using Dr.Fone is impossible. Be aware that they come with the trade-off of notifying other Circle members. Maintaining open communication within the Circle is crucial. Do these alternatives only when it’s necessary for your privacy.
Method 2: Turning Off Mobile Data and Wi-Fi
If Dr.Fone is unavailable, a simple tactic is to disable both mobile data and Wi-Fi.
- Step 1: Open your device settings. Go to Connections or Network & Internet.
- Step 2: Disable both mobile data and Wi-Fi. Life360 will lose real-time tracking capability, but be cautious, as this may raise suspicion.
Method 3: Switching To Airplane Mode
Another option is to activate Airplane Mode, severing all connections, including location sharing. Again, this method may alert Circle members to your departure.
- Step 1: Access your device settings. Look for Connections or Network & Internet.

- Step 2: Toggle on Airplane Mode. The method severs all connections, including location sharing.
Method 4: Turning Off Your Realme 11X 5G
A straightforward yet noticeable method involves turning off your device. While it suspends location tracking on Life360, frequent use may draw attention.
Method 5: Disabling Background App Refresh
In your device settings, disable Background App Refresh for Life360. Although this may impact location accuracy, it’s an option to consider if Dr.Fone isn’t accessible.
- Step 1: Go to your device Settings. Look for Apps or Application Manager.

- Step 2: Locate Life360 and disable Background App Refresh for the app. Alternatively, you can disable Background App Refresh as a whole.
Method 6: Enabling Battery Saving Mode
Switching to “Battery saving” or “Power saving” mode can affect the frequency of Life360 updates. While it offers a subtle way to limit location sharing, it may not provide foolproof privacy. Follow the steps:
- Step 1: Go to your device Settings. Look for the Battery option.

- Step 2: Enable Battery saving or Power saving mode.
Method 7: Getting a Burner Phone
Acquiring a secondary, inexpensive phone for Life360 use may be an alternative if all else fails. This method involves monetary considerations and may not be practical for everyone.
Part 3. A Deep Dive on Life360’s Circle Feature
Life360’s Circle feature serves as the cornerstone of the app. It fosters connectivity and safety among its users. After diving into how to leave a Circle on Life360 in the above parts, it’s time to have a comprehensive look at essential aspects of the Circle feature:

Can You Remove Someone From a life360 Circle?
As the admin, you have the authority to remove someone from a Life360 Circle. The control ensures that you can manage the group dynamics and permissions.
How To Know if Someone Leaves the Circle?
Life360 notifies Circle members when someone leaves. The transparency feature aims to keep everyone informed about changes within the group.
Can You Include Non-Family Members in a Circle?
While Life360 is designed for family safety, you can include non-family members in a Circle. The flexibility caters to scenarios where close friends or caregivers need to be part of the safety network.
Is Circle Place Alerts Really That Useful?
The Circle Place Alerts feature proves valuable for users. It allows predefined locations to trigger alerts when members enter or leave those areas. While useful for safety monitoring, its practicality may vary depending on individual preferences and needs.
What if People in the Circle Feel Micromanaged?
Knowing the feeling of being micromanaged, especially among kids and teens, Life360 introduces the Bubble feature. The Bubble feature allows users to set a custom safety zone. It balances monitoring and granting a sense of autonomy within a designated area.
Conclusion
Leaving a Life360 Circle can be achieved through the standard method. However, it alerts other members, which can be annoying. While alternative methods exist, they often trigger notifications. If you want to know how to leave a Life360 circle without anyone knowing, Dr.Fone is recommended as the optimal tool.
The platform is proficient in location spoofing without alerting the Circle. Whether addressing privacy concerns or aiming for a quick escape, Dr.Fone proves its worth. It’s the preferred choice if you google the question, “How do I leave a life360 group online.” Ensure a seamless alone time without notifying other members.
How to Change/Fake Your Realme 11X 5G Location on Viber
Viber is one of the most commonly used messenger apps. It allows you to send short messages like texts, videos, images, audio, and documents. Viber also has another exciting feature that will enable you to share your location. But sometimes, you might want to change location on Viber to prank your friends or for security purposes. So, read on to learn how to fake location on Viber with some simple solutions.
Part 1: What is the My Location feature on Viber?
If you’ve used WhatsApp’s location feature before, you’ll know what Viber’s “My Location” is all about. With this feature, you can share your live location for whatever reasons you may have. For example, you may want to share your live location with your kids or vice-versa. Or, you might simply want to share a fake location on Viber with your nosy friends.
But as good as it sounds, this live location feature is enabled by default on your Realme 11X 5G/Android browser. Therefore, you can send a location on Viber without knowing. This can be advantageous to stalkers or even cause misunderstanding in your relationship. What’s worse, it shares your actual location with every text you send. But fret not because this post will help you disable or enable My Location on Viber according to your needs.
Part 2: How to disable or enable My Location on Viber?
So, without wasting too much time, let’s find out the steps to disable/enable Viber location-sharing feature. It’s straightforward.
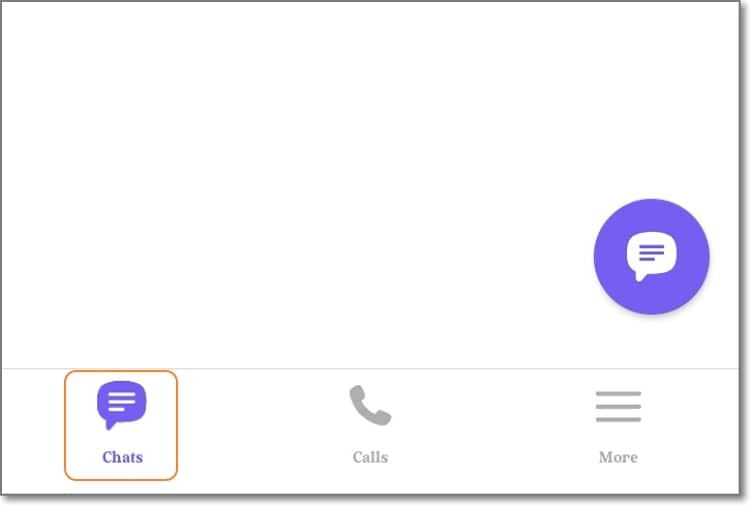
Step 1. Fire up your Viber app on mobile or PC and tap the Chats button. Here, proceed to open a chat that you want to enable/disable location sharing.
Step 2. Next, tap the Ellipsis (three dots) icon at the top-right corner of the screen and choose Chat Info. Alternatively, simply swipe the screen to the left.
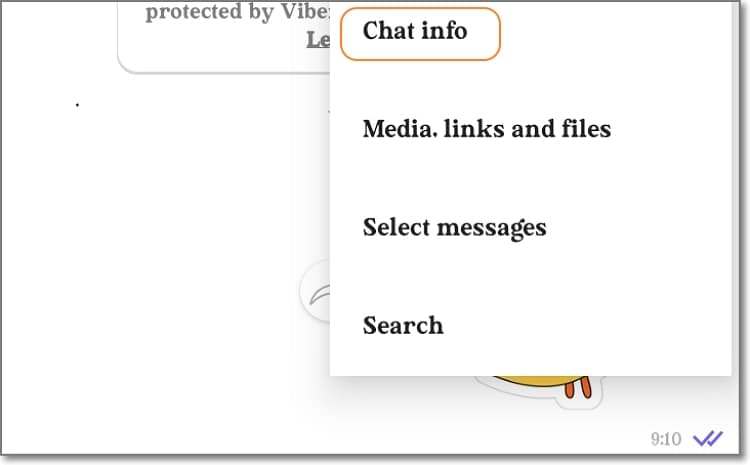
Step 3. On the Chat Info window, simply enable or disable the Attach location always toggle. It’s done!

Pro tip: You might be wondering how to share your actual Viber location with a chat or group. Again, this is very straightforward. Simply open the conversation and tap the three dots on the text field. Then, click the Share Location button and choose your location on the Google map. Lastly, tap Send location to share the Viber location with your selected contact.

Part 3: Can I send a fake location on Viber, and How?
So, is it possible to Viber’s fake location? Unfortunately, Viber doesn’t allow users to share a different place from the real one. That’s because the app asks to automatically access your actual location data using Wi-Fi or GPS while signing up. Therefore, based on the permission you set yourself, the answer is NO.
But nothing is impossible in the tech world. You can easily instruct Viber to share a different location using a third-party app or service like Dr.Fone - Virtual Location . With this professional GPS tool, you teleport your Viber location to anywhere in the world with a simple mouse click.
It’s compatible with Android/iOS devices and boasts a simple-to-understand map. Interestingly, you can walk or drive to your new location and even stop between destinations to make it more believable. It’s nothing complex!
You can check out the this video for further instruction.
Key features of Dr.Fone - Virtual Location:
- Compatible with all Android and iOS versions.
- Teleport Viber location to anywhere in the world.
- Walk or drive to your new Viber location.
- Simulate Viber movements with custom speed.
- Works with Pokemon Go , Facebook, Instagram , Snapchat , Viber, etc.
Steps to change Viber location with Dr.Fone:
Step 1. Launch Dr.Fone Virtual Location.
Install and run Wondershare Dr.Fone on your Windows/Mac computer, and then tap the Virtual Location tab on the Home page.
Step 2. Connect your phone to Dr.Fone with a USB cable.
Connect your smartphone to your PC using a USB wire and tap Get Started on the new Dr.Fone pop-up window. Remember to enable the “File Transfer” option on your smartphone instead of “Charging.”
Step 3. Link your phone to Dr.Fone via USB debugging
Press the Next button to begin connecting your phone to Dr.Fone. If the connection fails, enable USB debugging on your phone by following the on-screen instructions. On Android phones, tap Settings > Additional settings > Developer options > USB debugging. In addition, set Dr.Fone as the mock location app on your phone.
Step 4. Enter the GPS coordinates or location address.

If the connection is successful, the Virtual Location map will launch automatically on Dr.Fone. Now enter the coordinates or address in the location field at the top-left corner. After finding the exact location that you want, simply tap Move Here before sharing your new location on Viber. That is easy, right?
Dr.Fone - Virtual Location
1-Click Location Changer for both iOS and Android
- Teleport from one location to another across the world from the comfort of your home.
- With just a few selections on your computer, you can make members of your circle believe you’re anywhere you want.
- Stimulate and imitate movement and set the speed and stops you take along the way.
- Compatible with both iOS and Android systems.
- Work with location-based apps, like Pokemon Go , Snapchat , Instagram , Facebook , etc.
3981454 people have downloaded it
Part 4: Why send fake location on Viber?
Now that you know how to spoof location on Viber. Let’s discuss some reasons to spoof location on this messaging app. Below are some common ones:
- Protect your privacy
Many people don’t want other online users to have a clue of their actual whereabouts. If you’re one of them, use a third-party tool to spoof your Viber location on your Realme 11X 5G or Android.
- Prank your friends
Do you want to show your friends that you’re in London or New York when you’re in some remote village/town somewhere in reality? Yes, that sounds cool!
- Improve sales
If you’re a digital marketer, you might want to convince your potential clients that the goods are from a specific region or city close to them. Believe it or not, this can lead to more sales closures.
Wrap it Up
You can share your live location on Viber just like you would on Facebook, WhatsApp, and other social media apps. But because most of these apps don’t allow you to share fake locations, I recommend Dr.Fone - Virtual Location change your area to anywhere in the world. Give it a try!
How to Send and Fake Live Location on Facebook Messenger Of your Realme 11X 5G
Do you want to learn how to fake a live location on Messenger? Here’s the perfect learning spot. These days, many situations can compel you to spoof location on Facebook Messenger. But as simple as it sounds, you might need to invest in a costly VPN. Facebook requests permission to track your actual GPS location when installing the app or creating an account. But fret not because you don’t even need a VPN service to change your Facebook location. This post will show you several shortcuts on how to send a fake location on Messenger.
Part 1: The Benefits of Changing Location on Facebook Messenger
There are numerous reasons to learn how to send fake locations on Messenger, just as initially said. Here are some of them:
- Business awareness
Sometimes, you might want your customers to believe that your products or offices are in a specific location. In that case, spoofing your live location on Messenger is a great idea.
- Prank friends and have fun
There’s nothing wrong with fooling your Facebook friends about your location. You can show them that you’re in a unique spot when you’re just around them.
- Hide identity
Your online security is paramount. And one way to protect yourself from online sniffers is by spoofing live locations on Facebook Messenger.
- Make new friends
Often, Facebook will tailor its friend suggestions to people close to your proximity, thanks to the “Nearby Friends” feature. But you can start getting new and refreshing tips from people in your new location.
Part 2: How to Change Location on Facebook Messenger
After learning some reasons to fake location on Messenger, let’s now know how to do that with easy steps. You don’t need third-party help to mock live locations on Messenger on Android or iPhone. That’s because the app boasts its inbuilt location feature. Follow me:
Step 1. Open Facebook Messenger and launch the conversation with which you want to share the fake location.
Step 2. Click the “four dots” at the bottom-left corner and tap Location.

Step 3. Now tap Allow Location and choose a new location on the world map that appears.
Step 4. After choosing a location, tap Send Location to share it with your selected friend. It’s that easy!
Part 3: How to Change a Live Location on Facebook Messenger [iOS & Android]
As you can see, sending a pinned location directly on Messenger is only good if you want to share the place with a specific contact. In other words, you can’t natively spoof the location of multiple contacts on Messenger. So, if you want to fake live location on Messenger on iOS and Android, using a robust option like Wondershare Dr.Fone is a good idea.
With this virtual location tool, you can change your GPS location anywhere. That makes it helpful if you want to brag about your actual location with some tangible proof. Another thing, you can simulate location movements by choosing a particular route or transport. In addition to Facebook, Dr.Fone also works with apps like Pokemon Go , Instagram , Facebook , etc., etc.
You can check out the this video for further instruction.
Here’s how to fake live location on Messenger with Dr.Fone:
Step 1. Download Dr.Fone and fire it up.

Start by downloading and installing Dr.Fone from the official website and launch the software on your Mac or Windows PC. Then, connect your smartphone to the PC using a USB wire. Please ensure to select the “Transfer Files” option.
Step 2. Launch the Virtual Location tool and enable USB debugging.
On Dr.Fone’s home page, press the Virtual Location tab and click Get Started. Now enable USB debugging to connect your phone to Dr.Fone. On Android, click Additional Settings > Developer options >USB debugging. Also, remember to set Dr.Fone as the mock location app.
Step 3. Launch the map and choose a fake location for Messenger.
Once USB debugging is enabled, press Next to launch the map. Now enter your new location’s address or GPS coordinates and tap Move Here. And there is that!
Bonus tip: How to make your new Messenger location more believable
Want to make your new location more believable? Simple, Dr.Fone will help you with that. Just enter the new coordinates or location on Dr.Fone and take a screenshot of the new area. Of course, you can find dozens of free location pictures on Google. After that, open the image on Facebook and tap the “location” icon. Now search and select your new location and post the picture.
Up to this point, you shouldn’t have any qualms spoofing your live location on Facebook Messenger. For example, if you want to send a pinned GPS coordinate to a single contact on Messenger, then simply use the inbuilt function to change location. However, your new location might not be believable since your actual device location will remain the same. In other words, there’s no proof that you’re actually in that particular location.
So, use Dr.Fone to fake location on Messenger with unreal precision. This third-party location changer allows you to teleport your location to anywhere. You can even change Messenger location by walking, driving, or cycling. Then to make it more believable, you can share a post with a screenshot of your new location. Remember, your new location will be visible to all your Facebook friends.
Part 5. FAQ: What People Also Ask about Facebook Location Services
1. Why is my Facebook Messenger location wrong?
The issue of the wrong Facebook location is commonplace these days. Fortunately, it’s nothing complicated as it’s mainly about the incorrect GPS settings on your phone. So, go ahead and enable GPS tracking on your device.
Open Settings > Privacy > Location Services for iPhone users and then enable Location Services. On the other hand, Android users should click Settings > Security and Location > Locations > and enable Use Locations.
2. Can I fake my location on Facebook?
In a typical scenario, it’s impossible to lie about your location on Facebook. That’s because the app asks for permission to track your GPS location before you can use it. But as you’ve seen, Wondershare Dr.Fone makes it a cakewalk to a fake live location on Messenger.
3. How can I hide my location on Facebook?
As said earlier, the reason why Facebook gives the wrong location is because of disabled location settings. It’s the reverse! So, use this Settings feature to hide your actual location on Facebook.
Conclusion
Any queries regarding how to send a fake location on Messenger? Let us know if you have any. Meanwhile, use Messenger’s inbuilt location feature to share an artificial place with a friend or contact. But because this method only allows you to share fake locations with a single chat, use Wondershare Dr.Fone - Virtual Location instead. It’s simple, fast, and effective. Are you ready?
 safe & secure
Also read:
- [New] Innovative Ways to Capture Online Discussions for 2024
- [Updated] 2024 Approved Elevate Your Content Strategies to Climb YouTube Ranks
- [Updated] A Step-by-Step Tutorial Starting & Joining a Zoom Meeting on Android
- 6 Fixes to Unfortunately WhatsApp has stopped Error Popups On Tecno Spark 10 Pro | Dr.fone
- 年齢チェック不要:YouTubeに抜ける隠されたテクニック
- In 2024, Game-Changing Tactics to Record High-Stakes Gameplay
- In 2024, How to Change Apple iPhone XS Max Location on Skout | Dr.fone
- In 2024, How to Change GPS Location on Apple iPhone XS Max Easily & Safely | Dr.fone
- In 2024, How to Detect and Stop mSpy from Spying on Your Apple iPhone XS Max | Dr.fone
- In 2024, How to Get and Use Pokemon Go Promo Codes On Nokia C12 Plus | Dr.fone
- In 2024, How To Leave a Life360 Group On Apple iPhone XS Max Without Anyone Knowing? | Dr.fone
- In 2024, How To Pause Life360 Location Sharing For Apple iPhone XS Max | Dr.fone
- In 2024, How to Send and Fake Live Location on Facebook Messenger Of your Apple iPhone XS Max | Dr.fone
- In 2024, Set Your Preferred Job Location on LinkedIn App of your Apple iPhone XS Max | Dr.fone
- In 2024, Simple and Effective Ways to Change Your Country on YouTube App Of your Apple iPhone XS Max | Dr.fone
- In 2024, Why Your WhatsApp Live Location is Not Updating and How to Fix on your Apple iPhone XS Max | Dr.fone
- Resolving Scanner Error Messages: A Comprehensive Guide - Troubleshooting Tips by YL Computing
- Tips and Tricks for Setting Up your Vivo G2 Phone Pattern Lock
- Updated In 2024, SRT Subtitle Translation Tools and Techniques
- Title: In 2024, How To Leave a Life360 Group On Realme 11X 5G Without Anyone Knowing? | Dr.fone
- Author: Abigail
- Created at : 2025-01-08 16:38:38
- Updated at : 2025-01-14 18:05:35
- Link: https://location-social.techidaily.com/in-2024-how-to-leave-a-life360-group-on-realme-11x-5g-without-anyone-knowing-drfone-by-drfone-virtual-android/
- License: This work is licensed under CC BY-NC-SA 4.0.