
In 2024, How to Send and Fake Live Location on Facebook Messenger Of your OnePlus Open | Dr.fone
How to Send and Fake Live Location on Facebook Messenger Of your OnePlus Open
Do you want to learn how to fake a live location on Messenger? Here’s the perfect learning spot. These days, many situations can compel you to spoof location on Facebook Messenger. But as simple as it sounds, you might need to invest in a costly VPN. Facebook requests permission to track your actual GPS location when installing the app or creating an account. But fret not because you don’t even need a VPN service to change your Facebook location. This post will show you several shortcuts on how to send a fake location on Messenger.
Part 1: The Benefits of Changing Location on Facebook Messenger
There are numerous reasons to learn how to send fake locations on Messenger, just as initially said. Here are some of them:
- Business awareness
Sometimes, you might want your customers to believe that your products or offices are in a specific location. In that case, spoofing your live location on Messenger is a great idea.
- Prank friends and have fun
There’s nothing wrong with fooling your Facebook friends about your location. You can show them that you’re in a unique spot when you’re just around them.
- Hide identity
Your online security is paramount. And one way to protect yourself from online sniffers is by spoofing live locations on Facebook Messenger.
- Make new friends
Often, Facebook will tailor its friend suggestions to people close to your proximity, thanks to the “Nearby Friends” feature. But you can start getting new and refreshing tips from people in your new location.

Part 2: How to Change Location on Facebook Messenger
After learning some reasons to fake location on Messenger, let’s now know how to do that with easy steps. You don’t need third-party help to mock live locations on Messenger on Android or iPhone. That’s because the app boasts its inbuilt location feature. Follow me:
Step 1. Open Facebook Messenger and launch the conversation with which you want to share the fake location.
Step 2. Click the “four dots” at the bottom-left corner and tap Location.

Step 3. Now tap Allow Location and choose a new location on the world map that appears.
Step 4. After choosing a location, tap Send Location to share it with your selected friend. It’s that easy!
Part 3: How to Change a Live Location on Facebook Messenger [iOS & Android]
As you can see, sending a pinned location directly on Messenger is only good if you want to share the place with a specific contact. In other words, you can’t natively spoof the location of multiple contacts on Messenger. So, if you want to fake live location on Messenger on iOS and Android, using a robust option like Wondershare Dr.Fone is a good idea.
With this virtual location tool, you can change your GPS location anywhere. That makes it helpful if you want to brag about your actual location with some tangible proof. Another thing, you can simulate location movements by choosing a particular route or transport. In addition to Facebook, Dr.Fone also works with apps like Pokemon Go , Instagram , Facebook , etc., etc.
You can check out the this video for further instruction.
Here’s how to fake live location on Messenger with Dr.Fone:
Step 1. Download Dr.Fone and fire it up.

Start by downloading and installing Dr.Fone from the official website and launch the software on your Mac or Windows PC. Then, connect your smartphone to the PC using a USB wire. Please ensure to select the “Transfer Files” option.
Step 2. Launch the Virtual Location tool and enable USB debugging.


On Dr.Fone’s home page, press the Virtual Location tab and click Get Started. Now enable USB debugging to connect your phone to Dr.Fone. On Android, click Additional Settings > Developer options >USB debugging. Also, remember to set Dr.Fone as the mock location app.
Step 3. Launch the map and choose a fake location for Messenger.
 SwifDoo PDF 2-Year Plan
Once USB debugging is enabled, press Next to launch the map. Now enter your new location’s address or GPS coordinates and tap Move Here. And there is that!

Bonus tip: How to make your new Messenger location more believable
Want to make your new location more believable? Simple, Dr.Fone will help you with that. Just enter the new coordinates or location on Dr.Fone and take a screenshot of the new area. Of course, you can find dozens of free location pictures on Google. After that, open the image on Facebook and tap the “location” icon. Now search and select your new location and post the picture.
Up to this point, you shouldn’t have any qualms spoofing your live location on Facebook Messenger. For example, if you want to send a pinned GPS coordinate to a single contact on Messenger, then simply use the inbuilt function to change location. However, your new location might not be believable since your actual device location will remain the same. In other words, there’s no proof that you’re actually in that particular location.
So, use Dr.Fone to fake location on Messenger with unreal precision. This third-party location changer allows you to teleport your location to anywhere. You can even change Messenger location by walking, driving, or cycling. Then to make it more believable, you can share a post with a screenshot of your new location. Remember, your new location will be visible to all your Facebook friends.
Part 5. FAQ: What People Also Ask about Facebook Location Services
1. Why is my Facebook Messenger location wrong?
The issue of the wrong Facebook location is commonplace these days. Fortunately, it’s nothing complicated as it’s mainly about the incorrect GPS settings on your phone. So, go ahead and enable GPS tracking on your device.
Open Settings > Privacy > Location Services for iPhone users and then enable Location Services. On the other hand, Android users should click Settings > Security and Location > Locations > and enable Use Locations.
2. Can I fake my location on Facebook?
In a typical scenario, it’s impossible to lie about your location on Facebook. That’s because the app asks for permission to track your GPS location before you can use it. But as you’ve seen, Wondershare Dr.Fone makes it a cakewalk to a fake live location on Messenger.
3. How can I hide my location on Facebook?
As said earlier, the reason why Facebook gives the wrong location is because of disabled location settings. It’s the reverse! So, use this Settings feature to hide your actual location on Facebook.
Conclusion
Any queries regarding how to send a fake location on Messenger? Let us know if you have any. Meanwhile, use Messenger’s inbuilt location feature to share an artificial place with a friend or contact. But because this method only allows you to share fake locations with a single chat, use Wondershare Dr.Fone - Virtual Location instead. It’s simple, fast, and effective. Are you ready?
 /a>
/a> safe & secure
 Screensaver Factory, Create stunning professional screensavers within minutes. Create screensavers for yourself, for marketing or unlimited royalty-free commercial distribution. Make screensavers from images, video and swf flash, add background music and smooth sprite and transition effects. Screensaver Factory is very easy to use, and it enables you to make self-installing screensaver files and CDs for easy setup and distribution. Screensaver Factory is the most advanced software of its kind.
How to Change OnePlus Open Location on Skout
When it comes to dating application or website, Skout has made its appearance in this regard a long way back. The app was founded in 2007 and offers a platform to help you get connected with the people. You can use Skout either on your OnePlus Open or an iOS device. The main function of the app is that it takes help of your device’s global positioning system (GPS) and lets you find the users in a specific radius where you are.
Since it is a location-based app, many times you might have questioned like “how can I change my location on Skout”. If yes, this article is what just you need. We will assist you how to change location on Skout on Android as well as iOS devices. Scroll down and get to know more!

Part 1: 2 Solutions to Change Skout Location on iOS
1.1 Change Skout Location on iOS using a GPS Simulator
When you are an iPhone user, the best way to change Skout location is using dr.fone – Virtual Location (iOS) . This tool performs way better than any other in the market when you want to change iOS location. With the help of this, you can easily teleport anywhere across the world. Moreover, you can fake routes and show moving from various places. It is completely safe to use and a user-friendly one. Here is how you can do Skout location change on PC using this tool.
Step 1: Get the Software
From the original website of dr.fone – Virtual Location (iOS), download it on your computer and then install it. When you do the installation process completely, you are required to launch the program. After launching, choose “Virtual Location” tab from the first page.
Step 2: Plug iPhone to PC
Take your iOS device and get the original lightening cord as well. Make a secure connection between the computer and the iPhone using it. When it gets detected by the program, click on “Get Started” button.
 Easy and Safe Partition Software & Hard Disk Manager

Step 3: Activate Teleport Mode
You will see a map window now. Here, what you firstly need to do is to find the actual location of yours. If you can’t find the accurate location, go to the icon at the lower right part which is “Center On” icon. This will bring the accurate location.

Now, from the three icons available at the upper right side of the page, click on the 3rd one. This will enable the “Teleport Mode”. Once done, enter the name of the place in the field given and hit on “Go”.
Step 4: Spoof Location
The program will no longer take time and easily understand the location. It will display a pop-up from where you need to click on the “Move Here” button. The location will be successfully changed now. You can now see the changed or spoofed location on your OnePlus Open easily.

Dr.Fone - Virtual Location
1-Click Location Changer for both iOS and Android
- Teleport from one location to another across the world from the comfort of your home.
- With just a few selections on your computer, you can make members of your circle believe you’re anywhere you want.
- Stimulate and imitate movement and set the speed and stops you take along the way.
- Compatible with both iOS and Android systems.
- Work with location-based apps, like Pokemon Go , Snapchat , Instagram , Facebook , etc.
3981454 people have downloaded it
1.2 Change Skout Location on iOS using Cydia
Another way to get the Skout location changed is through Cydia. Cydia is basically a platform that allows you to install the applications that are not validated by Apple. However, you will need to jailbreak your device in order to go ahead.
Limitations:
- As we have mentioned above, one of the biggest disadvantages of using this way is that you will have to get your device jailbroken. And no doubt the other limitations will also be related to this.
- While using this method, your device may end up getting bricked. So, be sure if you really wish to use this method.
- Lastly, the method can make your device vulnerable to malware and other malicious apps.
If you are still comfortable using Cydia to change Skout location, let us move on the steps.
Step by Step Guide on how to change location on Skout app
Step 1: Open CYdia in the first place and search for “FakeLocation”.
Step 2: Tap on “Modify” and get back to the Homescreen.

Step 3: Look for the FakeLocation app icon now and tap on it. Once you open it, tap on “Choose my fake location.

Step 4: Use the map to adjust at the location you want to spoof.
Step 5: Now, you are done. Just open Skout and enjoy the new location.

Part 2: Change Skout Location on Android with a Spoofer App
If you are an Android user and wondering how to change your location on Skout, all you need is a spoofer app. You can get a lot of options from Play Store. However, one of the popular apps that can be relied upon is Fake GPS GO Location Spoofer Free. This app doesn’t require rooting if your device is having Android version 6 and more. You can easily create routes with this app. Let us know how this works.
Step by Step Guide to change Skout location via FakeGPS Go
Step 1: Before you get the app installed it is important to turn on the developer options firstly. And to do this, all you need is to go to the “Settings” in your device and tap on “About Phone”.
Step 2: You will see a “Software Info” option. Tap on it and scroll to the build number. Tap on it 7 times and you will see the developer options getting enabled on your device.
Step 3: As we are using Android, you need to head to the Google Play Store and look for the app on it. Now, install and then open it to proceed.
Step 4: While the app is launched, tap on the “ENABLE” option located at the bottom.


Step 5: Now, you will be directed to the Developer options page. Here, choose “Select mock location app” and tap on “FakeGPS Free” subsequently.

Step 6: Now, get back to the Fake GPS app and the look for the route that you want to spoof. Press on the Play button and you are good to go. Your location will be changed on Skout.
Limitations:
- No matter spoofing is fun, but you need to be a little careful. In case it gets detected by the company, your account may get banned as this is against the policy of any app.
- The process of using the spoofer app to change Skout location can seem to be difficult and complex.
- Some apps require you to root your device in order to let you proceed with spoofing properly.
- When you spoof your location with the app too frequently, this may make your profile under suspicious activity monitoring.
Part 3: Use Tinder instead
Tinder has its own popularity among today’s generation and it has revolutionized the way of dating. If you are interested in faking location on a dating app, using Tinder will be our next suggestion. Unlike Skout, Tinder offers it own Tinder + feature in order to assist you in changing the location of your device. The condition is to subscribe the plan for Tinder +.
However, when you use Tinder +, you may feel it to be an expensive deal. On the other hand Skout is free to sign up. You need to be having a Facebook account in order to join Tinder whereas Skout doesn’t want any such requirement. Moreover, on Skout, you can have the meet tab with which you are allowed to see the photos of people and know the age.
Here are the detailed steps on how you can change location.
Step 1: Launch the Tinder in your OnePlus Open as the first step. Upon launching it successfully, go to your profile icon and tap on it. You will find it at the top of the screen.
Step 2: Look for the “Settings” option now and then choose “Get Tinder Plus” or “Tinder Gold”. You can now subscribe a plan and then Tinder + will be yours.
Step 3: Now, again open the Tinder app followed by tapping on the profile icon.
Step 4: Choose “Settings” and hit on “Swiping in” option. Next, tap on “Add a new location” and then you know what to do.

How to Hide/Fake Snapchat Location on Your OnePlus Open
The GPS functionality is very prominent these days. Especially when various apps or websites are making use of your geological location to deliver more relevant content. Be it, social networking apps or gaming apps, for instance, Snapchat, and Pokemon Go respectively.
Talking about Snapchat, this app offers you different badges and filters depending upon your Geographical location. It actually utilizes the GPS feature of your device to determine where you are located. This can sometimes be annoying as you may wish to access a filter or badge that is not available at your Geological location. Now, this is where you need the Snapchat spoof location app. You not only can hide your actual location from Snapchat. Instead, cast a fake location on Snapchat map, and eventually, you can easily access the badges/filters at your convenience!
Sounds interesting, right? Let’s understand more about the tutorials on how to hide/fake location on Snapchat map.
 LYRX is an easy-to-use karaoke software with the professional features karaoke hosts need to perform with precision. LYRX is karaoke show hosting software that supports all standard karaoke file types as well as HD video formats, and it’s truly fun to use.
Part 1. What Snapchat is using your location for?
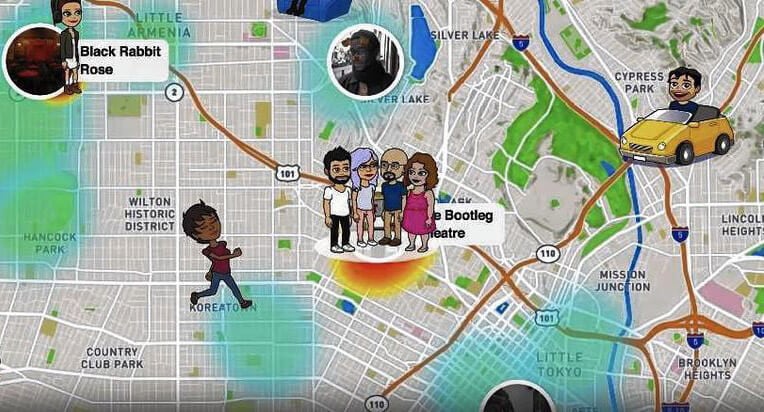
Snapchat basically utilizes your location for the SnapMap feature that furnishes the location-based filters etc. over your device. This SnapMap feature was unveiled in 2017. If you haven’t deliberately enabled it yet or you’re unaware of this feature, implies that you’re still “off the grid”. If you wish to enable this feature, you literally need to authorize Snapchat “3x times” and the last, fourth one to authorize your device.
With the SnapMap feature enabled, you can easily get to know about the whereabouts of your friends, and in turn, there’re allowed to know yours. As long as the Snapchat app is running over your screen, the SnapMap location of your Bitmoji gets updated dynamically. But as soon as you quit the app, the last known location of your Bitmoji is displayed over the SnapMap.

Part 2. Why people want to hide/fake location on Snapchat?
When it comes to fake Snapchat location there can be several reasons behind that. Here are some scenarios where people do wish to hide/fake location on Snapchat. Let’s explore.
- Sometimes, you may wish to utilize the cute filter that you saw your favorite celebrity putting up when he/she was in Sydney, Australia (or any other location).
- Or, you may wish to simply spoof location Snapchat for fun and be popular among your friends that you know some really cool tricks.
- Perhaps, you wish to stay ahead one step ahead in the dating game. For instance, you’re planning to move to a location a hundred miles away, and wish to have a person to spend quality time with when you reach there.
- Another reason is that is absolutely fun to trick people into believing that you’re spending your leisure time on an expensive tour. For instance, you can check in to a classy restaurant (you’ve never been to in real) in Dubai by mocking the GPS location.
- Even better for the kids who wish to fake GPS location to hide their real location over the location-sharing SnapMap feature from their parents, family, or friends.
Part 3. How to hide location on Snapchat
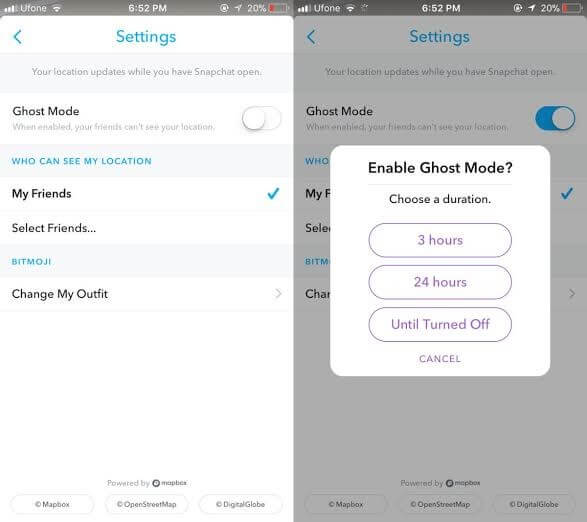
When it comes to disabling or hiding the location on Snapchat, the tutorial is extremely easy. Snapchat itself offers you a setting called Ghost mode. You just need to enable it. Here’s how to get it done.
First, get into the Snapchat app and then visit either the Discover screen or the Camera or Friends. Next, tap on the magnifying glass and hit on Map.
As soon as the SnapMap screen loads up, you need to access the settings by hitting the Gear icon on the top right corner.
Then, make use of the settings to set up your privacy and hit on the “Ghost Mode” toggle switch to turn it on. A pop-up window will appear with 3 different settings:
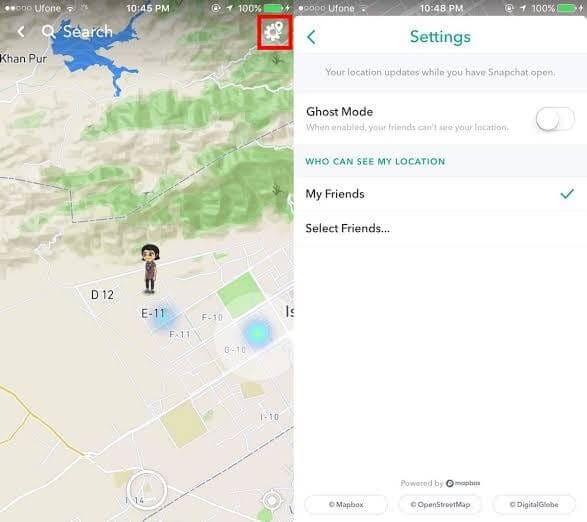
- 3 hours : Ghost mode is turned on for 3 straight hours.
- 24 hours : Ghost mode is turned on for 24 straight hours.
- Until Turned Off : Ghost mode is turned on until you manually turn it off.
Selecting either of the aforementioned settings will hide your location from SnapMap. Implies, other than you no one will be able to locate you over SnapMap.
 Project Manager - Asset Browser for 3Ds Max
Part 4. How to fake Snapchat location on iPhone
4.1. Change Snapchat location to anywhere using a Smart Tool (easy)
You can easily spoof location on Snapchat using the tool Dr.Fone - Virtual Location (iOS) . This tool is easy to operate and works perfectly when it comes to spoofing any location. Here is how to fake GPS Snapchat iPhone without jailbreak.
Step 1: To begin with this Snapchat location spoofer, simply head to the official website of Dr.Fone – Virtual Location (iOS). Download the software package from there and then install it afterwards.
Step 2: After successful downloading, open the tool. Now, you need to opt for the “Virtual Location” module from the main interface. Post doing this, click on the “Get Started” button.

Step 3: You can notice your current virtual location on the map in the next window. If you can’t, simply go to the “Current Virtual Location” icon available on the lower right side of the screen. Click on it and it will show your current virtual location.
Step 4: It’s time to activate the “Teleport Mode”. To do this, all you need is to click on the first icon given on the upper right side. After this, you need to enter the location where you desire to teleport in the blank field given on the upper left. Hit on “Go” when you’re done.
 With Screensaver Wonder you can easily make a screensaver from your own pictures and video files. Create screensavers for your own computer or create standalone, self-installing screensavers for easy sharing with your friends. Together with its sister product Screensaver Factory, Screensaver Wonder is one of the most popular screensaver software products in the world, helping thousands of users decorate their computer screens quickly and easily.
Step 5: A few moments later, the system will perceive the desired location you have entered. A pop-up box will come up where the distance will be shown. Click on the “Move Here” option in the box.
Step 6: This is it! The location has been changed to the desired one now. Now, whenever you click the “Current Virtual Location” icon, you will see the new location.
Also, on your iOS device, you can now Fake Snapchat location or in any other location-based app.

 The BootIt Collection covers multi-booting, partitioning, and disk imaging on traditional PC’s using the standard BIOS and newer PC’s using UEFI. The collection includes BootIt Bare Metal (BIBM) for standard BIOS systems and BootIt UEFI (BIU) for UEFI system.
4.2. Change Snapchat Location using Xcode (complex)
Now, if we talk about fake location for Snapchat map on iPhone, it’s not as easy as it looks. You need to be an extremely tech-savvy person to fake Snapchat location without jailbreaking your OnePlus Open. You simply can’t download a Snapchat location spoofer app over your OnePlus Open and fake it. But fret not, we’re glad to bring you a detailed tutorial with which you can easily perform location spoofing on Snapchat and that too, without jailbreaking your OnePlus Open.
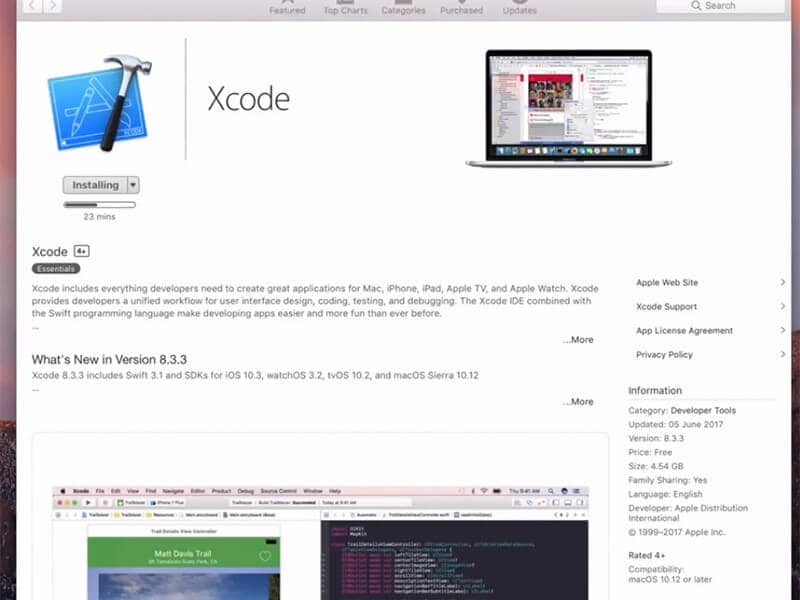
Step 1: Install Xcode and Set up a Dummy app
Grab your Mac computer first and then head over to the App Store. Now, look for the Xcode application and get it installed on your computer.
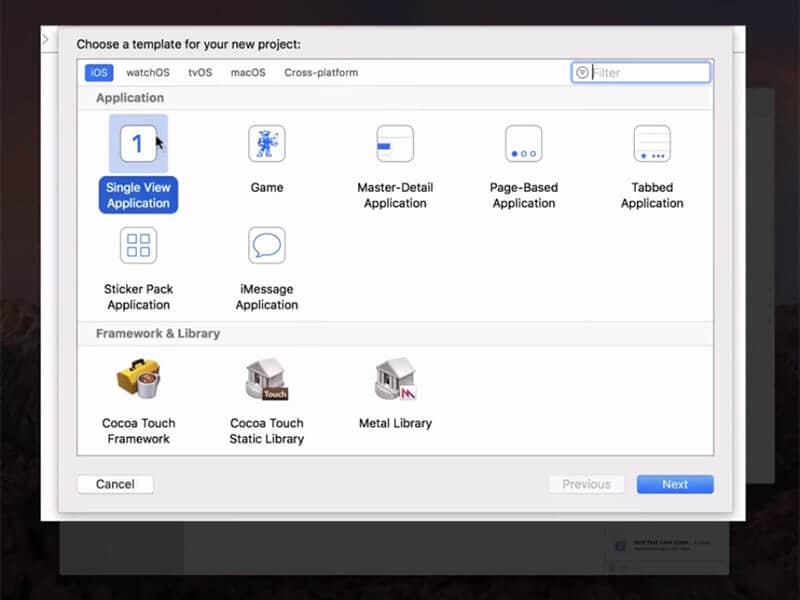
Once the application is installed, launch it over. The Xcode window will come up over your screen. Now, set up a new project and select “single view application” followed by hitting “Next”.
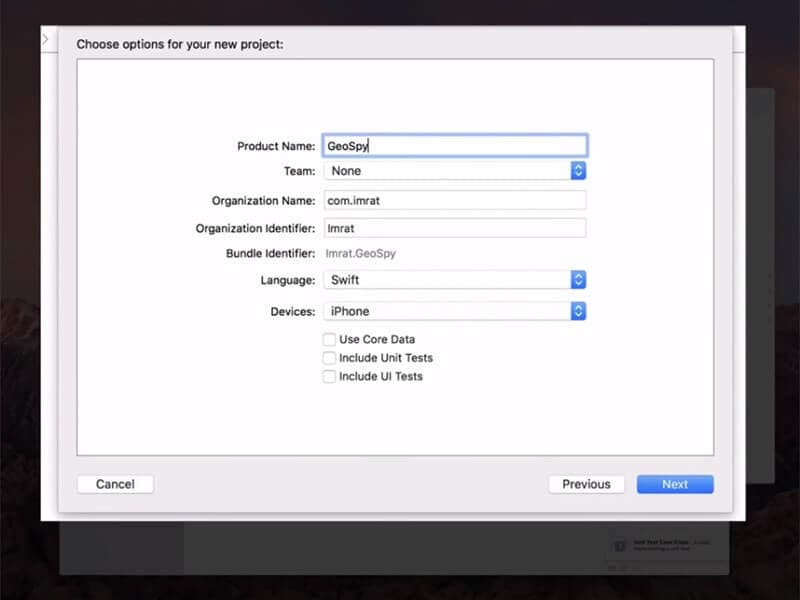
Then, give a name to your project, for instance, “GeoSpy” and hit on the “Next” button.
Step 2: Setup GIT on Xcode
- On the upcoming screen, Xcode will throw up a pop-up message stating “Please tell me who you are” and some GIT commands that you need to execute.

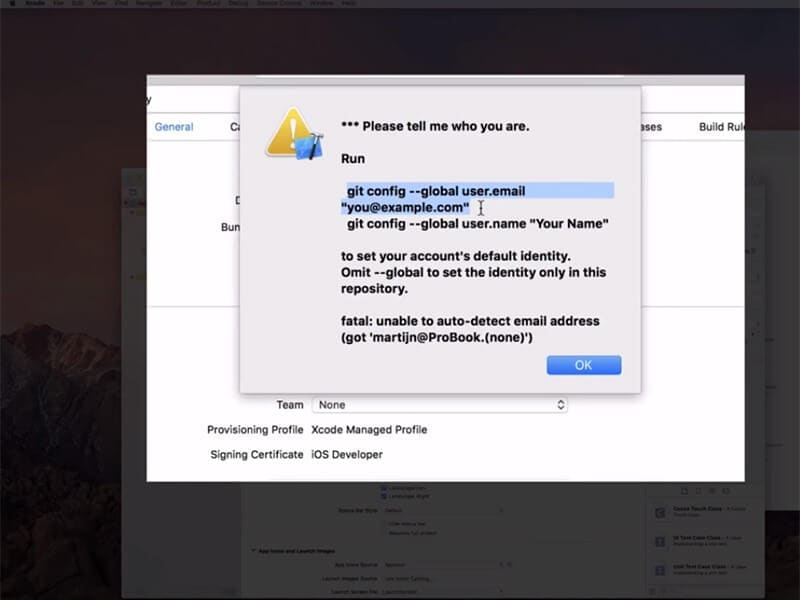
- For this, fire up the “Terminal”over your Mac and then execute the commands as follows:
- git config –global user.email “you@example.com “
- git config –global user.name “your name”
Note: Change the values for “you@example.com ”and “your name” with your information.


- Next, you need to make sure that to set up a development team and meanwhile, connect your OnePlus Open to your Mac computer.
 Allavsoft Batch Download Online Videos, Music Offline to MP4, MP3, MOV, etc format
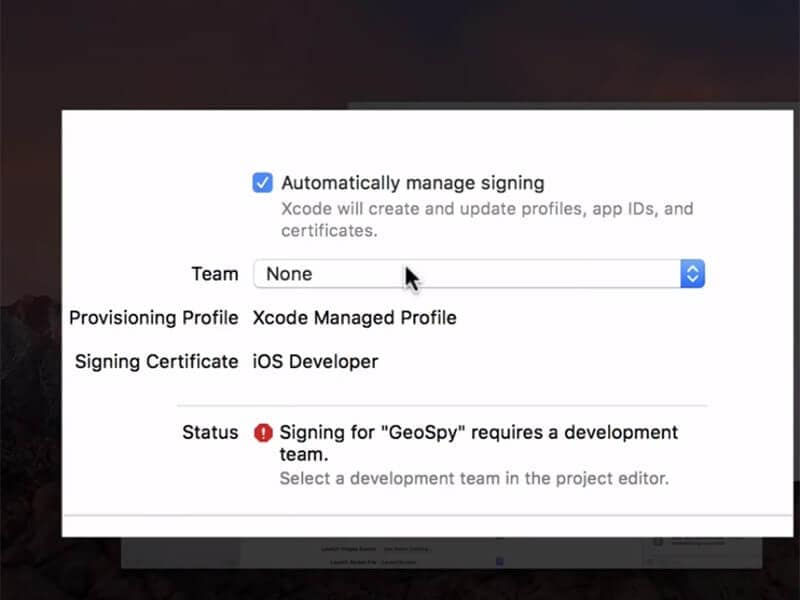
Once done, opt it in as the build device and while you do it, ensure to keep it unlocked.
Lastly, if everything is performed correctly, Xcode will now process some symbol files, please be patient and wait for it to complete.
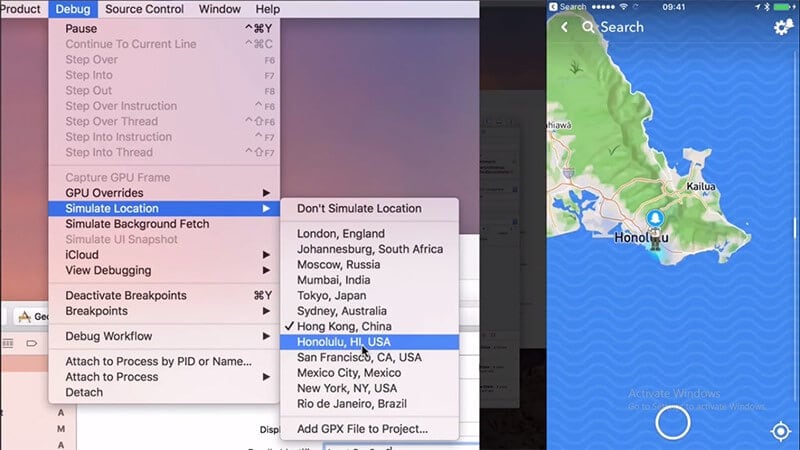
Step 3: Move Bitmoji
Now, you’re all set to fake location for Snapchat map. For this, simply hit on the “Debug” menu and then opt for “Simulate Location” from the drop-down window. Lastly, select the location from the list as per your preference and you’re done.
 vMix Pro - Software based live production. vMix Pro includes everything in vMix 4K plus 8 channels of Replay and 8 vMix Call
Part 5. How to fake Snapchat location on Android
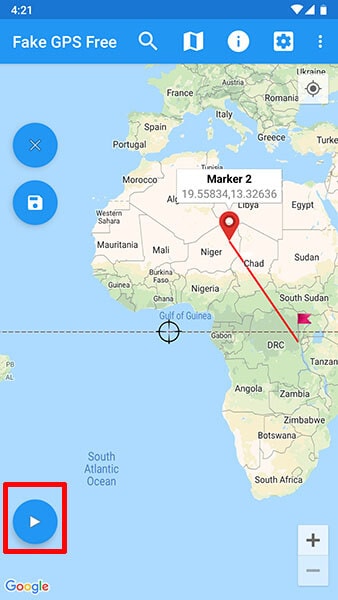
Last but not least, the next method to fake Snapchat location is for Android devices. For this, you need to download a Snapchat spoof app (easily available over Google Play Store) on your OnePlus Open. Here’s all that you need to do.
Head to the Google Play Store and then look for the “fake GPS” app. You may be provided with several similar options, be it free or paid. If you get along with any other app, it may require your OnePlus Open to be rooted.
You need to opt for the “Fakegps free” app for Snapchat. This app doesn’t require you to root your Android. But ensure that you are running on Android version 6.0 or higher.
Install the Fake GPS Free app for Snapchat and then launch it afterwards. On the main screen, you’ll be asked to“ENABLE MOCK LOCATIONS”. Hit on it and you’ll be redirected to the“Developer options” screen.
Here, you need to simply tap on the “Select Mock Location App” option and opt for “FakeGPS Free” from the list of options appearing.

Note: You may need to enable the “Developer options” first to access these settings. For this, head to the “Settings”>“About Phone”> hit on “Build Number” – x7 times.
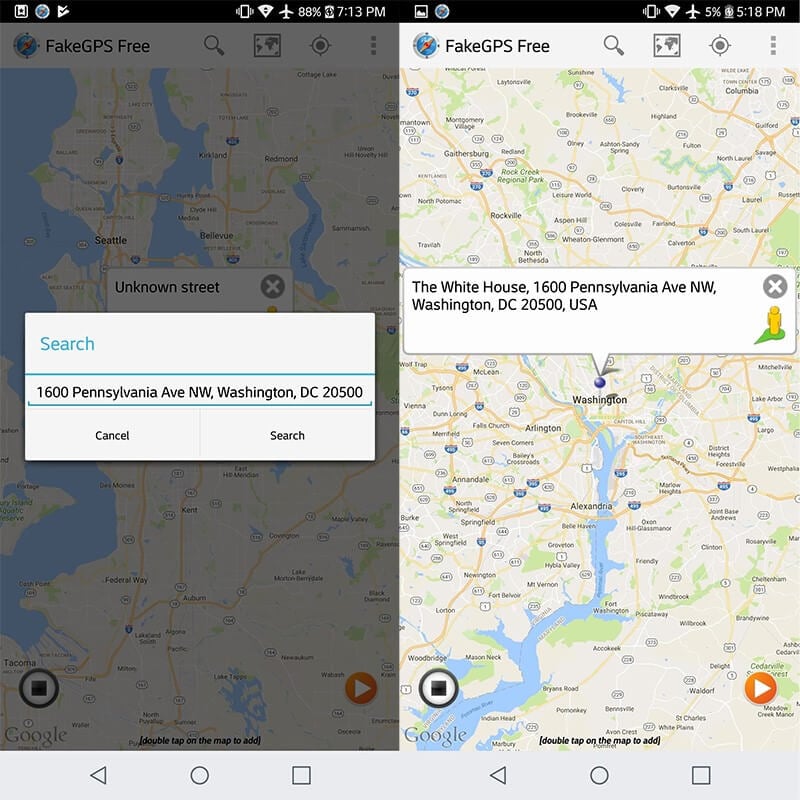
- Once done with enabling mock location, hit the back button on your touch screen to retreat back to the Fake GPS Free app.
- Now, hit on the “Search” icon over the top to find the desired location. Or, simply double tap over the map on your desired location to drop the pin.
- Lastly, hit the “play” button available over the right bottom of your screen to activate the fake GPS location for Snapchat.

Final Words
While reaching towards the end of the article, we are pretty sure that you now fully understand what it takes to fake Snapchat location on Android or iPhone. The aforementioned ways are fully tested and work even without rooting or jailbreaking your devices respectively. Happy Spoofing!
- Title: In 2024, How to Send and Fake Live Location on Facebook Messenger Of your OnePlus Open | Dr.fone
- Author: Abigail
- Created at : 2024-07-24 18:14:29
- Updated at : 2024-07-25 18:14:29
- Link: https://location-social.techidaily.com/in-2024-how-to-send-and-fake-live-location-on-facebook-messenger-of-your-oneplus-open-drfone-by-drfone-virtual-android/
- License: This work is licensed under CC BY-NC-SA 4.0.