
In 2024, Set Your Preferred Job Location on LinkedIn App of your Apple iPhone X | Dr.fone
Set Your Preferred Job Location on LinkedIn App of your Apple iPhone X
LinkedIn is the most widely used professional network that allows you to connect with professional people, learn new skills, and look out for the desired jobs. LinkedIn can be accessed from your desktop system as well as mobile phones. The need for changing the job location on LinkedIn arises when you are planning to move to a new city or a country and want to search for prospective job options. Changing the location will help the employers in the destination city to locate you and consider you for the job even before you move into the location. At times, when LinkedIn shows jobs in the wrong location, you need to change and update the location. Learn in detail about how to change job location LinkedIn.

How to set a preferred job location on LinkedIn?
To change your preferred job location on LinkedIn, below mentioned are the methods and steps.
![]() FX PRO (Gold Robot + Silver Robot(Basic Package))
FX PRO (Gold Robot + Silver Robot(Basic Package))
Method 1: Change LinkedIn Location on Computer [Windows/Mac]
To change your location on LinkedIn through your Windows and Mac systems, below listed are the steps.


- Step 1. Open your LinkedIn account on your system and tap on the Me icon at the homepage.
- Step 2. Next, tap on View profile and then click on the Edit icon in the introduction section.
- Step 3. A pop-up window will appear where you need to move down to reach the Country/Region section.
- Step 4. Here you can now select the desired Country/Region from the drop-down list. Additionally, you can also choose the city/district and the postal code.
- Step 5. Finally, click on the Save button to confirm the selected location.
Method 2: Change LinkedIn Location on Mobile Devices [iOS & Android]
LinkedIn can also be accessed from your Android and iOS devices, and the steps to change the location on these devices are as follows.
- Step 1. Open the LinkedIn app on Your Apple iPhone X and click on the profile picture and then select the View Profile option.
- Step 2. At the introduction section, click on the Edit icon and then scroll down to the section of Country/Region.
- Step 3. From the drop-down list, choose the desired Country/Region. As per the selection made, the city and the postal code also have to be added.
- Step 4. Tap on the Save button to confirm the selection.
Method 3: Change the LinkedIn location by Drone – Virtual Location [iOS & Android]
Another simple and quick way to change your location for your LinkedIn profile is by using a software called Dr.Fone - Virtual Location . This versatile tool is compatible with working for your iOS and Android devices and allows changing the location of your device and several apps, including LinkedIn. With just a single click, you can teleport your GPS location anywhere in the world. Additionally, you can also simulate the GOS movements as you move along the route.

Dr.Fone - Virtual Location
1-Click Location Changer for both iOS and Android
- Teleport from one location to another across the world from the comfort of your home.
- With just a few selections on your computer, you can make members of your circle believe you’re anywhere you want.
- Stimulate and imitate movement and set the speed and stops you take along the way.
- Compatible with both iOS and Android systems.
- Work with location-based apps, like Pokemon Go , Snapchat , Instagram , Facebook , etc.
3981454 people have downloaded it
Quick to download, the software has a simple interface, and the process of changing location is quick, let’s dive into it now.
Steps to change LinkedIn job search location using Drone-Virtual Location
Step 1. Download, install and run the Drone software on your system, and from the main interface, choose the Virtual Location option.

Step 2. Click on Get Started at the main software interface and then connect your Apple iPhone X or your Android device to your system.
Step 3. After the Apple iPhone X device is connected, a new window will open, which will show your present device location on the map.

Step 4. Now you need to activate the teleport mode, and for this, click on the teleport icon at the upper-right corner.

Step 5. Next, choose the desired location at the upper-left field from the drop-down list and then tap on the Go button.

Step 6. At the new pop-up box, click on the Move Here button to set the new location as your current location. All the location-based apps on your phone, including LinkedIn, will now show this new location as their current location.

Changing and setting a customized location on your LinkedIn profile can be beneficial in several ways, as listed below.
- Get the job in the new location: If you are anytime soon planning to relocate to a new location, searching for a new job after reaching the place can be a time-consuming and hassled task. To prevent this, you can update your LinkedIn location so that prospective employers can search you from the list of job seekers at this new location. Moreover, when you update your location before actually moving, you get more time to search for your choice of job.
- Probability of salary raise: Updating your LinkedIn location will create chances of getting a better salary hike as the prospective employers consider you to be from the same location as theirs and for them, there will be no hassles of work permit issues, and additional cost of relocation.
- More job options: When you update your LinkedIn location, your options for jobs increase, and you become eligible for the jobs which otherwise were not applicable for your location or profile. Thus, access to more job profiles gives you better chances of growing and negotiating.
FAQ: All you want to know about changing location on LinkedIn
 The BootIt Collection covers multi-booting, partitioning, and disk imaging on traditional PC’s using the standard BIOS and newer PC’s using UEFI. The collection includes BootIt Bare Metal (BIBM) for standard BIOS systems and BootIt UEFI (BIU) for UEFI system.
1. Should I change my location on LinkedIn, although I haven’t relocated yet?
If you are planning to relocate to a new place soon, updating your LinkedIn location is fine. Location update will help you target the job market and with job-seeking to get the desired job. It is suggested that suppose if you are moving to ABC location soon, you can update your LinkedIn location to ABC but at the same time mention your present current location, somewhere in the profile. Mentioning your current location will not create any feeling of being cheated or misled by the people who visit your profile.
2. How do I hide my location on LinkedIn?
There is no option on LinkedIn to hide your location. You can only provide incorrect information by changing, customizing, or setting a fake location but cannot hide it. By default, Linkedin keeps your profile visible to all. You can change it by following the steps given below:
- 1. Log in to your LinkedIn profile.
- 2. Go to settings, click on the “Privacy” tab in the menu.
- 3. Click on the “Edit your public profile” link.
Final Words
LinkedIn location on your systems as well as mobile devices can be changed either by changing it through app settings or using a professional tool like Dr.Fone - Virtual Location . Using the software, you can change the location of your device that will automatically update all the GPS and location-based apps, including LinkedIn, accordingly.
 Simple and intuitive video editing
How to Fake Snapchat Location without Jailbreak On Apple iPhone X
Snapchat users are very fond of using custom filters when sharing content on the app. It is a great way to ensure that your images and videos are only viewed by the people that you target. However, a new feature called Geo-filters has brought a lot of mixed feelings amongst Snachatters.
The filter is location-based, which makes any content that you share to be seen by people who are within your geographic fence.
Imagine that you are standing at the Niagara Falls and want to share with people who are in Europe; you will not be able to do this and this is why the filters are problematic to people in the Snapchat community.
Thankfully, there are ways in which you can spoof our device, allowing you to access Geofilters anywhere in the world. Today, you learn several ways in which you can achieve this objective with ease.
Part 1: Benefits that faking Snapchat brings to us
Snapchat comes with a lot of filters, both sponsored and crowdsourced, which you can use to interact with different people. When Geofilters was introduced, it meant that you could only access filters that were designed for specific locations.
Sponsored filters generally tend to target people in certain areas, and this can limit how you disseminate your content on Snapchat.
The main benefit that you get from faking Snapchat is getting access to these filters without even moving an inch.
When you spoof your device, Snapchat thinks that you are actually in the area that you have spoofed to. This virtual location will then allow you to access the filters that are available in that area.
Part 2: A free but complicated way to fake Snapchat location no jailbreak
One of the best ways to fake Snapchat without jailbreak is to use XCode. This is an app on your Apple iPhone X that allows you to tweak certain aspects of the apps that you have on your device, including Snapchat.
Get XCode on your device and then launch it. Start by using the locations that are found to setup XCode. You can download XCode from Apple App Store. You will need your Apple ID and password to use XCode.

Here are the steps that you have to follow:
Step 1: Start by creating a basic single-view application
Launch XCode and then create a new project
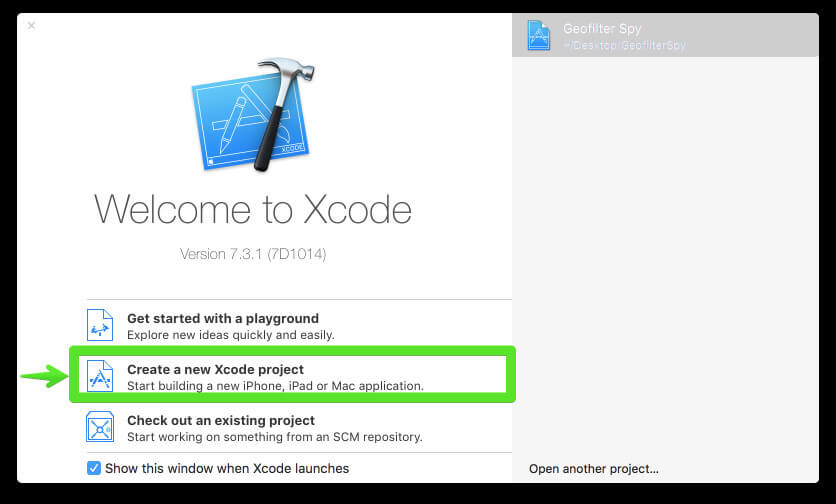
Then choose the option marked “Single View iOS application.

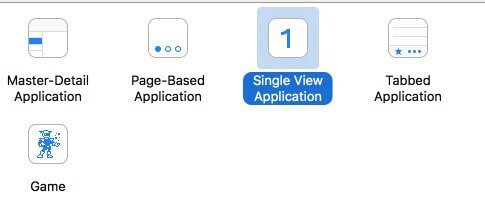
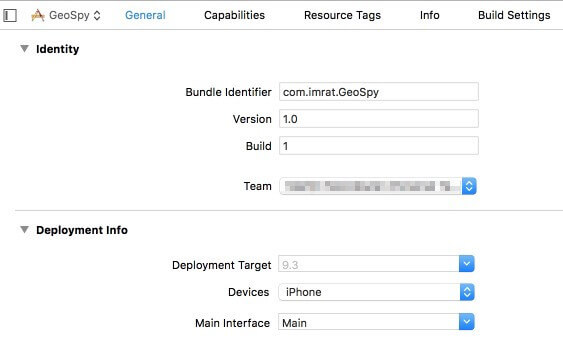
Now customize the project options and give it any name that you desire.

Now proceed and customize the Organization Name and the Identifier. The identifier works like a reverse domain name so you can use anything you desire.
Proceed and select swift as your preferred language and then click on “iPhone” as your device so the app will be small.
Any other options below this should be left in their default states.
Now go ahead and save the project to a location on your computer. Since the version control does not apply in this case, make sure that you uncheck the option before you save the app.

Step 2: transfer and run the created app on your iOS device
People who do not have the latest version of XCode will run into the error shown below.
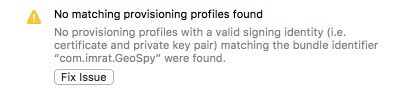
IMPORTANT: do NOT click on “Fix Issue” until you do the following tasks:
- Access the preferences on your XCode
- Choose the accounts tab
- Click on the add (+) icon at the bottom left side of your screen
- Now choose “Add Apple ID”.
- Type in your Apple ID and password
You should now have an accounts screen similar to the one shown in the image below.
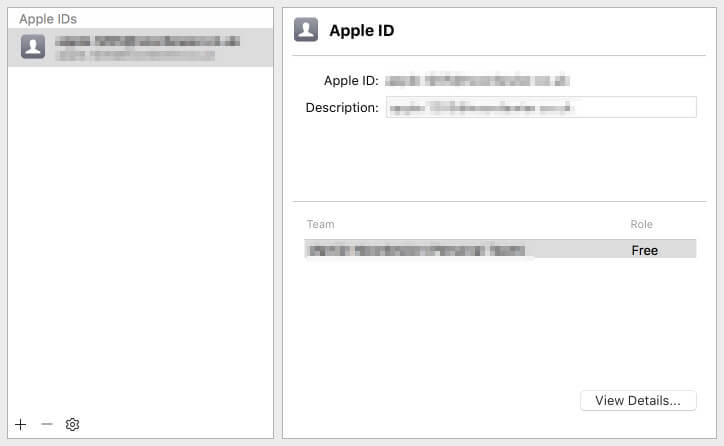
Now close the window and click on the “team” dropdown menu. You may now select the Apple ID that you just created.
Now you can go ahead and click on the “Fix Issue” button.
Now the error will be resolved and you should have a screen that is similar to the image below.
You may now run the app that you created before on your iOS device.
Use an original USB cable to connect the iOS device to your computer.
Towards the top right-hand corner of your screen, click on the button that is displaying your project name and then click on the iOS device.
 Power Tools add-on for Google Sheets, 12-month subscription

Now your iOS device will be showing at the top. Select it and proceed.
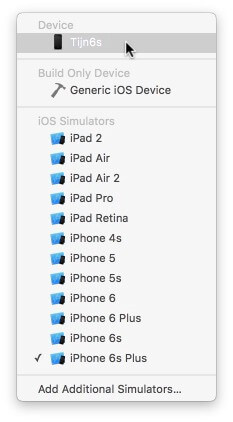
Hit the “Play” icon that is found at the top left side of your screen.
Wait for the process to be complete. You might as well get a cup of coffee as this can take quite a while.

When the process is complete, XCode will install the app on your iOS device. You will get the following error if your device has not been unlocked; unlocking the iOS device will put off the error message.
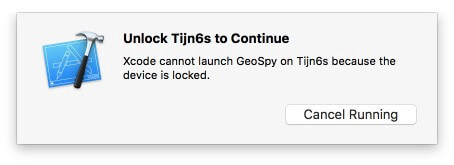
Now you should be viewing a blank screen on your iOS device. Do not worry; your device has not been ruined. This is the app that you have just created and installed. Pressing the “Home” button will dismiss the blank screen.
Step 3: It’s time to spoof your location
Go to Google Maps or iOS maps which will now show your current location.
Go to XCode and then choose “Simulate Location” from the “Debug” menu and then select a different location to test.
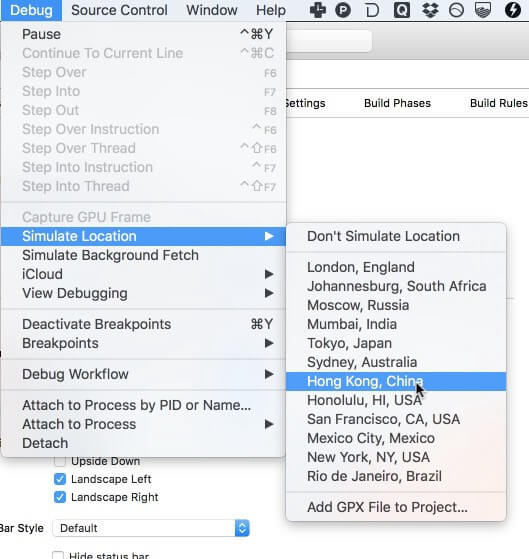
If you have done all that you need to do, then the location of your iOS device should instantly jump to the location that you have chosen.
Now you can proceed and see if you have access to Geo-filters in the new location.
Step 4: Spy Geo-Filters on Snapchat
Now you can launch Snapchat and then access the filters in the area that you have teleported to. Remember that you can move from one location to the next on XCode without having to close Snapchat. Just cancel the current snap after changing the location and create a new snap to see the filters in the new location. If this fails to respond, then go back to Google maps or iOS map app and then ensure that you are in the desired location. Once you have done so, close Snapchat and restart it again, and you will be in the new location once more.
 NeoDownloader - Fast and fully automatic image/video/music downloader.
Part 3: A paid but easy way to fake Snapchat location without jailbreak
You can also fake your Snapchat GPS location using a premium app such as iTools. This is a popular application, used to spoof many other apps that require geo-location data to work. Another point to note is that the latest iPhone models cannot be jailbroken. The iOS version today is very secure and you cannot tweak it like before.
Thankfully, you can use a premium, not free, iTools to change your virtual location without jailbreaking the Apple iPhone X device. You can get iTools on a trial basis, but after the period expires, you will have to pay $30.95 to continue using it.
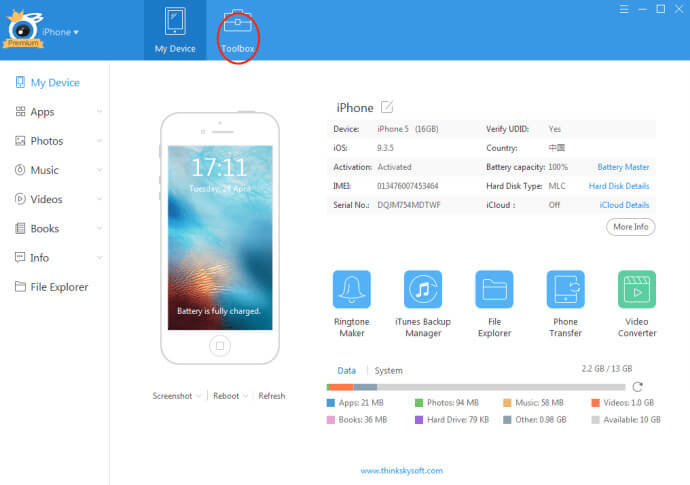
Step 1: Download and install iTools on your computer and then launch it. Connect your iOS device to your computer using the original USB cable that came with the Apple iPhone X device.
Step 2: Go to the iTools panel and click on “toolbox”.
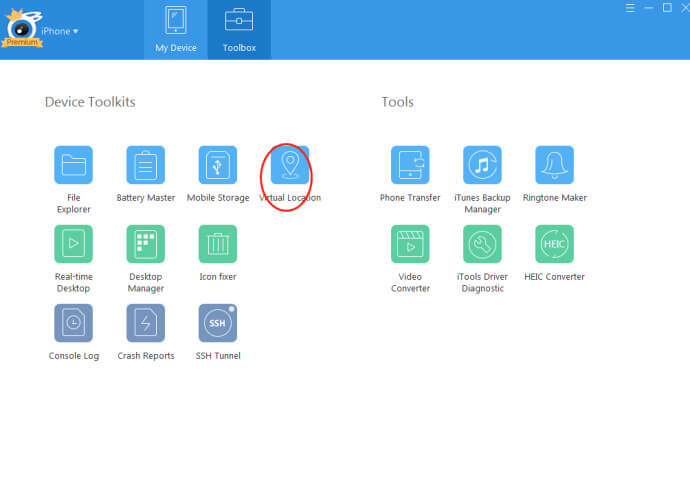
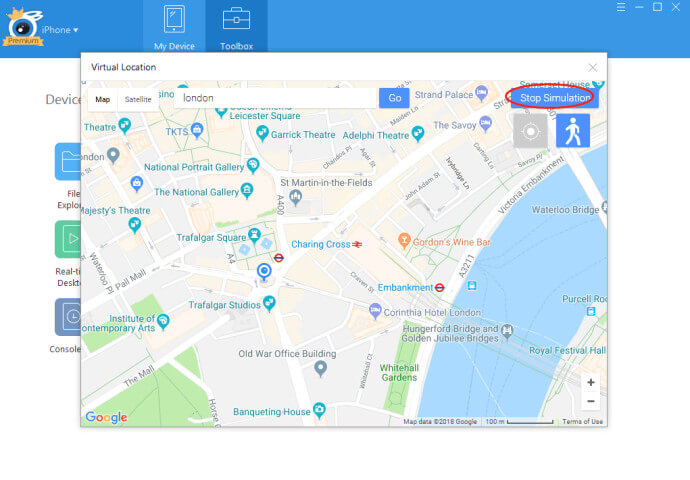
Step 3: Select the Virtual Location button within the Toolbox Panel
Step 4: Type in the location that you want to teleport to and then click on ‘Move Here”.
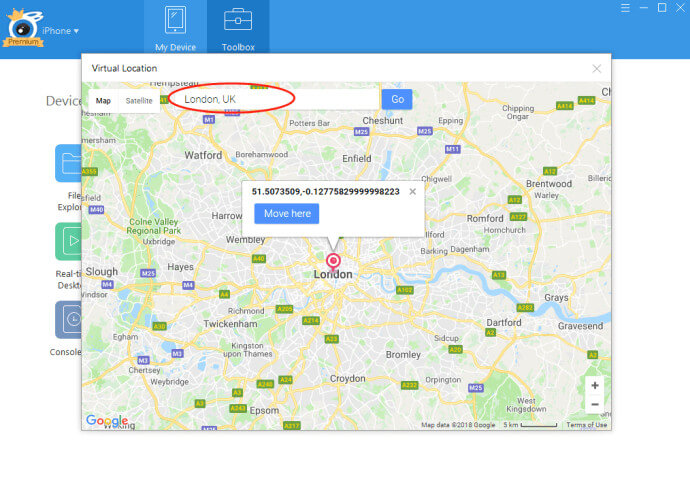
Step 5: Now open your Snapchat and you will be able to access the filters found in the location that you typed in.
Once you are finished with this spoofed location, you can simply select “Stop Simulation” in iTools. This is a premium tool, but very simple to use. It is the best tool to use, especially if you are having a device with the latest iOS version.
Part 4: A brief comparison of XCode vs. iTools to fake Snapchat GPS location
From the steps used in both methods, it is very clear that iTools is the best app to use to fake your Snapchat GPS location for several reasons. Here are some of them:
- Ease of use - Using XCode to fake your Snapchat GPS location is a long and complicated process, whereas using iTools is simple and clean.
- Price – Although XCode is free while iTools is not, the benefits of using iTools surpass the cost. This makes it less-costly when it comes to performance and convenience.
- Security – XCode may not be very secure, especially when it comes to avoiding detection by Snapchat. You may have to keep going back to XCode, and changing the location, switching off Snapchat, and restating it again. However, when using iTools, your location is fixed until you stop the simulation.
- Versatility – XCode cannot be used on the latest iOS devices without posing problems, while iTools is a simple and effective tool for all iOS versions.
In conclusion
When you want to spoof Snapchat to access Geo-Filters in any part of the world, you can use the complicated XCode or pay a fee and use the simpler iTools. There are various benefits that you gain from teleporting using these tools, with Geo-Filters access being the biggest benefit. If you want to use Snapchat all over the world without moving out of your home, then these are the ways that you can go about it.

How to Fake Snapchat Location on Apple iPhone X
In this case, you can either turn off the location sharing feature or even fake your Snapchat location. Trust me - with the help of a Snapchat location spoofer, you can easily do it and that too without jailbreaking/rooting your phone. In this post, I will share these tips to fake GPS for Snapchat like a pro!

Part 1: What is the Location Feature in Snapchat all about?
A while back, Snapchat has integrated the GPS feature, which means it can track your location in the background. Besides that, your friends on Snapchat can also access your real-time location if they want. To access this feature, you can just launch Snapchat and pinch out the home screen. Now, you can get a map-based interface, where you can check the location of your friends. You can also tap on their avatar to get more details about their location.
If the feature is enabled, then you can also share your location with others and even post it in your stories too.
How to turn it off?
Well, to be honest, a lot of people don’t like to share their location with others on Snapchat. Thankfully, you can just disable it by visiting your Snapchat Settings and turning on the Ghost Mode. When the Ghost Mode is enabled, your location won’t be shared with others. To start sharing your location, you can just turn off the Ghost Most and select with whom you wish to share your whereabouts (all or selected contacts).
Part 2: Why You Might Wish to Fake Snapchat Location?
Needless to say, if someone has our real-time location access, then they can easily track us. Therefore, if you are concerned about your security or privacy, but can’t turn the feature off, then you can use a Snapchat spoof hack. This will fake your location for the Snapchat map and no one would know your actual whereabouts.
Apart from security concerns, a lot of users would like to spoof location on Snapchat to trick their friends. You can just change your location to anywhere in the world and make your friends believe that you are visiting that place for fun.

Part 3: How to Fake Snapchat Location on iPhone without Jailbreaking it?
Now when you know the different scenarios to spoof location on Snapchat, let’s get into some details. Ideally, you can implement a Snapchat fake location hack on both iOS and Android devices. If you own an iOS device, then you can take the assistance of a reliable application like Dr.Fone - Virtual Location . Without the need to jailbreak your device, it can spoof your Apple iPhone X location to anywhere in the world.
You can search for a location by its name, address, or specific coordinates and can further adjust it on its map. The application also lets us simulate our movement between different spots. This will let you spoof your location not only on Snapchat, but on other dating and gaming apps as well. Here’s how you can use this Snapchat location spoofer and change your location in seconds.
- Firstly, just install the application on your system and connect your Apple iPhone X to it using a working cable. From the home of the Dr.Fone toolkit, launch the Virtual Location module.
- Once your Apple iPhone X is detected, you need to agree to the terms, and click on the “Get Started” button.

- Now, you can see your present location on the map-like interface of the application. To spoof location on Snapchat, go to the top-right corner, and click on the “Teleport Mode” option.
- This will let you enter the name or the address of the target location in the search bar. You can also enter the exact coordinates of the place and load it on the interface.
- In the end, you can just adjust the pin around or zoom in/out the map as per your requirements. Once you are done, click on the “Move Here” button to fake GPS location on Snapchat.
You can later launch Snapchat and check your location, which would be changed now.
Part 4: How to Fake GPS for Snapchat on Android?
Unlike iPhone, it is pretty easy to fake GPS on Snapchat map for Android devices. This is because there are plenty of fake GPS apps on the Play Store (which is not allowed on the App Store as of now). Though, before you use these apps, you need to make some changes on your Android phone. Here’s how you can fake Snapchat location on an Android without rooting.
Firstly, you need to unlock your Android phone and visit its Settings > About Phone to tap the “Build Number” feature 7 times straight. After this, you can easily access the Developer Options on your Android phone.
Great! Once it is enabled, you can go to its Settings > Developer Options and turn on the feature to mock location on the Apple iPhone X device.
Now, you can just go to the Play Store and install any reliable fake GPS app on the phone (like Lexa or Hola fake GPS). Later, you can go back to its Settings > Developer Options and let the installed app mock location on your phone.
That’s it! Now you can simply launch the installed fake GPS app and enter the name/address of the place to spoof your device location. Your location would automatically be changed on all the installed apps (including Snapchat).
Conclusion
There you go! Now when you know how easy it is to use a Snapchat location spoofer, you can change your location on the app like a pro. While Android users have plenty of options to perform a Snapchat spoof on their device, iPhone users have to be a bit cautious. There are only a handful of tools like Dr.Fone - Virtual Location that can fake Snapchat location without jailbreaking your device. Go ahead and explore these solutions to protect your location on Snapchat or prank your friends without causing any harm to your phone.
- Title: In 2024, Set Your Preferred Job Location on LinkedIn App of your Apple iPhone X | Dr.fone
- Author: Abigail
- Created at : 2024-07-24 16:17:05
- Updated at : 2024-07-25 16:17:05
- Link: https://location-social.techidaily.com/in-2024-set-your-preferred-job-location-on-linkedin-app-of-your-apple-iphone-x-drfone-by-drfone-virtual-ios/
- License: This work is licensed under CC BY-NC-SA 4.0.