
In 2024, Why Your WhatsApp Location is Not Updating and How to Fix On Lava Yuva 2 Pro | Dr.fone
Why Your WhatsApp Location is Not Updating and How to Fix On Lava Yuva 2 Pro
WhatsApp is a free messaging app owned by Meta, initially Facebook. Currently, this platform boasts over two billion active users, even outshining Messenger and WeChat. One of the reasons WhatsApp is popular is letting users share their live location with individuals and group chats. However, sometimes you may experience the annoying WhatsApp location not updating issue. Luckily, this article has a solution to this problem. We’ll also address how to share my location on the WhatsApp issue. Let’s learn!

Part 1: Why is WhatsApp Live Location Not Updating?
First and foremost, let’s discuss some of the reasons why your WhatsApp live location is not updating on Android or iPhone. Below are some of them:
You should be conversant with the idea that WhatsApp can’t function without the internet. In other words, you can’t send or receive messages and calls without strong internet. And the same applies to updating your live location.
2. Disabled location feature
Here’s another reason why WhatsApp live location is not updating on iPhone or Android. While signing up, WhatsApp will request to access your phone’s GPS location. Therefore, disabling this feature by mistake can prevent WhatsApp from updating your location.
3. Inappropriate time and date
Although uncommon with modern phones, this can be another reason for a wrong live location on WhatsApp. Therefore, connect your phone to the internet to update your date and time. You might also want to restart your phone and see if it works.
Part 2. How to Fix WhatsApp Live Location Not Updating Problem?
Now that you already know why WhatsApp’s live location isn’t updating, it’s time to check out the solutions. Let’s go!
Step 1. Restart internet connection
Sometimes, it only takes a simple phone restart to get things back on track. Of course, this will also sort out any bugs in your WhatsApp app. Another thing, you can enable and disable “flight mode” to restart your data connection.
Step 2. Update the app and phone
When last did you update your system and apps? You should constantly update your apps and phone system to enjoy better performance and security. It is straightforward!
Step 3. Enable location service
You can also check if your location service is enabled on iPhone or Android settings. On iPhone, click Settings > Privacy > Location Service. It’s even easier on Android. Swipe down your screen, long-press the GPS button, and enable the Location toggle.
Step 4. Reset location service on iPhone
iPhone users can try to reset the Location & Service settings. To do that, open Settings > General > Reset > Reset Location & Privacy.
Step 5. Uninstall and reinstall WhatsApp
If all else fails, then it’s probably time to get handy. Simply uninstall your WhatsApp app and then get a newer version on Play Store or App Store. But often, this won’t be necessary after updating the app.
Part 3: [WhatsApp Tip] Fake WhatsApp Live Location with Unreal Accuracy
There have been multiple security concerns about WhatsApp before. But while the jury is still out, do yourself a favor and protect your live location from spyware and other users. Also, you might want to spoof WhatsApp location for business purposes and prank friends.
That said, learning to fake location on WhatsApp is super simple with Dr.Fone - Virtual Location . With this GPS app, you can teleport your WhatsApp live location to anywhere in the world. And to make your new location more believable, this program lets you simulate movements by foot, scooter, or car. Remember, it works with all iPhone/Android versions and other social media apps like Pokemon Go , Snapchat , Instagram , Facebook , etc.
 Project Manager - Asset Browser for 3Ds Max
Dr.Fone - Virtual Location
1-Click Location Changer for both iOS and Android
- Teleport GPS location to anywhere with one click.
- Simulate GPS movement along a route as you draw.
- Joystick to simulate GPS movement flexibly.
- Compatible with both iOS and Android systems.
- Work with location-based apps, like Pokemon Go , Snapchat , Instagram , Facebook , etc.
3981454 people have downloaded it
Below is how to spoof WhatsApp live location with Dr.Fone:
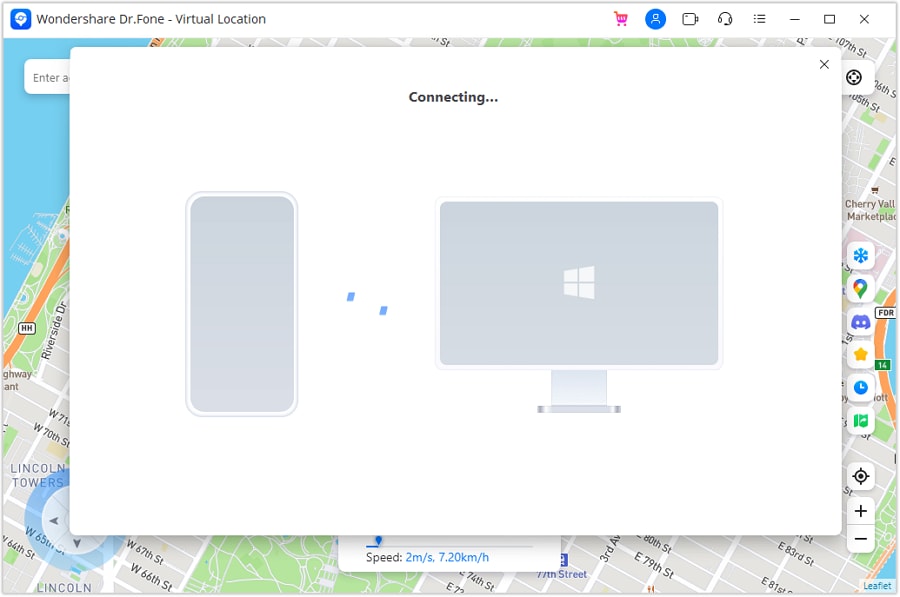
Step 1. Open the Virtual Location tool.
 SwifDoo PDF Perpetual (1 PC) Free upgrade. No monthly fees ever.

Install and launch Dr.Fone on PC, and then connect your phone to the PC with a USB firewire. Then, tap the Virtual Location button on the home page and click Get Started on the pop-up window.
Step 2. Connect your phone to Dr.Fone.

To connect your phone to this all-in-one software, enable “transfer files” instead of “charging” on your phone. Then, enable USB debugging under the settings tab. On Android, just click Settings >Additional Settings > Developer options > USB debugging.
Step 3. Choose a new WhatsApp live location to share.


After USB debugging is on, tap Next and enter the new location on the search field at the top-left corner. Now choose the area and tap Move Here. Interestingly, you can choose a movement route and customize the speed. And there is that!

Part 4. How to Send Live Location on WhatsApp?
Back in 2017, WhatsApp rolled out a brand-new feature that allows users to send their live location to family and friends. This location can come in handy if you want to meet up somewhere or let your friends and family know you’re safe and secure. And lest I forget, you can also use it to prank your friends.
Note, however, that WhatsApp only allows you to share your real-time location for 8 hours, 1 hour, or 15 minutes. In other words, this gives you control over how long users can see you on the map. Moreover, this information can’t be shared with anyone once you stop sharing.
So without wasting time, here’s how to send live location on WhatsApp for Android or iPhone:
Step 1. Enable the GPS service on your phone by clicking the GPS button on the control panel.
Step 2. Open WhatsApp and tap the group chat or individual chat with which you want to share the location.
Step 3. Now click the Attach button on the text field and click Location.

Step 3. Allow WhatsApp access to your device’s location and then press the Share Live Location button.

Step 3. Last but not least, set the duration your contact will view your location, add a comment, and tap the Send button. That’s it!
Note: As you can see, WhatsApp relies on your GPS location to share your actual location. So, use Wondershare Dr.Fone to change your device’s location and then share it on WhatsApp.

Part 5: How to Fix Common WhatsApp Issues on Android & iPhone
Wondershare Dr.Fone is the perfect tool to handle all your WhatsApp issues. Below are some common issues it can help you with:
- Lost Messages
Sometimes you might accidentally or intentionally delete WhatsApp chats or messages. Fortunately, Dr.Fone can help you dig out and recover those messages with a simple click. Just launch the Data Recovery tool, connect your phone to the software, and Dr.Fone will scan for all lost and current messages.
- Transfer WhatsApp data
Thanks to the fast-paced mobile technology, it’s inevitable to migrate to a new phone. But you’ll have to sacrifice all your WhatsApp data. Luckily, Dr.Fone allows you to backup, restore, and transfer all WhatsApp data.
- Backup WhatsApp Business chats
Having a WhatsApp Business account is vital if you’re an online marketer. Here, you can create a business profile and enjoy quick replies, automatic messaging, accurate statistics, etc. So, to avoid losing your invoices and other business chats, use Dr.Fone to back up and transfer your WhatsApp Business chats to a new phone.
Wrap it Up
See, there’s nothing complex about the WhatsApp live location not updating issue. Just update and restart the app or check your location settings if it’s enabled. And, of course, use Dr.Fone to share a fake location on WhatsApp and perform other WhatsApp tasks like backing up and transferring data. Thank me later!
How To Activate and Use Life360 Ghost Mode On Lava Yuva 2 Pro
Life360 is a popular location-sharing app among families and friends. The platform enables real-time tracking of loved ones’ whereabouts on smartphones. But there are moments when you might want to disable it for privacy.
If you’re intrigued by maintaining privacy on Life360, read on further. Learn how to activate the Life360 Ghost Mode. It’s a valuable feature when you need personal space without alerting your family or friends. Uncover the steps to use Ghost Mode in Life360 through a location-sharing app. Enjoy a balance between staying connected and maintaining your privacy.

WPS Office Premium ( File Recovery, Photo Scanning, Convert PDF)–Yearly
 PCDJ Karaoki is the complete professional karaoke software designed for KJs and karaoke venues. Karaoki includes an advanced automatic singer rotation list with singer history, key control, news ticker, next singers screen, a song book exporter and printer, a jukebox background music player and many other features designed so you can host karaoke shows faster and easier!
Part 1. What Does Life360 Ghost Mode Mean?
Life360 Ghost Mode is a workaround and not an official feature. It’s an unofficial term for those who hide or spoof their GPS location within the Life360 platform.
- Ghost Mode is activated using external tools to conceal or manipulate your GPS location within the Life360 app.
- It’s a workaround to gain an added layer of privacy. It allows you to control the visibility of your real-time location on the Life360 map.
- Unlike turning off the internet or your phone, Ghost Mode involves more nuanced methods. It ensures discreet location management.
- Turning off the internet or the phone displays a clear “No Network” or “Phone Off” message. Ghost Mode provides a different status indication to make your Life360 look normal.
Now that you know all of Life360 Ghost Mode updates and their significance, let’s explore the steps to enable it. Learn how to activate Ghost Mode within the Life360 app by using a dedicated tool.

Part 2. How To Activate Ghost Mode on Life360
Wondershare Dr.Fone - Virtual Location is a versatile tool for enhancing privacy. With its key features, you can activate Life360’s Ghost Mode. It offers great control over your GPS location. Here are the key features of Dr.Fone to maximize Ghost Mode.
 Easy GIF Animator is a powerful animated GIF editor and the top tool for creating animated pictures, banners, buttons and GIF videos. You get extensive animation editing features, animation effects, unmatched image quality and optimization for the web. No other GIF animation software matches our features and ease of use, that’s why Easy GIF Animator is so popular.
- Spoof your location without leaving home
Dr.Fone allows you to manipulate your GPS location without moving. It provides a seamless way to activate Ghost Mode on Life360.
- Automatic movement (change directions in real-time)
The tool enables automatic movement. It allows you to alter your location in real-time, simulating authentic movements.
- 360-degree directions
Dr.Fone offers the flexibility of 360-degree directions. It gives you precise control over your virtual location within the Life360 app.
- Keyboard control
The keyboard control feature allows for effortless navigation, making it user-friendly for both novices and experienced users.
Activate Ghost Mode With Dr.Fone - Virtual Location
Follow these step-by-step instructions to activate Ghost Mode on Life360 using Dr.Fone - Virtual Location:
- Step 1: Download and install Dr.Fone on your computer. Launch the app and connect your smartphone. Next, click on Toolbox > Virtual Location. Click Get Started and tick the I am aware of the disclaimer box.
- Step 2: Follow the on-screen instructions. Once connected, click Manage Device to control your location without moving. Choose the “One-Stop Route” function from the top right. Tap anywhere on the map to set your destination.

- Step 3: Input the number of movements, and select Round or Loop trip. Adjust the walking speed and click Move Here to start the simulation. You can Pause or Clear at any point to start again.

- Step 4: Activate Teleport Mode by choosing the first icon in the top-right. Enter your desired location in the Search bar, press Enter, and confirm on the map. Click Move Here to change your smartphone’s location. Ensure alignment with the spoofed location on your computer. You are now under Life360 Ghost Mode.

Part 3. Will Others Know if Ghost Mode Is Activated on Life360?
Activating Ghost Mode on Life360 through a virtual location changer presents both advantages and potential drawbacks.
- Enhanced privacy
Ghost Mode provides an added layer of privacy. It allows you to move without being tracked by family or friends.
- Risk of miscommunication
Others won’t know your location, potentially leading to miscommunication or emergency concerns.
- Potential for sneaking out
You can engage in activities like sneaking out without being monitored by their Life360 circle.
Pros of Ghost Mode Activation
Here are the pros of using Ghost Mode on Life360.
- **Discreet movements.**Enables you sers to move discreetly, maintaining confidentiality.
- **Freedom of movement.**Offers freedom in activities without constant location tracking.
- Privacy control. You have control over when and how you share your location information.
 CollageIt Pro
Cons of Ghost Mode Activation
Here are some unwanted scenarios if you’re under Life360 Ghost Mode.
- Emergency concerns. Others won’t be aware of your actual location, posing risks in emergencies.
- **Accident risk.**Lack of real-time tracking may hinder quick assistance in case of accidents.
- Communication challenges. Potential for miscommunication as your true whereabouts remain undisclosed.
Part 4. Other Methods To Turn Off Location on Life360
When Ghost Mode feels too troublesome, alternative methods exist to turn off location sharing on Life360 temporarily. Here’s a guide on six different approaches:
Method 1: Turning Off WiFi and Data
Disabling WiFi and data on Life360 is a common method to prevent location tracking. Here’s a step-by-step guide:
- Step 1: Launch Life360 on your phone. Turn off WiFi and data; you can specifically disable them on iPhones for the Life360 app.

- Step 2: In Settings, locate Life360 Disable Cellular Data, Background Refresh, and Motion & Fitness. Once done, the Life360 location will then remain static at the current position.
Method 2: Dsiable Location Services for Life360
Disabling location services provides an effective solution for pausing Life360 without detection, The method applies to both Android and iOS devices. Here’s how:
- Step 1 (iOS): Go to Settings > Privacy > Location Services. Scroll and find Life360.
- Step 1 (Android): Go to Settings > Apps > Life360.
 PaperScan Professional: PaperScan Scanner Software is a powerful TWAIN & WIA scanning application centered on one idea: making document acquisition an unparalleled easy task for anyone.
- Step 2 (Android): Tap Permissions > Location. Choose Deny or Ask every time to deactivate location access for Life360.
- Step 2 (iOS): Tap on it and opt for Never to turn off location access for Life360.

Method 3: Low Data Mode
Disabling WiFi and Data on Life360 might trigger notifications, alerting anyone to your offline status. An alternative method to deactivate Life360 awareness is by using Low Data Mode:
For iOS: Open the Settings app on your Lava Yuva 2 Pro or iPad. Tap on Wi-Fi. Select the i icon beside the connected Wi-Fi network. Toggle on the Low Data Mode switch.


For Android: Open the Settings app. Scroll and tap on Cellular or Mobile Data. Tap on Cellular Data Options or Mobile Data Options. Toggle on the Low Data Mode switch.
Method 4: Turn on Airplane Mode
Activating Airplane Mode deactivates all network connections. It includes GPS, offering a swift solution to cease location sharing on Life360. The action also suspends calls, texts, and internet access, so keep that in mind. Follow the steps:
For iOS: Swipe your screen to access the Control Center. Tap the airplane icon to activate Airplane Mode. Alternatively, go to Settings > Airplane Mode. Toggle the switch beside it On.

For Android: Swipe your screen to access the quick settings menu. Tap the airplane icon to enable Airplane Mode. Alternatively, go to Settings > Airplane Mode. Toggle the switch beside it On.
Method 5: Use a Burner Phone
While it may seem cumbersome, using a burner phone is a straightforward method to disable location sharing on Life360. Install Life360 on the burner phone using the same account. Connect it to the relevant WiFi, and then remove Life360 from your primary device.
Method 6: Use a VPN Service
Using a VPN service alters your IP address, which can help spoof Life360 to show an inaccurate location. The approach is beneficial when you aim to conceal your location without entirely turning off location sharing. Remember, though, that it’s not foolproof and may not provide consistent results.
Conclusion
Life360 Ghost Mode, though not an official feature, provides a discreet way to enhance privacy within the app. While it’s a valuable tool for moments when you need personal space, be aware of its downsides. If Ghost Mode seems too risky, explore alternative methods.
The ease of enabling Ghost Mode on/off using Dr.Fone makes it a convenient option. Striking the right balance between connectivity and privacy in Life360 requires thoughtful consideration. Explore the dynamics of Ghost Mode in Life360 to decide if it aligns with your preferences and needs.
How to Change your Lava Yuva 2 Pro Location on Twitter
Twitter is one of the most used social media platforms of today’s time, where anyone can voice their opinion regarding any trend or event in the form of short messages. Moreover, it’s a free platform that displays the hot debates and news based on your country, which is usually a good thing.
However, it restricts other global trends due to the limited location exposure. However, you can change the trending location according to your preferences with a few tricks to avail the best experience. If you have questions such as how to change your Twitter location, then this article is for you.
Part 1: How to Change Location on Twitter
Usually, Twitter allows you to keep tabs on current hot topics in your country. While in Nowadays, people prefer to be aware of the global trends, which are impossible to access with the default settings. But there are a few valuable ways by which you can change Twitter location regardless of any device to gain the most out of this mega content platform.
How to Change Twitter Location on Mobile Phone
Twitter for mobile is easy to use, but it offers limited privacy options compared to desktop versions, such as you can’t change your username or delete your account on the mobile Twitter. Still, it does allow you to change your location in a few easy steps:
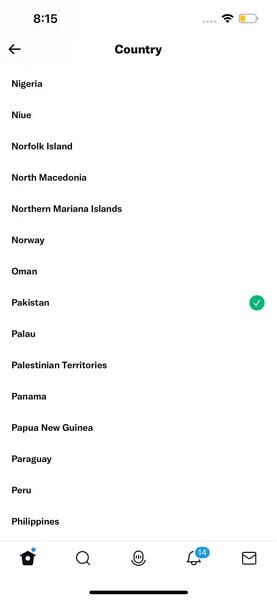
Step 1: First, open the Twitter app, visit your profile, and go to “Settings and Privacy.”
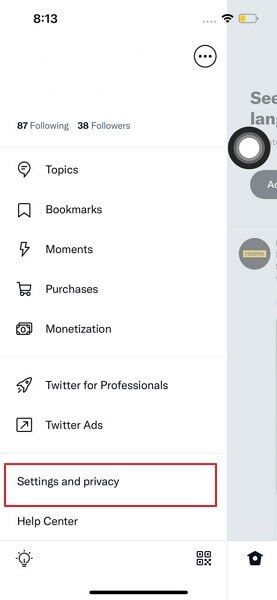
Step 2: Next, click on “Your Account” and later on “Account Info.” You have to access your “Account Information” by clicking on it.
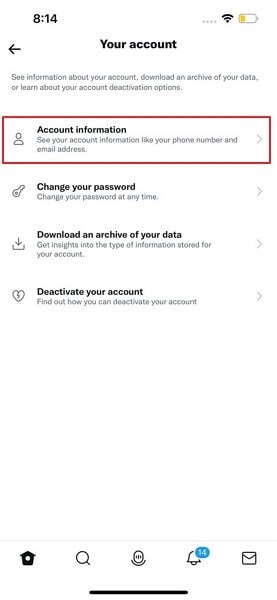
Step 3: Lastly, choose the “Country” and change the location according to your preference.
How to Change Twitter Location on a Computer
Unlike Twitter applications, the desktop version is efficient. For example, you can change the Twitter location to your desired region in just a few steps:
Step 1: First, go to the Twitter website and log in with your username and password.
 SwifDoo PDF 2-Year Plan
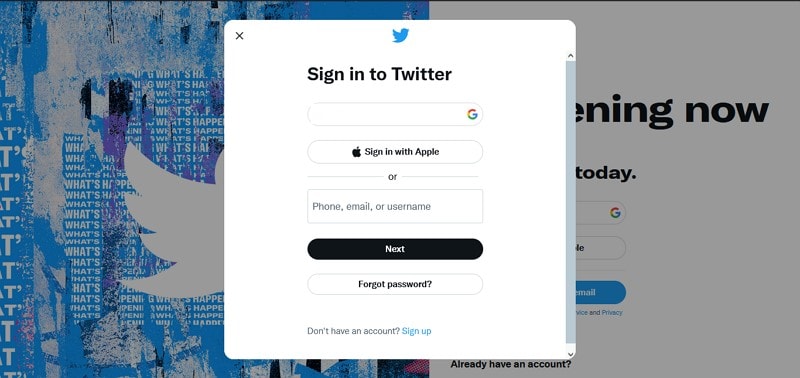
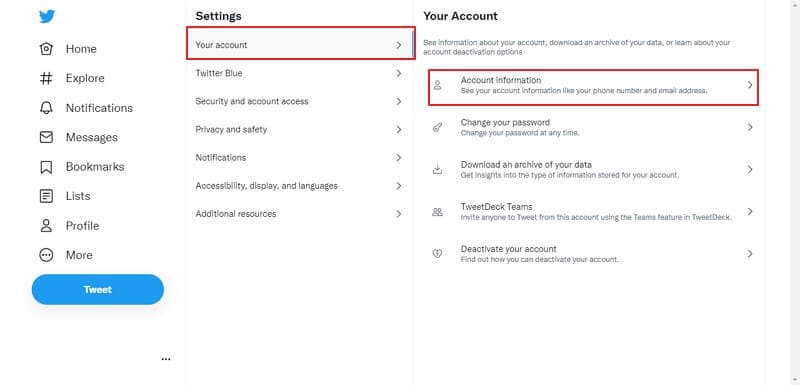
Step 2: After logging in, go to “More” options from the Twitter home and click on “Settings and Privacy,” Now, select the option of “Account Information” from the “Your Account” settings.
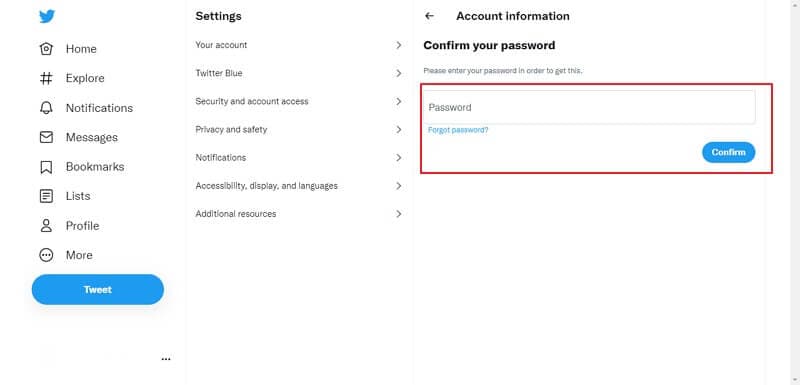
Step 3: You will be asked to enter your password. After confirming your password, click on the “Country” you wish to change your Location.

What is the Difference between My Profile Location and My Country Setting on Twitter?
Country setting and profile location are both entirely different things. The country setting determines what trends and news will be displayed on your discovery page.
In contrast, profile location is your public location that other users can see when visiting your profile. Therefore, changing your country setting will not impact your original profile location unless you make a change yourself.
Part 2: How to Fake Location on Twitter
In this technological era, changing your location to the other end of the world is just a few clicks of tasks; various software is available on the market, such as Dr.Fone, which can easily spoof your location.
Dr.Fone – Virtual Location is a well-recognized software compatible with iOS and Android devices. It can easily change your area to your desired country in a few clicks without risking your privacy.

Why Do We Need to Fake Location on Twitter?
There are several reasons people want to learn how to change location on Twitter. Some of the reasons are mentioned below:
For Privacy Protection
Almost all social media platforms use your IP address and location to provide you with a genuine experience. Still, many people do not wish to risk their privacy, and for that reason, they use software and tools to fake their location.
For Tricking Friends and Family
You can spoof your location to prank or trick your friends and family into thinking that you’re on vacation or taking a trip when you’re not.
For Making New Friends
One of the reasons people prefer to spoof their location is to socialize and make friends with people other than their region; it’s the most innovative way by which you can easily have a chat with anyone from around the world without revealing your actual location.
Dr.Fone - Virtual Location
1-Click Location Changer for both iOS and Android
- Teleport from one location to another across the world from the comfort of your home.
- With just a few selections on your computer, you can make members of your circle believe you’re anywhere you want.
- Stimulate and imitate movement and set the speed and stops you take along the way.
- Compatible with both iOS and Android systems.
- Work with location-based apps, like Pokemon Go , Snapchat , Instagram , Facebook , etc.
3981454 people have downloaded it
How to Fake Twitter Location by Dr.Fone - Virtual Location
With Dr.Fone – Virtual Location, you can easily fake your Twitter location with a few simple steps:
Step 1: Download Dr.Fone Mobile Toolkit
Firstly, download and install the Dr.Fone – Virtual Location tool on your computer and launch it. Then, select the “Virtual Location” tool from the displayed Dr. Fone tools.


Step 2: Connect your Mobile
Connect your Lava Yuva 2 Pro or Android device to the computer through a USB cable. Now, hit the “Get Started” button.
Step 3: Activate Teleport Mode
You can now see your actual location on the displayed maps and if the location is incorrect, click on the “Center On” icon. To fake the Twitter location, click on the “Teleport” icon at the upper right corner of the screen and search for the location where you want to spoof.
Step 4: Spoof Right Away
Finally, click on the “Move Here” icon in the popup box, and your GPS will be located at that particular location. Now launch the Twitter app, and it will directly display your selected spoof location.

 safe & secure

Part 3: FAQs About Twitter Location
- Could your location be tracked via Twitter?
Yes, you can be tracked through Twitter only when set on default settings. As per Twitter privacy, it’s required to attain your IP address, location, and other details to offer you valid trends and news that are trending within your region.
- How do I enable and disable my location on Twitter?
Choose “Settings and Privacy,” then “Privacy and Safety.” Then, under “Data sharing and off Twitter activity,” head to “Location Info.” Now, hit on “Add Location Information to your Tweets.” If that box is already ticked, your location is enabled; now, uncheck it to disable it.
- What’s the reason behind Twitter having the wrong location?
If you want your Twitter location to be accurate and precise. Firstly, you should enable the location setting from your Twitter application, then go to your mobile settings and enable location services for Twitter. Keep in mind that if one of these settings is not enabled, your location won’t be correct.
- Why does Twitter hide worldwide trends?
In 2020, Twitter changed its privacy by removing worldwide trends. Still, few global trends can be seen on the explore page, directly or indirectly connected with your location or your preference of content to offer the best experience to you. But, if you wish to explore more of these worldwide trends, you can always spoof the location.
Conclusion
Twitter is one of the most content-consuming social platforms globally. Its users are always thirsty to debate and share their opinions on various topics, which can, unfortunately, be restricted because of the limited exposure to global trends. But with the help of this detailed article, anyone can easily change Twitter location to the desired region.
safe & secure
- Title: In 2024, Why Your WhatsApp Location is Not Updating and How to Fix On Lava Yuva 2 Pro | Dr.fone
- Author: Abigail
- Created at : 2024-07-24 17:00:31
- Updated at : 2024-07-25 17:00:31
- Link: https://location-social.techidaily.com/in-2024-why-your-whatsapp-location-is-not-updating-and-how-to-fix-on-lava-yuva-2-pro-drfone-by-drfone-virtual-android/
- License: This work is licensed under CC BY-NC-SA 4.0.