Simple and Effective Ways to Change Your Country on YouTube App Of your Motorola Moto G Stylus (2023) | Dr.fone
Simple and Effective Ways to Change Your Country on YouTube App Of your Motorola Moto G Stylus (2023)
YouTube is easily the most popular video-sharing and media platform today. It’s where you can find free popular and trending videos across the globe to stream to your heart’s content. However, you’ll notice that some videos are blocked in some countries for several reasons, including copyright claims, legal requests, or licensing rights.
If you want to bypass these restrictions, simply read below to learn the simplest and most effective ways to change your location on YouTube. You’ll be able to access content that is otherwise restricted in your country by following our handy guide in no time.


Part 1: How to Change Location Settings on YouTube?
You can change your YouTube location settings if you want to make some videos available in your country. We’ll show you how to change your YouTube region, whether you’re on a computer, Android, iPhone, or iPad, by following these simple steps below.
Method 1: Change Your Location on YouTube from Computer
Here are the steps to change location on YouTube while using a computer.
Step 1: Click your Profile Picture.

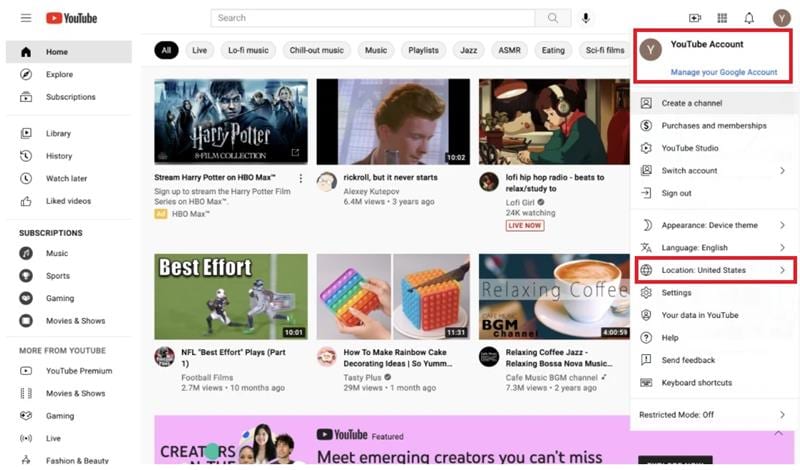
Step 2: Click Location.
Step 3: Choose the location you’d like to use.
Method 2: Change Your Location on YouTube from Android
Here’s how to change your country on YouTube if you’re on Android.
Step 1: Open YouTube on your Motorola Moto G Stylus (2023).
Step 2: Tap your Profile Picture and choose Settings > General > Location.

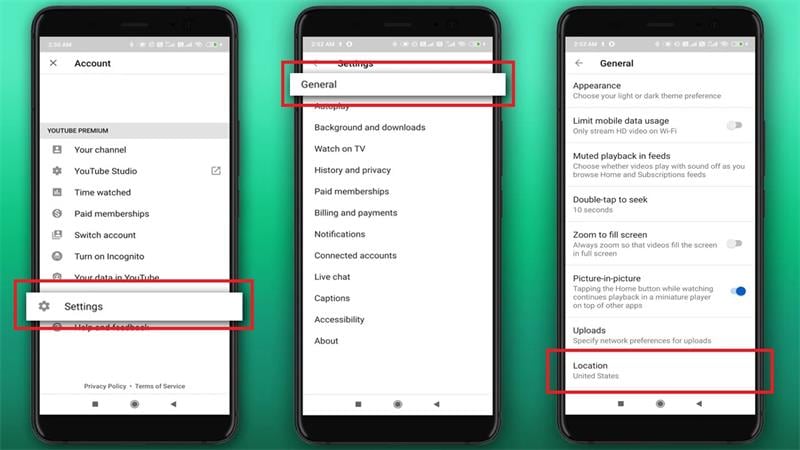
Step 3: Choose your desired country from the list of available options.
Method 3: Change Your Location on YouTube from iPhone and iPad
Lastly, if you’re using an iPhone or an iPad, simply follow the steps below to change your location on YouTube.
Step 1: Tap your Profile Picture.
 Simple and intuitive video editing
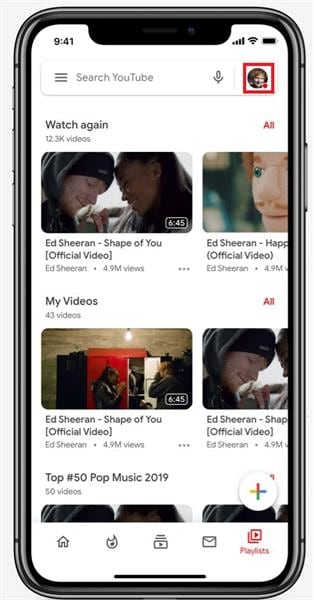
Step 2: Tap Settings > General > Location.
Step 3: Select your desired country.
Part 2: How to Change Your Country to Watch Blocked YouTube Videos?
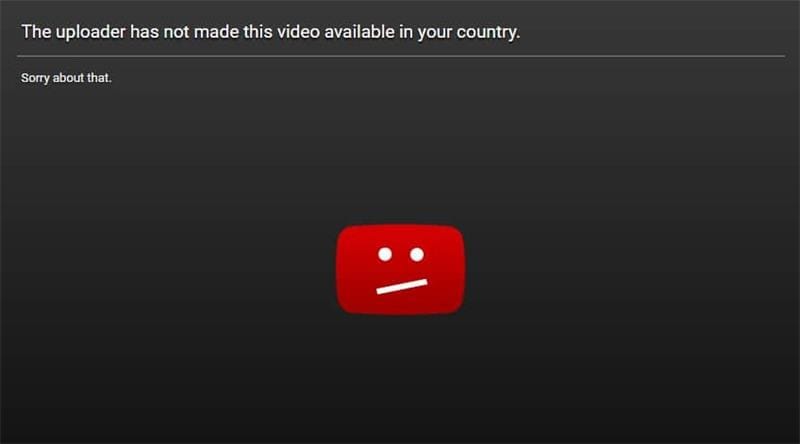
There are generally no issues when watching YouTube videos anywhere you are. The only instance to have problems accessing YouTube is when you are in a country where the platform is blocked, such as in North Korea or China. Even then, some contents are still geo-restricted unless you’re in the right region.
In this part, we’re listing five different methods to access YouTube’s full library so you can stream all you want.
Method 1: Change Your Home Area on YouTube Manually
Here are the steps to manually manage your home area on YouTube to change your location.
Step 1: Sign up for YouTube TV and open the YouTube TV application.
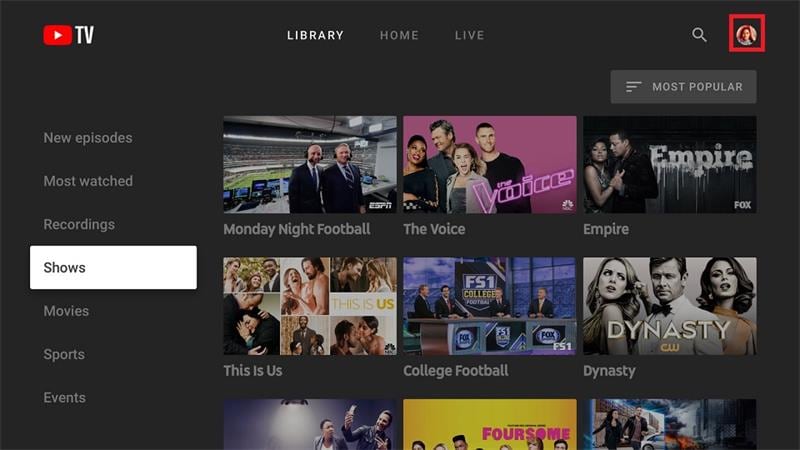
Step 2: Click your Profile Picture and click Location > Home Area.
Step 3: Update your home area.
Note
You can only change your location twice a year. You should also use YouTube at least once every three months in your country to ensure YouTube TV provides the correct local networks.
Method 2: Change Location on YouTube Using a VPN
The simplest and most effective way to unblock restricted content on YouTube is by using a VPN. In this example, we’ll be using NordVPN to change your location on YouTube using a VPN. Here are the steps.
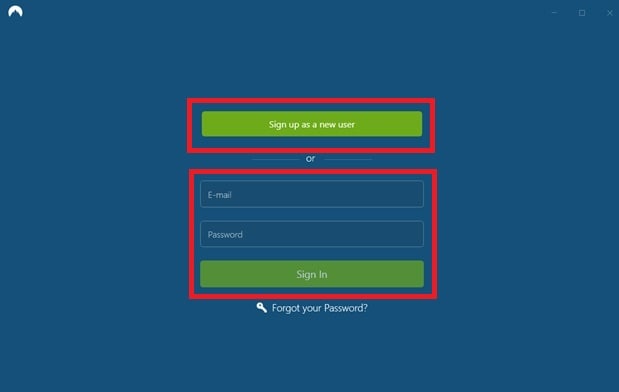
Step 1: Download and install NordVPN. Sign in or create an account.
Step 2: Use Quick Connect or connect to a specific country by clicking on the pin on the map. You can click on Search here as well to find a specific server in the country of your choosing. There’s also a list of countries at the left sidebar so you can choose a server manually.

Step 3: Open YouTube and browse previously blocked content.
The Best VPNs for YouTube
Aside from NordVPN, there are other VPNs you can try to access content on YouTube, including ExpressVPN, CyberGhost, and Surfshark.
NordVPN utilizes up to 5,200 servers in 60 countries, with some servers optimized for ultra-fast streaming. It’s one of the fastest VPNs available today, where you can unblock geo-restricted content wherever you are, with a no-logs policy for unbreakable encryption.
Like NordVPN, ExpressVPN optimizes speed for downloading and streaming. It uses more than 3,000 servers in more than 90 countries to provide cutting-edge connectivity, which includes 256-bit AES encryption for perfect anonymity.
CyberGhost has over 7,000 servers in more than 80 countries to unblock geo-restricted content across YouTube, Netflix, Amazon Prime, and more. CyberGhost doesn’t keep logs of your activities as well, ensuring your activity is safe.
Lastly, Surfshark is another reliable VPN to unblock restricted content on YouTube and other platforms. It uses up to 3,200 servers in 65 countries to provide a high-speed and low-latency connection at all times. Surfshark has a no-logs policy like the three VPNs on the list, making your online activity safe and anonymous.
Here’s a handy table to compare the best VPNs available today in terms of ratings, number of servers, supported devices, prices, and more.
| NordVPN | ExpressVPN | CyberGhost | Surfshark | |
|---|---|---|---|---|
| Number of Servers | 5,200 Servers | 3,000 Servers | 7,000 Servers | 3,200 Servers |
| Streaming Reliability | Excellent | Good | Good | Excellent |
| Streaming Services | YouTube | |||
| Netflix | ||||
| HBO Go | ||||
| Amazon Prime | ||||
| SkyGo | ||||
| BBC iPlayer | ||||
| Etc. | YouTube | |||
| Netflix | ||||
| HBO Go | ||||
| Amazon Prime | ||||
| SkyGo | ||||
| BBC iPlayer | ||||
| Etc. | YouTube | |||
| Netflix | ||||
| Amazon Prime | ||||
| BBC iPlayer | YouTube | |||
| Netflix | ||||
| HBO Go | ||||
| Amazon Prime | ||||
| SkyGo | ||||
| BBC iPlayer | ||||
| Etc. | ||||
| Supported Devices | Windows, macOS, iOS, Android, Linux, Smart TVs, Routers | Windows, macOS, iOS, Android, Linux | Windows, macOS, Linux (command line), iOS, Android | Windows, macOS, iOS, Android, Linux |
| Average Speeds | 100+ MBPS | 100+ MBPS | 100+ MBPS | 100+ MBPS |
| 24/7 Support | Yes - with live chat | Yes - with live chat | Yes, but email only: [email protected] | Yes, but email only: [email protected] |
| Free Trial | None - but with a 30-day money-back guarantee | None - but with a 30-day money-back guarantee | 24-Hour free trial | 7-day free trial for Android, iOS, and macOS only |
| Prices | $11.99 - 1 Month | |||
| $59.88 - 1 Year | ||||
| $95.76 - 2 Years | $12.95 - 1 Month | |||
| $59.95 - 6 Months | ||||
| $99.95 - 1 Year | $12.99 - 1 Month | |||
| $41.94 - 6 Months | ||||
| $56.94 - 2 Years + 4 months free | $12.95 - 1 Month | |||
| $47.88 - 1 Year | ||||
| $59.76 - 2 Years |
 Forex Robotron Basic Package
Method 3: Change Your Country on YouTube Using a Proxy Server
Using a Proxy to mask your location on the internet allows you to change your country on YouTube to access blocked content. In this example, we’ll use ProxFree YouTube Proxy to view locked YouTube content. Here are the steps to change your country on YouTube using a Proxy Server.
Step 1: Go to ProxFree YouTube Proxy .
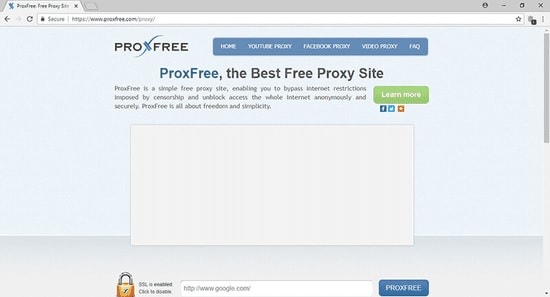
Step 2: On the Server Location dialogue box, choose a country in the available options on the dialogue box.
Step 3: Enter the URL of the specific video you want to see unblocked and click PROXFREE to open YouTube in the proxy’s tab.
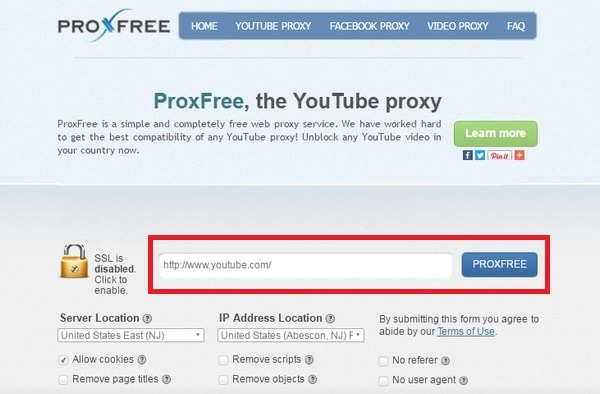
Note: You can also use YouTube’s search bar once YouTube’s tab is open on your proxy to search YouTube videos as usual.
Method 4: Change Your Country on YouTube Using a SmartDNS
Using SmartDNS to bypass YouTube geo-restrictions is useful for viewing blocked content in your country. This is because SmartDNS changes the Motorola Moto G Stylus (2023) device’s virtual location by editing its DNS address. Here are the steps to change your country on YouTube using SmartDNS.
Step 1: Find and select a DNS Server address from different DNS providers online. In this example, we’ll be using SurfShark .
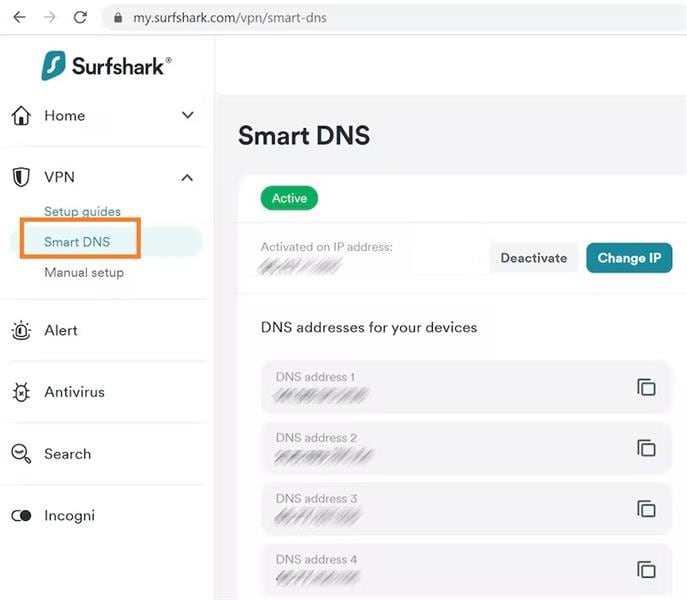
Step 2: Login or create an account. Click Smart DNS > Activate Smart DNS. Take note of the DNS address available to input on your computer’s Network Settings.
Step 3: Open Network Settings on your computer and find DNS Settings.
Step 4: Input your DNS Server address and click Ok once done. The DNS address should activate once you reconnect to the internet.
Note****_:_ Your IP address changes every 24 hours, which your ISP does. You’ll have to update your DNS address when it happens.
Method 5: Other Ways to Bypass YouTube’s Regional Filter
The easiest way to bypass YouTube’s regional filter is simply by downloading YouTube videos outright. Many websites are available online that allow you to download YouTube clips for free. In the step-by-step guide below, we’ll be using iTubeGo to download YouTube videos for viewing at a later time.
Step 1: Download and install iTubeGo . Launch the application on your computer.
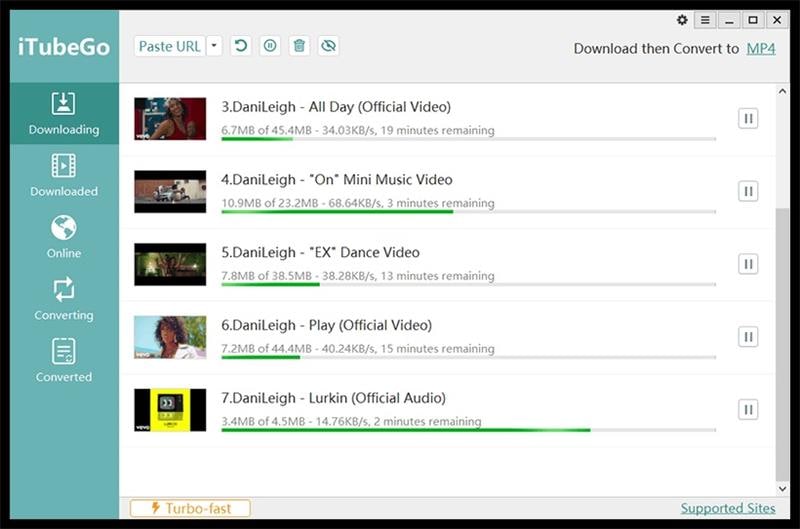
Step 2: Click Paste URL and paste the YouTube video’s URL on the dialogue box.
Step 3: Click Download to save the YouTube clip on your computer.
Here are the pros and cons of using each method to unblock geo-restricted content on YouTube.
| Pros & Cons | Manually on YouTube TV | Using VPNs | Using Proxy Servers | Using SmartDNS | Offline Downloads |
|---|---|---|---|---|---|
| Pros | You can easily change locations without downloading other applications. | Change countries on-the-fly to access even more content. | Some Proxy Servers don’t require downloading applications to use. | Unblocks geo-restricted content, much like VPNs. | You can always watch videos at a later time once downloaded. |
| Cons | You’re only allowed to change twice a month. | VPNs aren’t free, and you have to pay for a subscription. | Setting up Proxy Servers requires a little bit of technical know-how. | DNS is prone to manipulation by hackers. | You need to download a dedicated program to save YouTube videos. |
Part 3: Why Do Regions Block YouTube Content?
Although all YouTube videos are hosted on the same platform, a lot of them are geo-restricted to specific countries for various reasons. Many YouTubers sometimes lock their content in certain countries/regions due to licensing rights. YouTube may also block specific content to countries/regions to comply with local laws.
Conclusion
There are multiple ways to change your country on YouTube to access content that is otherwise unavailable in your location. You can change your country in settings on the YouTube app or use other methods, including using VPNs, SmartDNS, or Proxy Servers, to name a few. If all else fails, you can download an application that lets you save YouTube videos for offline viewing at a later time.
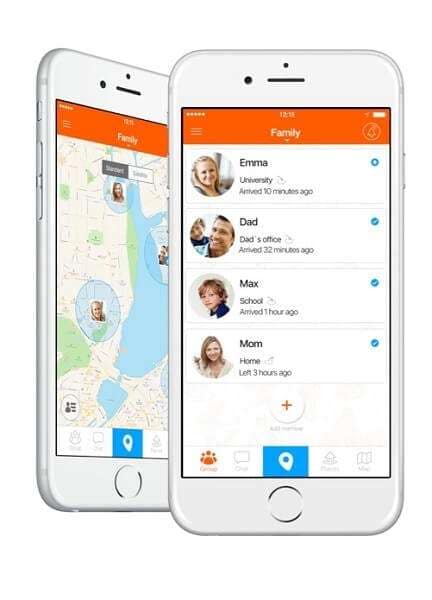
Does find my friends work on Motorola Moto G Stylus (2023)
Find my friends app is becoming a norm for most people. The Smartphone and app developers are now aware of this. As a result, most Smartphone platforms are adding tools that allow users to share their whereabouts with others. Apple has its native Find my friends for their iPhone. The app works great for a group of iOS users, but you may need to share location with Android devices, which the built-in app can’t help you with. When you want to use the “find friends” app, they certainly need to add people from Android and iPhone users. And, you can’t dictate what people are choosing as their smartphone platform. While some prefer Android, many of us are dedicated to the iPhone too. Therefore, if you need to keep track of the real-time location of your family members or friends, you need the assistance of a third-party tool. These apps are the most logical way to create a link to find my friends app for Android and iPhone.
Part1: How to track friends using iPhone or Android

Key features:
• Import from any devices and cams, including GoPro and drones. All formats supported. Сurrently the only free video editor that allows users to export in a new H265/HEVC codec, something essential for those working with 4K and HD.
• Everything for hassle-free basic editing: cut, crop and merge files, add titles and favorite music
• Visual effects, advanced color correction and trendy Instagram-like filters
• All multimedia processing done from one app: video editing capabilities reinforced by a video converter, a screen capture, a video capture, a disc burner and a YouTube uploader
• Non-linear editing: edit several files with simultaneously
• Easy export to social networks: special profiles for YouTube, Facebook, Vimeo, Twitter and Instagram
• High quality export – no conversion quality loss, double export speed even of HD files due to hardware acceleration
• Stabilization tool will turn shaky or jittery footage into a more stable video automatically.
• Essential toolset for professional video editing: blending modes, Mask tool, advanced multiple-color Chroma Key
1.1 Tracking Friends using iPhone
As an Apple user, you might already know about the “Find my friends” app on your device. It is the most convenient way to share your location with your friends. You can also keep track of your peers with it. If you ever feel lost in a new area, you can use this app to notify your friends. You can use this app to create a route for all to meet in a selected location. If your friends are heading toward the destination, the app will notify you.
Let’s see how one can use the “find my friends” on the iPhone, shall we?
1.1.1 You will find the “Find Friend” on your Home screen. In IOS 13, you will have to launch the “Find MY” app.

1.1.2 Tap “Add Friends.”
1.1.3 Add a contact name from your list. You can add several contacts here.
1.1.4 Tap Send.

1.1.5 Now select a time option.
If you want to share your location, launch the app first. Then Tap “Me.” Then, keep your “Share My Location” switched on.

1.2 Tracking Friends Using Android
Android users can also use this find my friends app. Even if someone in your group does not use a smartphone (seriously?), you can track them. You can send an invite, and if they agree, you can find your friend anytime. Remember, iPhone or Android, whatever the platform, all the members of the group have to agree with location sharing; otherwise, you cannot track them.
You can use find my friends from iPhone to an android user via Google Maps. You need to download the app and activate location service by taping “Allow While Using App” Then you have to select” “Share your location” You can then send your location to your android user friend from the message icon of the Google map.
 WonderFox DVD Ripper Pro
Part2: 3 best find my friends apps compatible both Android and iPhone
You have the preliminary idea of how one can find their friends using an iPhone or Android. But, how to keep track of all of your friends, while some of them are die-hard apple fanatics and others are android geeks? Well, you do not need to tell others about those anymore, as we are going to talk about three fabulous cross-platform apps for finding friends.
2.1 Find my friends
This app is straightforward and pretty simple to use. You can look at the map and find your friends at any time. Your friends also can keep track of you. SO, if security is your concern,” “Find my friend” is perfect for you. You can also chat with friends while they are on route.
You can also issue an alert to your friends whenever you are in an emergency. All your loved ones will get the address details, current time, and the remaining battery life. If your group has a mix of Android, iOS, and Blackberry, this app is excellent for you.


2.2 Familo
Familo is the best working “finding friend” app. The app is regularly updated, and you can sign up with a phone number. You don’t need Facebook or any username to use this app. You have to create a group and invite others. If they sign up, you will get their location details at any time of the day. Of course, they have to approve it first!


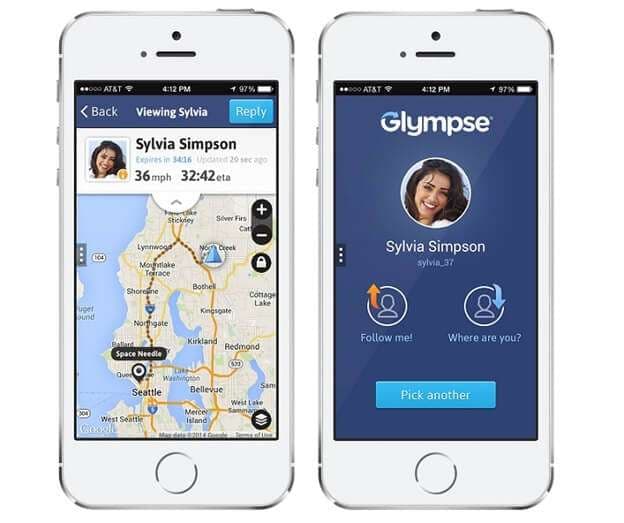
2.3 Glympse
What makes Glympse different from others is the fact that you don’t even need to sign up here! You can set up a group for a specific time, and share your location to anyone you want to. You can even share your places via the web. If you wish to track your friends temporarily or contact someone for a specific period, Glympse is the right choice for you. And, if someone is not comfortable with the idea of location sharing, you can send your location via the web. They can use the shared link to know your area without ever installing the app. But, if you want to check up on your loved ones continually, then Glympse cannot satisfy your demand. As a temporary service, your location sharing link will be activated for four hours at most.
![]() FX PRO (Gold Robot + Silver Robot(Basic Package))
FX PRO (Gold Robot + Silver Robot(Basic Package))
Conclusion
Remember, there are several other find my friends apps in the app store, which can entice you. Some of them have pretty neat features. But, they can drain your battery too fast; others can be pretty limited on their free version. And, many of find my friends apps are partial to either iPhone or Android. But, why not try them out yourself? Everybody’s needs and tastes are different. Give my three favorite find my friend apps for Android and iPhone a try, if they suit you, great. If not, there are more options. Find one for you and keep a “leash” on your loved ones!
 Easy and Safe Partition Software & Hard Disk Manager
How to Share/Fake Location on WhatsApp for Motorola Moto G Stylus (2023)
Whether you have Android or iPhone, at some point, you need to trick your phone that you are somewhere else. It can be weird as most of us use the GPS app to get our real location, find directions, and see weather updates. However, in some situations, we need to fake locations to get access to some features on our phones or do something else legitly. So, if you want to know how to send a fake location on WhatsApp, then we have a detailed guide for you.
Part 1. Common Scenarios to Share Fake Location on WhatsApp
There are many situations where users might need to set up fake locations, for fun, and other reasons. Some of the common scenarios where you have to fake live location on WhatsApp are listed below:
- You don’t want your friends and family to know your actual location when you are outside.
- When you are thinking of giving a surprise to your loved ones.
- To pull a prank on your friends.
Whatever your reason is to fake location on WhatsApp, you can use a third-party app for the job as long as it is legit.
Part 2. All You Want to Know about WhatsApp Location Function
2.1 Send Location on WhatsApp
2.1.1 Merits & Demerits
When sending locations on WhatsApp, the process is quite simple to comprehend. However, a complete set of reasons explains this process’s merits and demerits. When looking for them in a particular place, using location features on WhatsApp greatly helps. While in an emergency, sharing location with your loved ones is the best way to keep yourselves safe.
On the other hand, sharing location on WhatsApp can sometimes put your life at risk if it falls into the wrong hands. Whenever you share a location on WhatsApp, it directly uses your device’s location services. This, in turn, utilizes the battery, which can lead you to face battery drainage problems.
2.1.2 How To Send Location on WhatsApp?
As you’ve learned some essential merits and demerits about sharing locations on WhatsApp, provided below is a comprehensive step-by-step guide. Look through the steps to know more about the easy way of sharing live location with your loved ones:
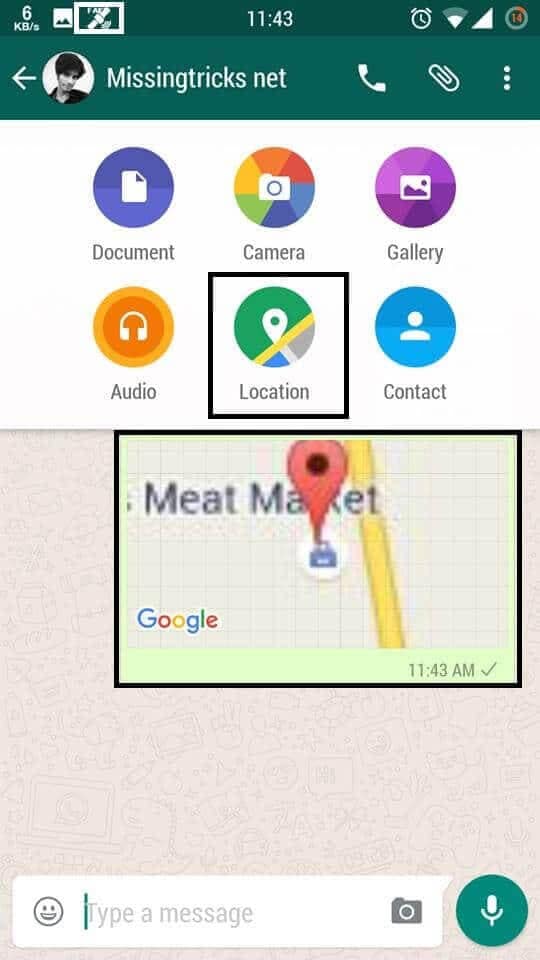
1. As you open WhatsApp and lead into the respective chat, select the “Attachment” or “+” icon according to your device. Continue to choose the “Location” option from the list.
2. This leads you to a new screen that shows your location status. Look for the “Search” bar on the top and type in the location you want to send. Observe the search results and tap on the location to send it to the individual.


2.2. Pin a Location in WhatsApp Location Service
2.2.1 Merits & Demerits
The live location sharing feature in WhatsApp is introduced to give your close ones an idea of your location even when you are constantly moving. The biggest merit of this feature is that it allows the users to track the person’s location long after it was shared.
But sometimes, the user shares the live location even when they want to share a fake location on WhatsApp. This really ruins your plan if you are planning to give someone a surprise or doing something special for them.
2.2.2 How to Pin a Location in WhatsApp
The live location feature is entirely optional, and it depends on whether you want to use it. The process to pin a location is pretty simple. If you want to send a fake location on WhatsApp, then you might need some help. But it is easy to pin your live location.
1. Launch WhatsApp on your phone and open the chat with the person you want to send your location.
2. Select the icon that looks like a paperclip and choose the Location option.
 Greeting Card Builder
3. There you will see the “Share Live Location” option and then continue. The GPS will automatically pin down your current location, and you will get an option to select the duration for which you want to share the location.

Specify the period and continue you begin the sharing.
And that’s how you pin a location. If at some point, you decide that you don’t want to share your location, then you can stop it manually.
Part 3. Use a Location Spoofer to Fake Location On both Android and iPhone WhatsApp
3.1 Fake location or Live Location on WhatsApp using Dr.Fone Location Spoofer
There are times when we want to share a fake location or send fake live location on WhatsApp with our contacts. While Android users can use a readily available fake location app, both Android and iOS users can try a dedicated tool like Dr.Fone - Virtual Location (iOS & Android) . With this user-friendly application, you can change your location to anywhere in the world with a single tap. You can start and stop the simulation anytime and even simulate movement between different spots, which is helpful for sharing fake live location.
There is no need to jailbreak the target iOS device to use this fake GPS WhatsApp trick. The application is a part of the Dr.Fone toolkit, which is known for its security solutions. You can use it on almost every iOS and Android device as it is compatible with new and old iPhone models. You can follow these steps to send fake locations or live location on WhatsApp using Dr.Fone – Virtual Location (iOS & Android).
Send Fake Location with Teleport Mode
The following video shows you how to teleport your Motorola Moto G Stylus (2023) GPS location, and more tutorials can be found in the Wondershare Video Community .
Here is a video for you to learn how to teleport your Motorola Moto G Stylus (2023) GPS location:
Step 1: Launch the Virtual Location app
To start with, launch the Dr.Fone toolkit on your computer and launch the “Virtual Location” feature from its home.

Using an authentic lightning cable, connect your Motorola Moto G Stylus (2023) to the computer and click on the “Get Started” button.

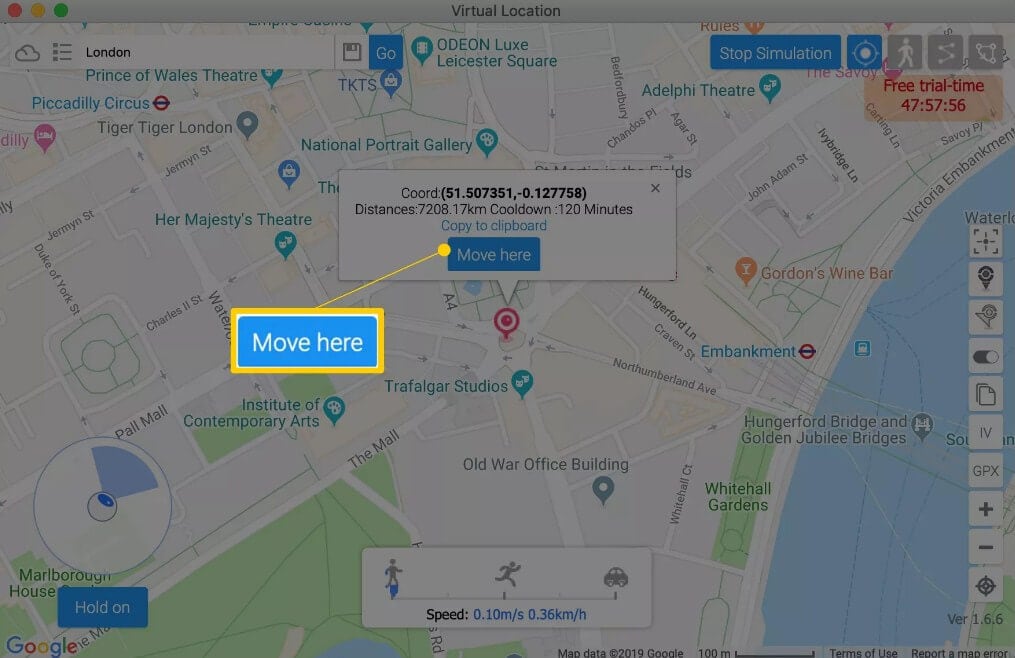
Step 2: Look for any location of your choice
A map-like interface would be launched on the screen with dedicated options at the top-right corner. Just click on the teleport feature, which is the first option here.

Now, you can go to the search bar and look for any location (address, city, state, coordinates, etc.) you want to switch to.

Step 3: Share fake location on WhatsApp
To change your location, move the pin as per your requirements, and click on the “Move Here” button to mock your location.

This will display the changed location of your device on the interface, and you can stop the simulation whenever you want.

You can also open any app on your Motorola Moto G Stylus (2023) and see the new location on the interface. Just go to WhatsApp now and send the fake location on WhatsApp to your friends.

Send Fake Live Location with One-Stop Route/Multi-Stop Route
You already know how to send fake locations on WhatsApp via teleport mode, you can show your friends or family like you are moving in real life with the help of the One-Stop/Multi-Stop Route feature of Wondershare Dr.Fone – Virtual Location. Follow the instructions provided below to fake live location on WhatsApp:
Step 1: Activate the “One-Stop Route” or “Multi-Stop Route” feature from the top right side of the screen and set the points on the screen in which you want to show your movement on WhatsApp.

Step 2: Afterward, select the trip type, number of rounds, and speed according to your requirements and press the “Start Moving” button to initiate the multi-stop route feature.


3.2 Fake location on WhatsApp using iTools location spoofer
Unfortunately, faking your WhatsApp location on iPhone is not as easy as you think. You can’t just download an app that will help you to fake WhatsApp live location. Instead, you will have to use a computer program for this. There is a special tool designed by ThinkSky called iTools. It will allow the users to pick any location and trick your Motorola Moto G Stylus (2023) apps into believing that you are actually at that location.
Users don’t even have to jailbreak their devices to do this. The steps you need to follow to send fake location WhatsApp are given below:
Step 1: Install the iTools software on your computer and connect your Motorola Moto G Stylus (2023) to the computer. Once the app is installed, launch it and tap on the Virtual Location option from the home interface.
Step 2: Enter the fake location in the search box and let the software detect the location. The marker will automatically land on the map. Tap on the “Move Here” option on the screen, and your Motorola Moto G Stylus (2023) location will instantly move to that particular location.
Step 3: Now, launch the WhatsApp app and click on the Share Location option. The app will show the new fake location, and you can share it with anyone you want.
To get your real location back, you will have to reboot your Motorola Moto G Stylus (2023). But you can only do this only 3 times for free. Also, this trick works on any iPhone running on iOS 12 and older.
Part 4. Use Location Faking App from Google Play (Android Specific)
4.1. How to Select a Good App to Fake Location?
The main purpose of using third-party apps to fake locations on WhatsApp is to triangulate your current position. That is why the most important thing in a good GPS faking app is accuracy. If you browse the Google Play Store, you will find unlimited applications that can serve this purpose. But don’t always go for the first choice. Look for features in the app you want such as:
- Location spoofing
- Accurate location up to 20 meters
- Navigate through the map easily
- Fool anyone with your location
You can use Fake GPS Location (or any other app you see proper) to help fake WhatsApp locations on Android. You can also use any other app considered suitable. The operations are just similar.
4.2. How to Fake Your Location?
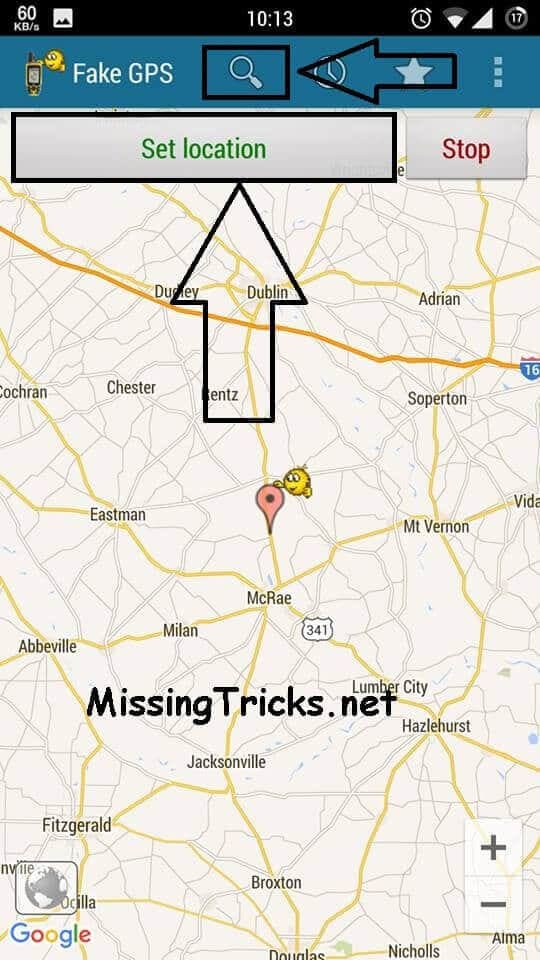
You will be glad to know that it is not that hard to fake live location for WhatsApp if you are using the right application. Here, we will explore using the Fake GPS Location app to share a fake location.
Step 1: Open Settings > Privacy > Location Services and turn the setting on. Also, make sure that WhatsApp has access to your GPS location and install the app on your Motorola Moto G Stylus (2023) from the Play Store.
 DLNow Video Downloader
Step 2: Go to the Settings and open “About Phone” info. Find the Build number and tap on 7 times to access the Developer Settings. From developer options, enable the “Allow Mock Locations” option.

Step 3: Now, open the app and search the location that you want to send. Once you have decided which location you want to share, click on the Set Location option.
Step 4: Now, open WhatsApp and click on the Share location option. Choose the option whether you want to send your current location or you want to share your Live Location and press send.

If you have shared the fake live location, remember to change it after 15 or 30 minutes.
Part 5. Can I Find My Friend Has Faked WhatsApp Location?
Some people often wonder if they share fake locations on WhatsApp, then there is a slight chance that their friends do the same with them. But it is a simple trick to figure out if someone has sent a fake location to you.

It is pretty simple, and if someone has sent you a fake location, you will see a red pin dropped on the location with the address text. However, there will be no text address if the location that is shared is original. And that’s how you identify that someone has shared a fake location.
Bonus Tip: How to transfer WhatsApp data from one device to another device without any hassle?
![]()
Dr.Fone - WhatsApp Transfer
One-click to transfer WhatsApp messages from One Device to Another Device.
- Transfer WhatsApp messages from Android to iOS, Android to Android, iOS to iOS, and iOS to Android.
- Backup WhatsApp messages from iPhone or Android on your PC.
- Allow restoring any item from the backup to iOS or Android.
- Completely or selectively preview and export WhatsApp messages from iOS backup to your computer.
- Support all iPhone and Android models.
3,480,561 people have downloaded it
Conclusion
Hopefully, now you know how to fake GPS on WhatsApp & how to identify the fake location. So, if you are planning to have some fun with a fake location, then you know what to do. Try Dr.Fone - Virtual Location today and explore a world of possibilities! Let us know if someone was able to recognize that you shared a fake location. It is a useful feature undoubtedly, don’t forget to share it with people who need it.
- Title: Simple and Effective Ways to Change Your Country on YouTube App Of your Motorola Moto G Stylus (2023) | Dr.fone
- Author: Abigail
- Created at : 2024-07-24 17:21:10
- Updated at : 2024-07-25 17:21:10
- Link: https://location-social.techidaily.com/simple-and-effective-ways-to-change-your-country-on-youtube-app-of-your-motorola-moto-g-stylus-2023-drfone-by-drfone-virtual-android/
- License: This work is licensed under CC BY-NC-SA 4.0.