
Simple and Effective Ways to Change Your Country on YouTube App Of your OnePlus Nord CE 3 Lite 5G | Dr.fone
Simple and Effective Ways to Change Your Country on YouTube App Of your OnePlus Nord CE 3 Lite 5G
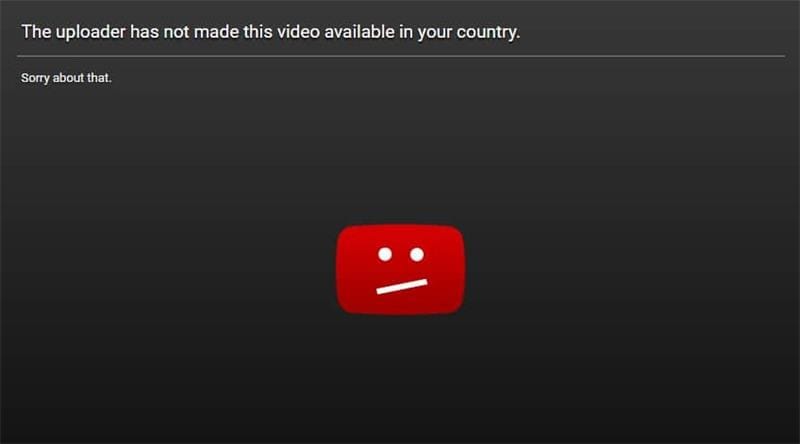
YouTube is easily the most popular video-sharing and media platform today. It’s where you can find free popular and trending videos across the globe to stream to your heart’s content. However, you’ll notice that some videos are blocked in some countries for several reasons, including copyright claims, legal requests, or licensing rights.
If you want to bypass these restrictions, simply read below to learn the simplest and most effective ways to change your location on YouTube. You’ll be able to access content that is otherwise restricted in your country by following our handy guide in no time.

Part 1: How to Change Location Settings on YouTube?
You can change your YouTube location settings if you want to make some videos available in your country. We’ll show you how to change your YouTube region, whether you’re on a computer, Android, iPhone, or iPad, by following these simple steps below.
Method 1: Change Your Location on YouTube from Computer
Here are the steps to change location on YouTube while using a computer.
Step 1: Click your Profile Picture.
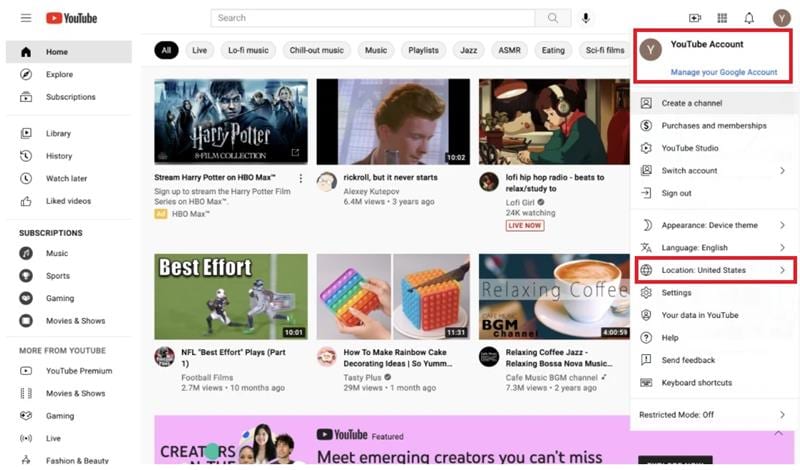Step 2: Click Location.
Step 3: Choose the location you’d like to use.
Method 2: Change Your Location on YouTube from Android
Here’s how to change your country on YouTube if you’re on Android.
Step 1: Open YouTube on your OnePlus Nord CE 3 Lite 5G.
Step 2: Tap your Profile Picture and choose Settings > General > Location.
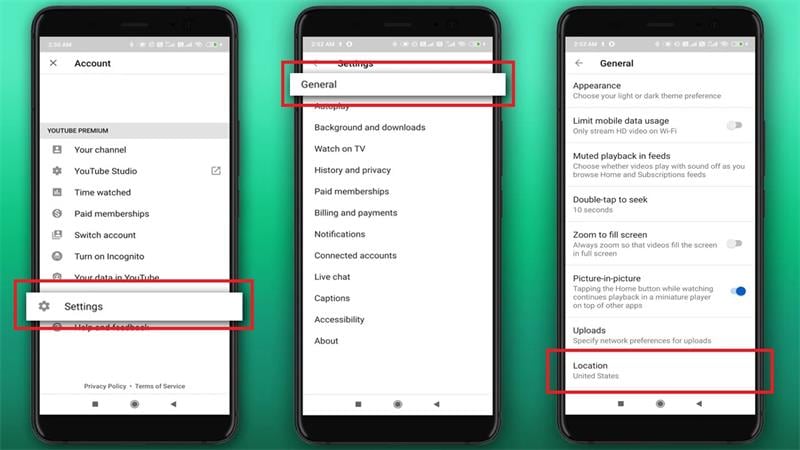
Step 3: Choose your desired country from the list of available options.
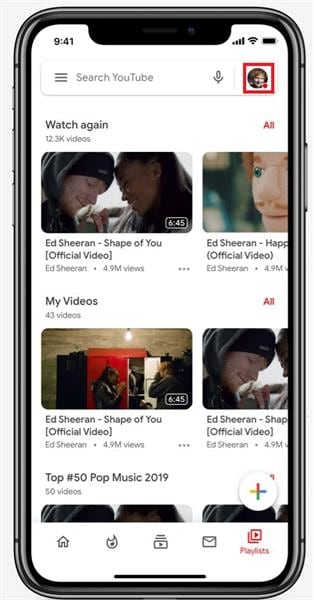
Method 3: Change Your Location on YouTube from iPhone and iPad
Lastly, if you’re using an iPhone or an iPad, simply follow the steps below to change your location on YouTube.
Step 1: Tap your Profile Picture.
Step 2: Tap Settings > General > Location.
Step 3: Select your desired country.
Part 2: How to Change Your Country to Watch Blocked YouTube Videos?
There are generally no issues when watching YouTube videos anywhere you are. The only instance to have problems accessing YouTube is when you are in a country where the platform is blocked, such as in North Korea or China. Even then, some contents are still geo-restricted unless you’re in the right region.
In this part, we’re listing five different methods to access YouTube’s full library so you can stream all you want.
Method 1: Change Your Home Area on YouTube Manually
Here are the steps to manually manage your home area on YouTube to change your location.
Step 1: Sign up for YouTube TV and open the YouTube TV application.
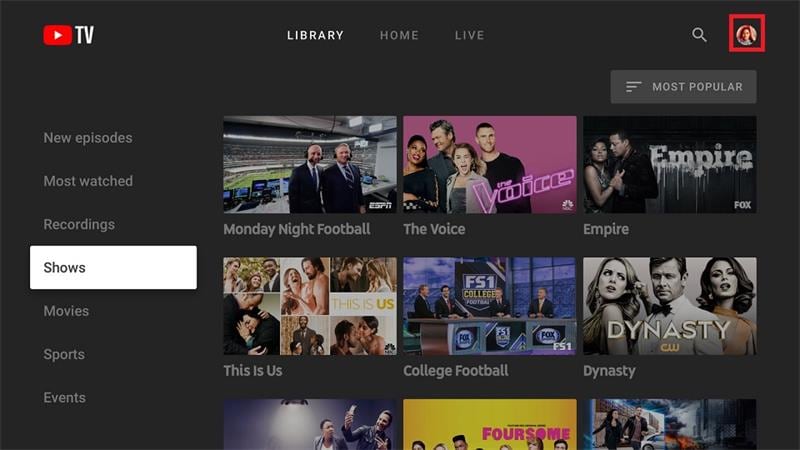
Step 2: Click your Profile Picture and click Location > Home Area.
Step 3: Update your home area.
Note
You can only change your location twice a year. You should also use YouTube at least once every three months in your country to ensure YouTube TV provides the correct local networks.
Method 2: Change Location on YouTube Using a VPN
The simplest and most effective way to unblock restricted content on YouTube is by using a VPN. In this example, we’ll be using NordVPN to change your location on YouTube using a VPN. Here are the steps.
Step 1: Download and install NordVPN. Sign in or create an account.
Step 2: Use Quick Connect or connect to a specific country by clicking on the pin on the map. You can click on Search here as well to find a specific server in the country of your choosing. There’s also a list of countries at the left sidebar so you can choose a server manually.

Step 3: Open YouTube and browse previously blocked content.
The Best VPNs for YouTube
Aside from NordVPN, there are other VPNs you can try to access content on YouTube, including ExpressVPN, CyberGhost, and Surfshark.
NordVPN utilizes up to 5,200 servers in 60 countries, with some servers optimized for ultra-fast streaming. It’s one of the fastest VPNs available today, where you can unblock geo-restricted content wherever you are, with a no-logs policy for unbreakable encryption.
Like NordVPN, ExpressVPN optimizes speed for downloading and streaming. It uses more than 3,000 servers in more than 90 countries to provide cutting-edge connectivity, which includes 256-bit AES encryption for perfect anonymity.
CyberGhost has over 7,000 servers in more than 80 countries to unblock geo-restricted content across YouTube, Netflix, Amazon Prime, and more. CyberGhost doesn’t keep logs of your activities as well, ensuring your activity is safe.
Lastly, Surfshark is another reliable VPN to unblock restricted content on YouTube and other platforms. It uses up to 3,200 servers in 65 countries to provide a high-speed and low-latency connection at all times. Surfshark has a no-logs policy like the three VPNs on the list, making your online activity safe and anonymous.
Here’s a handy table to compare the best VPNs available today in terms of ratings, number of servers, supported devices, prices, and more.
| NordVPN | ExpressVPN | CyberGhost | Surfshark | |
|---|---|---|---|---|
| Number of Servers | 5,200 Servers | 3,000 Servers | 7,000 Servers | 3,200 Servers |
| Streaming Reliability | Excellent | Good | Good | Excellent |
| Streaming Services | YouTube | |||
| Netflix | ||||
| HBO Go | ||||
| Amazon Prime | ||||
| SkyGo | ||||
| BBC iPlayer | ||||
| Etc. | YouTube | |||
| Netflix | ||||
| HBO Go | ||||
| Amazon Prime | ||||
| SkyGo | ||||
| BBC iPlayer | ||||
| Etc. | YouTube | |||
| Netflix | ||||
| Amazon Prime | ||||
| BBC iPlayer | YouTube | |||
| Netflix | ||||
| HBO Go | ||||
| Amazon Prime | ||||
| SkyGo | ||||
| BBC iPlayer | ||||
| Etc. | ||||
| Supported Devices | Windows, macOS, iOS, Android, Linux, Smart TVs, Routers | Windows, macOS, iOS, Android, Linux | Windows, macOS, Linux (command line), iOS, Android | Windows, macOS, iOS, Android, Linux |
| Average Speeds | 100+ MBPS | 100+ MBPS | 100+ MBPS | 100+ MBPS |
| 24/7 Support | Yes - with live chat | Yes - with live chat | Yes, but email only: [email protected] | Yes, but email only: [email protected] |
| Free Trial | None - but with a 30-day money-back guarantee | None - but with a 30-day money-back guarantee | 24-Hour free trial | 7-day free trial for Android, iOS, and macOS only |
| Prices | $11.99 - 1 Month | |||
| $59.88 - 1 Year | ||||
| $95.76 - 2 Years | $12.95 - 1 Month | |||
| $59.95 - 6 Months | ||||
| $99.95 - 1 Year | $12.99 - 1 Month | |||
| $41.94 - 6 Months | ||||
| $56.94 - 2 Years + 4 months free | $12.95 - 1 Month | |||
| $47.88 - 1 Year | ||||
| $59.76 - 2 Years |
Method 3: Change Your Country on YouTube Using a Proxy Server
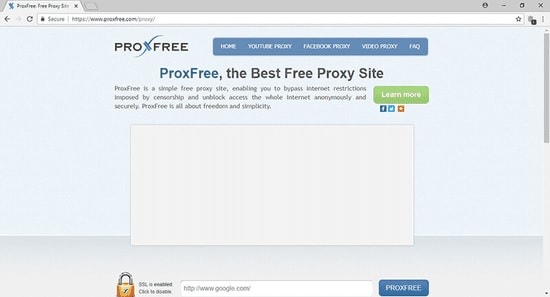
Using a Proxy to mask your location on the internet allows you to change your country on YouTube to access blocked content. In this example, we’ll use ProxFree YouTube Proxy to view locked YouTube content. Here are the steps to change your country on YouTube using a Proxy Server.
Step 1: Go to ProxFree YouTube Proxy .
Step 2: On the Server Location dialogue box, choose a country in the available options on the dialogue box.
Step 3: Enter the URL of the specific video you want to see unblocked and click PROXFREE to open YouTube in the proxy’s tab.
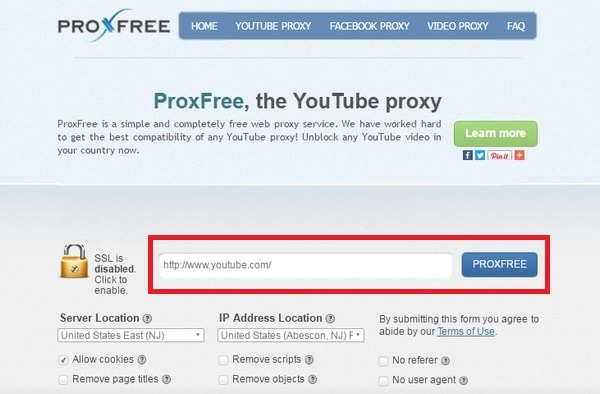
Note: You can also use YouTube’s search bar once YouTube’s tab is open on your proxy to search YouTube videos as usual.
Method 4: Change Your Country on YouTube Using a SmartDNS
Using SmartDNS to bypass YouTube geo-restrictions is useful for viewing blocked content in your country. This is because SmartDNS changes the OnePlus Nord CE 3 Lite 5G device’s virtual location by editing its DNS address. Here are the steps to change your country on YouTube using SmartDNS.
Step 1: Find and select a DNS Server address from different DNS providers online. In this example, we’ll be using SurfShark .
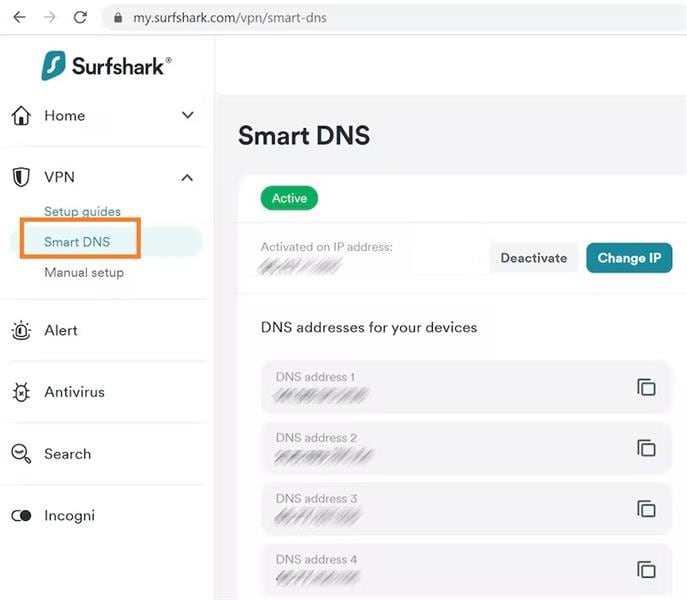
Step 2: Login or create an account. Click Smart DNS > Activate Smart DNS. Take note of the DNS address available to input on your computer’s Network Settings.
Step 3: Open Network Settings on your computer and find DNS Settings.
Step 4: Input your DNS Server address and click Ok once done. The DNS address should activate once you reconnect to the internet.
Note****_:_ Your IP address changes every 24 hours, which your ISP does. You’ll have to update your DNS address when it happens.
Method 5: Other Ways to Bypass YouTube’s Regional Filter
The easiest way to bypass YouTube’s regional filter is simply by downloading YouTube videos outright. Many websites are available online that allow you to download YouTube clips for free. In the step-by-step guide below, we’ll be using iTubeGo to download YouTube videos for viewing at a later time.
Step 1: Download and install iTubeGo . Launch the application on your computer.
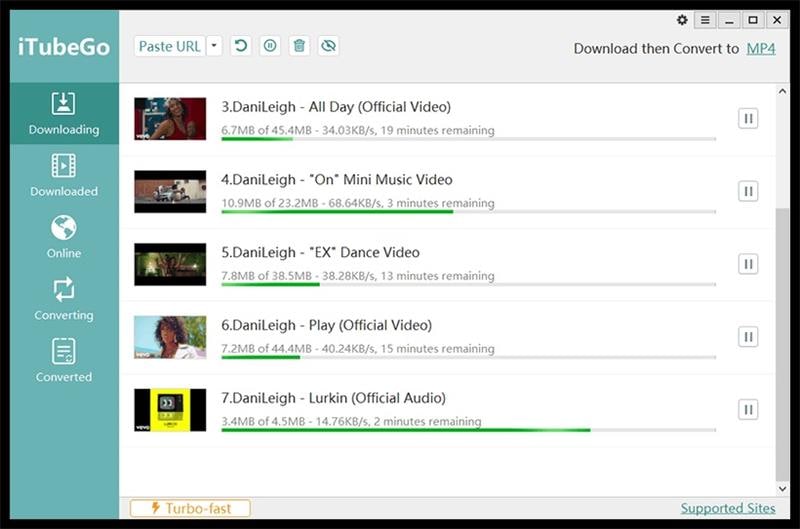
Step 2: Click Paste URL and paste the YouTube video’s URL on the dialogue box.
Step 3: Click Download to save the YouTube clip on your computer.
Here are the pros and cons of using each method to unblock geo-restricted content on YouTube.
| Pros & Cons | Manually on YouTube TV | Using VPNs | Using Proxy Servers | Using SmartDNS | Offline Downloads |
|---|---|---|---|---|---|
| Pros | You can easily change locations without downloading other applications. | Change countries on-the-fly to access even more content. | Some Proxy Servers don’t require downloading applications to use. | Unblocks geo-restricted content, much like VPNs. | You can always watch videos at a later time once downloaded. |
| Cons | You’re only allowed to change twice a month. | VPNs aren’t free, and you have to pay for a subscription. | Setting up Proxy Servers requires a little bit of technical know-how. | DNS is prone to manipulation by hackers. | You need to download a dedicated program to save YouTube videos. |
 With Screensaver Wonder you can easily make a screensaver from your own pictures and video files. Create screensavers for your own computer or create standalone, self-installing screensavers for easy sharing with your friends. Together with its sister product Screensaver Factory, Screensaver Wonder is one of the most popular screensaver software products in the world, helping thousands of users decorate their computer screens quickly and easily.
Part 3: Why Do Regions Block YouTube Content?
Although all YouTube videos are hosted on the same platform, a lot of them are geo-restricted to specific countries for various reasons. Many YouTubers sometimes lock their content in certain countries/regions due to licensing rights. YouTube may also block specific content to countries/regions to comply with local laws.

Conclusion
There are multiple ways to change your country on YouTube to access content that is otherwise unavailable in your location. You can change your country in settings on the YouTube app or use other methods, including using VPNs, SmartDNS, or Proxy Servers, to name a few. If all else fails, you can download an application that lets you save YouTube videos for offline viewing at a later time.
There are many reasons to fake location on Facebook. For example, you may want to hide your ideal address and protect your safety. Also, you might want to change the Facebook location to get better search results for products, friends, groups, and so on. But whichever the case, creating a fake GPS on Facebook is relatively easy. So, in this post, I want to introduce you to several methods to spoof your Facebook location quickly and easily.
Method 1: Spoof Facebook Location on Computer
You can easily fake your Facebook location by spoofing the town or city in the profile settings. This way, anyone who views your profile bio will see your new Facebook location.
So, without wasting much time, here’s how to spoof Facebook location on PC:
Step 1. Launch the Facebook app on your web browser and tap your profile icon.
Step 2. Here, click Edit details under the Intro section. After that, you’ll land on the Posts window by default.
Step 3. Now tap the Pencil icon to change the current city/town. You can also change your hometown, relationship status, and when you joined Facebook.
Step 4. Finally, tap the Save button, and Facebook will automatically update your current location. To see if the changes have been applied, tap the About tab to see your new profile.

Note: Although you can successfully change your bio, Facebook will still access your actual location. Now this means your Facebook recommendations and adverts will still be based on your locality. So, keep reading to learn other reliable ways to spoof your Facebook location.
Method 2: Change Facebook Location on Android phone
Unlike the strict iPhones, Android allows you to install a third-party app to change the GPS location of your device and Facebook, to be precise. This means you don’t need to fork out some serious money for a VPN service. So, in this section, you’ll learn to fake a Facebook location on Android using the Fake GPS location app. It is a free program for teleporting your phone IP address to new places with a simple screen tap. Let’s see how to do that:
Step 1. Install and launch the Fake GPS location app on Android.
Step 2. Next, “allow mock locations” in your Android’s developer settings. To do that, open Settings >Additional Settings >Developer options. Then, click “Select mock location app“ before choosing Fake GPS.

Step 3. Now go to the Fake GPS location app and choose a new location for your device. If satisfied, tap Ok to save the added area you’d like your device to appear on.
Step 4. Finally, head to Facebook and change your location settings.
Method 3: Create A Fake Check-In Location on Facebook
Sometimes you might want to prank your Facebook friends with a new location announcement. In other words, you can make them believe that you’re in a particular location when in reality, you’re not. In that case, the Facebook Check-In feature will come in handy. It’s a simple but highly effective feature that adds your fake location to a Facebook post. Just think of it as a status update.
So, below is how to fake location on Facebook with the Check-In feature:
Step 1. Open Facebook on your favorite browser and tap the “What’s on your mind“ field.
Step 2. Next, tap the GPS icon. You’ll see all the locations near you. Or, key in a fake address and select it on the suggestions.

Step 3. Now write whatever is on your mind and add the location to your latest post. It’s that easy!
Method 4: Fake Location for Facebook’s Nearby Friends via a Tool
While signing up on Facebook, you’ll be requested to allow the platform access to your actual GPS location. This will enable Facebook to correctly tailor adverts, friends, and other recommendations based on your location. But unfortunately, it can be challenging to change the actual location unless you’re willing to spend top dollar on a VPN service. Put, you’ll need to spoof your IP address to change the exact location.
For this reason, I recommend using a fake location tool like Dr.Fone - Virtual Location . It’s an all-in-one software that provides multiple solutions for your OnePlus Nord CE 3 Lite 5G or Android phone. It allows you to teleport your current location to anywhere in the world without jailbreaking your OnePlus Nord CE 3 Lite 5G or spending top dollar on a VPN service. This lets you take full advantage of the “Nearby Friends” Facebook feature that needs your actual GPS location.
Below are the key features:
- Transfer phone location to any place in the world.
- Intuitive and detailed zoom-in and zoom-out map.
- Compatible with all iOS and Android versions.
- Move to new locations on the map via different routes and means.
- Compatible with location-based apps like Telegram, Facebook, Twitter, etc.
Here is a video tutorial for you to learn and preview how to fake location on Facebook via Dr.Fone - Virtual Location
 safe & secure
Below is how to fake location on Facebook for Android and iPhone using Dr.Fone:
Step 1. Download and open Dr.Fone.

Install and run Dr.Fone on your Mac or Windows PC and then connect your phone to your computer using a USB cable. After that, select the file transfer option on your phone and then tap Virtual Location on Dr.Fone.
Step 2. Connect your phone to the software.


You’ll see a new Dr.Fone window, where you’ll click the Get Started button. Then, enable USB debugging on your phone before clicking Next.
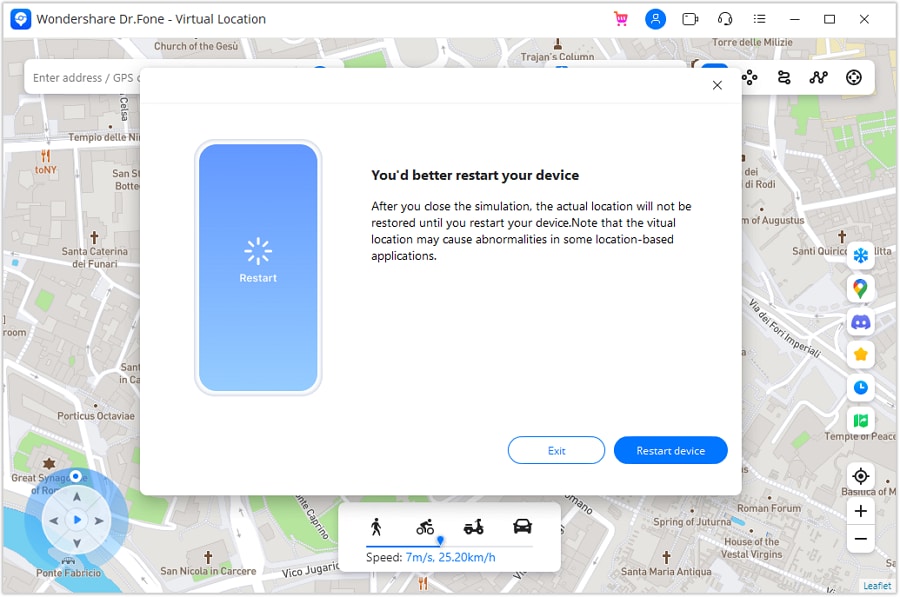
Step 3. Choose a location and start moving.

The Virtual Location map will launch after successfully connecting your smartphone to Dr.Fone. Now enter and select a location you wish to move to and click Move Here. Alternatively, you can tap an area to move to on the map and choose whether to move by foot, bicycle, scooter, or car. Your iPhone and Android device will save your new location automatically.

 TubeDigger - online video downloader from mostly any site
Wrap it up
See, you don’t need an expensive VPN service to fake your GPS location on Facebook convincingly. With Dr.Fone, you can easily change your OnePlus Nord CE 3 Lite 5G or iPhone location, which will immediately reflect on apps like Facebook, Google Maps, Telegram, and so on. And guess what? There are a host of other phone management features to exploit. You should try it!
safe & secure
Proven Ways in How To Hide Location on Life360 For OnePlus Nord CE 3 Lite 5G
“How can I hide my location on Life360 without my parents knowing? I’m 17 and find it uncomfortable. What’s the best way to demonstrate that I can be trusted and don’t require constant monitoring?”
Wondering how to hide your location on Life360 without them knowing? If you’re seeking independence, there are subtle ways to show trustworthiness. Start by having an open conversation and suggest designated check-in times to alleviate their worries. You can also explore the app’s settings together to adjust location-sharing preferences.
Building trust can foster a sense of autonomy. Help maintain a healthy parent-teen relationship on Life360 without compromising your comfort. But if you genuinely need more discretion, you’re on the right page. Learn how to hide location on Life360 without raising suspicions. Find a middle ground through communication.

 EmEditor Professional (Lifetime License, non-store app)
Part 1. Best Method To Hide Location on Life360 Without Them Knowing
Keep reading if you need to know how to hide your location on Life360 without anyone knowing. The most effective method is using a virtual location changer. These tools can alter the GPS coordinates your phone sends. It allows you to appear in a different location than where you are. Here are five tools you can use to hide location on Life360.
Wondershare Dr.Fone
Wondershare Dr.Fone - Virtual Location is a versatile and reliable virtual location changer. The tool is compatible with both iOS and Android devices. Known for its diverse functions, it allows you to hide your real location. The platform provides a solution for those seeking privacy on location-sharing apps like Life360. Here are its key strengths:
- Hide location without being tracked. Fone - VirtualLocation allows you to hide your real location from Life360 without leaving any traces.
- Teleport GPS location anywhere. Teleport your GPS location to any place in the world.
- Simulate GPS movement with a joystick. The app’s VirtualLocation feature provides a joystick feature, enabling you to simulate movement on the map.
- Compatibility with the latest iOS and Android. Fone - VirtualLocation stays updated to ensure compatibility with the latest operating systems.
How To Hide Location on Life360 Using Dr.Fone
Follow the steps to learn how to hide your location on Life360 without anyone knowing using Dr.Fone:
- Step 1: Download and install Dr.Fone on your computer. Click Toolbox > Virtual Location. In the next window, click Get Started. Afterward, connect your smartphone to your computer. Follow the on-screen instructions.
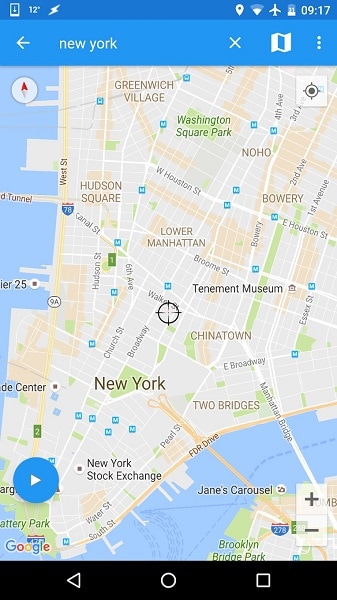
- Step 2: Go to the top-right section and select the One-Stop Route function. Whether you’ve already teleported or are using your current location, tap anywhere on the map to set your destination.

- Step 3: Input the desired number of back-and-forth movements. Choose between a Round trip or a Loop trip. Adjust the walking speed using the slider. Click Move Here at the bottom to initiate movement. To pause the simulation, click Pause, or tap Clear to revert to your original state.

- Step 4: Activate Teleport Mode by selecting the first icon from the left. Use the Search bar to type in your desired location. Hit Enter, and the map will display the specified location. To shift your smartphone’s location, click Move Here. The map will reflect the change, confirming the successful teleportation.
ExpressVPN
ExpressVPN, a renowned VPN service, enhances online privacy by masking your IP address. While it doesn’t change your GPS location, it provides a layer of security and anonymity. ExpressVPN is compatible with both iOS and Android devices. It offers a single-function solution for safeguarding your online activities.

Fake GPS Location Spoofer
Fake GPS Go Location Spoofer is an Android app that allows users to change their GPS location. Unlike some other tools, it does not support PC use or provide additional features like joystick simulation. The app is a simple solution for Android users seeking to modify their location without complicating the process.
 Nero Burning ROM:
The ultimate burning program for all your needs!
A Comparison Among the Five Virtual Location Changer
Among the various apps available, Wondershare Dr.Fone is the most versatile and reliable choice for both iOS and Android devices. Here’s a quick table comparing all the tools.
| Life360 Virtual Location Changer | Compatibility | PC Support | Safety | Functions |
|---|---|---|---|---|
| Wondershare Dr.Fone | iOS & Android | Yes | Yes | Diverse |
| ExpressVPN | iOS & Android | No | Yes | Single |
| Fake GPS Go Location Spoofer Free | Android | No | No | Single |
Part II. 7 Other Methods To Hide Location on Life360
Here are alternative solutions to hide your location on Life360 without resorting to third-party apps. These methods might not provide a foolproof solution, and their effectiveness can vary.
Turn On Airplane Mode
Enabling Airplane Mode on your smartphone disables all wireless communication, including GPS. While effective, the method will also interrupt calls and messages. Airplane mode is suitable for times when you need complete privacy.

Turn Off WiFi and Data
Disabling WiFi and mobile data prevents your phone from sending location updates to Life360. Note that the method may raise suspicion if others notice your lack of connectivity.

Turn Off Location Services or Precise Mode
You can turn off Location Services or switch to a less precise location mode in your phone settings. Keep in mind that this may affect other apps relying on location information, and it’s not a foolproof solution.


Low Data Mode
Some devices offer a Low Data Mode. The feature reduces the amount of data your phone uses. While not designed for hiding your location, it may slow down or limit the transmission of location data.
Disable Circle’s Location Sharing
Disabling location sharing within the circle settings can prevent your location from being visible to other members. Be cautious, as this action may prompt questions from circle members.
Use a Burner Phone
Using a secondary or temporary phone for Life360 can provide a discreet way to manage your location. The method requires an additional device and may not be practical for everyone.
Uninstall Life360 on Your OnePlus Nord CE 3 Lite 5G
The most direct method to prevent Life360 from tracking your location is to uninstall the app temporarily. It ensures that no location data is transmitted. Remember that this action may be noticeable if your absence from the app is monitored.

Part 2. Pros and Cons of Hiding Your Location on Life360
Whether to hide your location on Life360 involves weighing the advantages and drawbacks. Here’s a concise list of pros and cons to help you make an informed decision about managing your location visibility on Life360.

Pros of Hiding Your Location on Life360
- Privacy protection. Hiding your location provides a layer of privacy. It allows you to control who has access to your real-time whereabouts.
- Autonomy and independence. It grants a sense of independence, especially for individuals uncomfortable with constant tracking.
- Safety in sensitive situations. Maintaining a discreet location in certain situations can be crucial for personal safety. It offers protection in sensitive or vulnerable scenarios.
Cons of Hiding Your Location on Life360
- Eroded trust. Concealing your location may lead to a breakdown of trust with those who care about your well-being.
- Hiding your location may create confusion or concern among family members or friends. They may worry about your safety when unable to track your location.
- Violation of agreements. If you’re part of a Life360 circle, hiding your location might violate agreements within the circle. It can lead to misunderstandings and conflicts.

Bonus. For Parents: Your Child Hid Life360 Location – What Now?
Discovering that your child learned how to hide location on Life360 can be a moment for constructive engagement. Here are the steps parents, friends, or guardians can take:

Be Open and Honest
Approach the situation with openness and honesty. Start a non-confrontational conversation to understand the reasons behind their decision. Creating a safe space for dialogue encourages trust and helps address concerns.
Discuss the Positive Side of Life360
Highlight the positive aspects of Life360. Focus on its role in ensuring safety and maintaining family connections. Reinforce that the app is intended for security rather than invasive monitoring. Help your child see the benefits of using it.
Offer an Alternative App as a Backup
Suggest exploring alternative location-sharing apps that may align better with your child’s comfort level. Involving them in the decision-making process allows for compromise. It helps strike a balance between privacy and safety concerns.
Conclusion
While options like Airplane Mode and disabling location services exist, the most secure and comprehensive choice is Wondershare Dr.Fone. The virtual location changer allows discreet location adjustments without alerting anyone. With features like teleportation and joystick simulation, it’s the safest method for maintaining privacy on Life360.
For those seeking to master how to hide your location on Life360 without anyone knowing, Dr.Fone is the preferred solution. The tool ensures a reliable and inconspicuous experience.
- Title: Simple and Effective Ways to Change Your Country on YouTube App Of your OnePlus Nord CE 3 Lite 5G | Dr.fone
- Author: Abigail
- Created at : 2024-07-24 18:08:19
- Updated at : 2024-07-25 18:08:19
- Link: https://location-social.techidaily.com/simple-and-effective-ways-to-change-your-country-on-youtube-app-of-your-oneplus-nord-ce-3-lite-5g-drfone-by-drfone-virtual-android/
- License: This work is licensed under CC BY-NC-SA 4.0.