
Why Your WhatsApp Live Location is Not Updating and How to Fix on your Vivo T2 5G | Dr.fone
Why Your WhatsApp Live Location is Not Updating and How to Fix on your Vivo T2 5G
WhatsApp is a free messaging app owned by Meta, initially Facebook. Currently, this platform boasts over two billion active users, even outshining Messenger and WeChat. One of WhatsApp is popular is letting users share their live Location with individuals and group chats. However, sometimes you may experience the annoying WhatsApp location not updating issue. Luckily, this article has a solution to this problem. Let’s learn! We’ll also address how to share my Location on the WhatsApp issue.
First and foremost, let’s discuss some of the reasons why your WhatsApp live location is not updating on Android or iPhone. Below are some of them:
- Reason 1: Weak internet connection
You should be conversant with the idea that WhatsApp can’t function without the internet. In other words, you can’t send or receive messages and calls without a strong internet. And the same applies to updating your live Location.
- Reason 2: Disabled location feature
Here’s another reason why WhatsApp live Location is not updating on iPhone or Android. While signing up, WhatsApp will request to access your phone’s GPS location. Therefore, disabling this feature by mistake can prevent WhatsApp from updating your Location.
- Reason 3: Inappropriate time and date
Although uncommon with modern phones, this can be another reason for a wrong live location on WhatsApp. Therefore, connect your phone to the internet to update your date and time. You might also want to restart your phone and see if it works.
Part 2. How to Fix WhatsApp Live Location Not Updating Problem?
Now that you already know why WhatsApp’s Live Location isn’t updating, it’s time to check out the solutions. Let’s go!
1. Restart internet connection
Sometimes, it only takes a simple phone restart to get things back on track. Another thing, you can enable and disable “flight mode” to restart your data connection. Of course, this will also sort out any bugs in your WhatsApp app.
2. Update the app and phone
When last did you update your system and apps? It is very easy! You should constantly update your apps and phone system to enjoy better performance and security.
3. Enable location service
You can also check if your location service is enabled on iPhone or Android settings. On iPhone, click Settings > Privacy > Location Service. It’s even easier on Android. Swipe down your screen, long-press the GPS button, and enable the Location toggle.
4. Reset location service on iPhone/Android
iPhone users can try to reset the Location & Service settings. To do that, open Settings > General > Reset > Reset Location & Privacy. And for Android users, please try to take the refer the steps below to follow:
- Swipe down from the top of the screen
- Tap the Location icon;
- If you can’t find the Location icon, please go to settings, or tap the “Edit” icon to go on;
- Turn Google Location Accuracy on or off**.**
5. Uninstall and reinstall WhatsApp
If all else fails, then it’s probably time to get handy. Uninstall your WhatsApp app and then get a newer version on Play Store or App Store. But often, this won’t be necessary after updating the app.

Part 3: [WhatsApp Tip] Fake WhatsApp Live Location with Unreal Accuracy
There have been multiple security concerns about WhatsApp before. But while the jury is still out, do yourself a favor and protect your live Location from spyware and other users. Also, you might want to spoof WhatsApp location for business purposes and prank friends.
That said, learning to fake Location on WhatsApp is super simple with Wondershare Dr.Fone . With this GPS app, you can teleport your WhatsApp live location to anywhere in the world. And to make your new Location more believable, this program lets you simulate movements by foot, scooter, or car. It works with all iPhone/Android versions and other social media apps like Instagram, Facebook, Telegram, and Twitter.
You can check out this video for further instruction.
 EmEditor Professional (Lifetime License, non-store app)
 safe & secure
Below is how to spoof WhatsApp live location with Dr.Fone:
Step 1. Open the Virtual Location tool.


Install and launch Dr.Fone on PC and connect your phone to PC with a USB firewire. Then, tap the Virtual Location button on the home page and click Get Started on the pop-up window.
Step 2. Connect your phone to Dr.Fone.

To connect your phone to this all-in-one software, first, enable “transfer files” instead of “charging” on your phone. Then, enable USB debugging under the settings tab. On Android, just click Settings >Additional Settings > Developer options > USB debugging.
Step 3. Choose a new WhatsApp live location to share.

After USB debugging is on, tap Next and enter the new location on the search field at the top-left corner. Now choose the area and tap Move Here. And there is that! Interestingly, you can choose a movement route and customize the speed.


Part 4. How to Send Live Location on WhatsApp?
In 2017, WhatsApp rolled out a brand-new feature that allows users to send their live location to family and friends. This location can come in handy if you want to meet up somewhere or let your friends and family know you’re safe and secure. And lest I forget, you can also use it to prank your friends.
Note, however, that WhatsApp only allows you to share your real-time location for 8 hours, 1 hour, or 15 minutes. In other words, this gives you control over how long users can see you on the map. Moreover, this information can’t be shared with anyone once you stop sharing.
So without wasting time, here’s how to send live Location on WhatsApp for Android or iPhone:
Step 1. Enable the GPS service on your phone by clicking the GPS button on the control panel.
Step 2. Open WhatsApp and tap the group chat or individual chat with which you want to share the Location.
Step 3. Now click the Attach button on the text field and click Location.

Step 3. From there, allow WhatsApp access to your device’s location and then press the Share Live Location button.
 DLNow Video Downloader
Step 3. Last but not least, set the duration your contact will view your Location, add a comment, and tap the Send button. That’s it!
Note: As you can see, WhatsApp relies on your GPS location to share your actual location. So, use Wondershare Dr.Fone to change your device’s location and then share it on WhatsApp.
 vMix Basic HD - Software based live production. vMix Basic HD includes 4 inputs, 3 cameras, streaming, recording, playlist.
Part 5: How to Fix Common WhatsApp Issues on Android & iPhone
Wondershare Dr.Fone is the perfect tool to handle all your WhatsApp issues. Below are some common issues it can help you with:
1. Lost Messages
Sometimes you might accidentally or intentionally delete WhatsApp chats or messages. Fortunately, Dr.Fone can help you dig out and recover those messages with a simple click. Just launch the Data Recovery tool , connect your phone to the software, and Dr.Fone will scan for all lost and current messages.
2. Transfer WhatsApp data
Thanks to the fast-paced mobile technology, it’s inevitable to migrate to a new phone. But you’ll have to sacrifice all your WhatsApp data. Luckily, Dr.Fone allows you to backup, restore, and transfer all WhatsApp data .
3. Backup WhatsApp Business chats
Having a WhatsApp Business account is vital if you’re an online marketer. Here, you can create a business profile and enjoy quick replies, automatic messaging, accurate statistics, and so on. So, to avoid losing your invoices and other business chats, use Dr.Fone to back up and transfer your WhatsApp Business chats to a new phone.
Final Words
See, there’s nothing complex about the WhatsApp live location not updating issue. Just edit and restart the app or check your location settings if it’s enabled. And, of course, use Dr.Fone - Virtual Location to share a fake location on WhatsApp and perform other WhatsApp tasks like backing up and transferring data. Thank me later!
safe & secure

How to Change your Vivo T2 5G Location on Twitter
Twitter is one of the most used social media platforms of today’s time, where anyone can voice their opinion regarding any trend or event in the form of short messages. Moreover, it’s a free platform that displays the hot debates and news based on your country, which is usually a good thing.
However, it restricts other global trends due to the limited location exposure. However, you can change the trending location according to your preferences with a few tricks to avail the best experience. If you have questions such as how to change your Twitter location, then this article is for you.
Part 1: How to Change Location on Twitter
Usually, Twitter allows you to keep tabs on current hot topics in your country. While in Nowadays, people prefer to be aware of the global trends, which are impossible to access with the default settings. But there are a few valuable ways by which you can change Twitter location regardless of any device to gain the most out of this mega content platform.

How to Change Twitter Location on Mobile Phone
Twitter for mobile is easy to use, but it offers limited privacy options compared to desktop versions, such as you can’t change your username or delete your account on the mobile Twitter. Still, it does allow you to change your location in a few easy steps:
Step 1: First, open the Twitter app, visit your profile, and go to “Settings and Privacy.”

company, user or members of the same household. Action! - screen and game recorder</a>
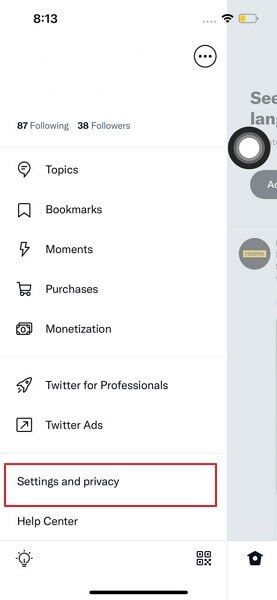
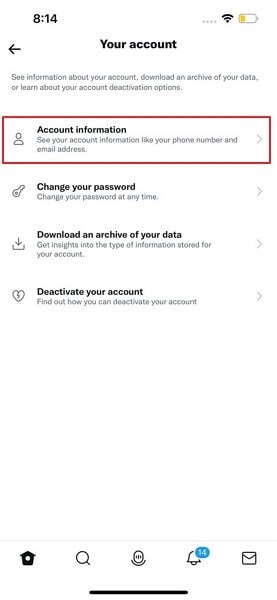
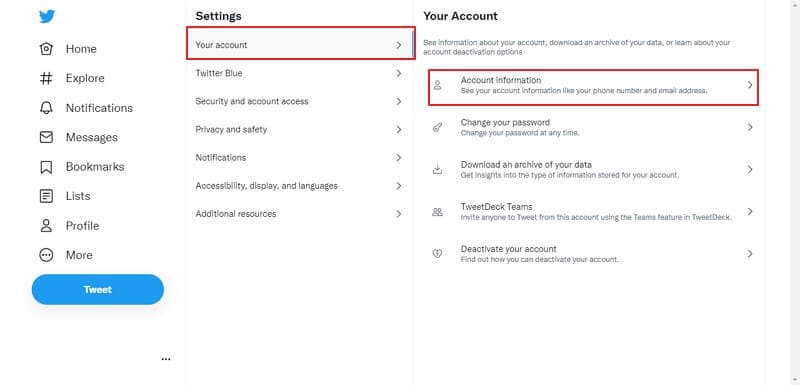
Step 2: Next, click on “Your Account” and later on “Account Info.” You have to access your “Account Information” by clicking on it.
 Glarysoft File Recovery Pro - Helps to recover your lost file/data, even permanently deleted data.
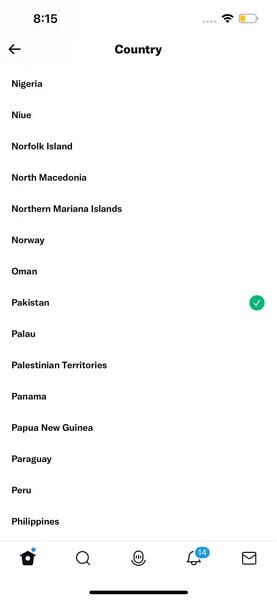
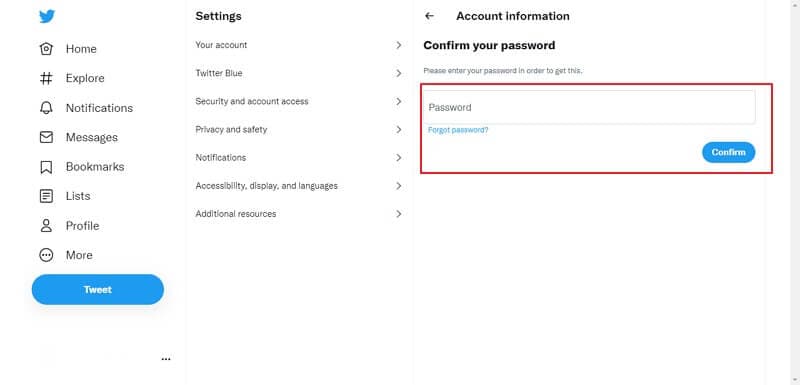
Step 3: Lastly, choose the “Country” and change the location according to your preference.
How to Change Twitter Location on a Computer
Unlike Twitter applications, the desktop version is efficient. For example, you can change the Twitter location to your desired region in just a few steps:
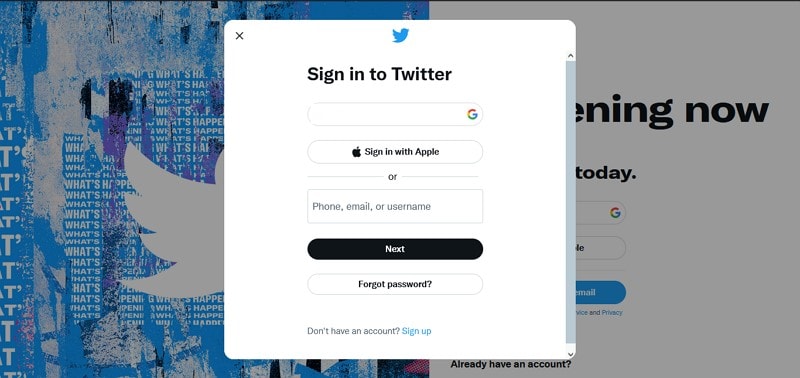
Step 1: First, go to the Twitter website and log in with your username and password.

Step 2: After logging in, go to “More” options from the Twitter home and click on “Settings and Privacy,” Now, select the option of “Account Information” from the “Your Account” settings.

Step 3: You will be asked to enter your password. After confirming your password, click on the “Country” you wish to change your Location.
What is the Difference between My Profile Location and My Country Setting on Twitter?
Country setting and profile location are both entirely different things. The country setting determines what trends and news will be displayed on your discovery page.
In contrast, profile location is your public location that other users can see when visiting your profile. Therefore, changing your country setting will not impact your original profile location unless you make a change yourself.

Part 2: How to Fake Location on Twitter
In this technological era, changing your location to the other end of the world is just a few clicks of tasks; various software is available on the market, such as Dr.Fone, which can easily spoof your location.
Dr.Fone – Virtual Location is a well-recognized software compatible with iOS and Android devices. It can easily change your area to your desired country in a few clicks without risking your privacy.
Why Do We Need to Fake Location on Twitter?
There are several reasons people want to learn how to change location on Twitter. Some of the reasons are mentioned below:
For Privacy Protection
Almost all social media platforms use your IP address and location to provide you with a genuine experience. Still, many people do not wish to risk their privacy, and for that reason, they use software and tools to fake their location.
For Tricking Friends and Family
You can spoof your location to prank or trick your friends and family into thinking that you’re on vacation or taking a trip when you’re not.
For Making New Friends
One of the reasons people prefer to spoof their location is to socialize and make friends with people other than their region; it’s the most innovative way by which you can easily have a chat with anyone from around the world without revealing your actual location.
Dr.Fone - Virtual Location
1-Click Location Changer for both iOS and Android
- Teleport from one location to another across the world from the comfort of your home.
- With just a few selections on your computer, you can make members of your circle believe you’re anywhere you want.
- Stimulate and imitate movement and set the speed and stops you take along the way.
- Compatible with both iOS and Android systems.
- Work with location-based apps, like Pokemon Go , Snapchat , Instagram , Facebook , etc.
3981454 people have downloaded it

WPS Office Premium ( File Recovery, Photo Scanning, Convert PDF)–Yearly
How to Fake Twitter Location by Dr.Fone - Virtual Location
With Dr.Fone – Virtual Location, you can easily fake your Twitter location with a few simple steps:
Step 1: Download Dr.Fone Mobile Toolkit
Firstly, download and install the Dr.Fone – Virtual Location tool on your computer and launch it. Then, select the “Virtual Location” tool from the displayed Dr. Fone tools.

Step 2: Connect your Mobile
Connect your Vivo T2 5G or Android device to the computer through a USB cable. Now, hit the “Get Started” button.
Step 3: Activate Teleport Mode
You can now see your actual location on the displayed maps and if the location is incorrect, click on the “Center On” icon. To fake the Twitter location, click on the “Teleport” icon at the upper right corner of the screen and search for the location where you want to spoof.

Step 4: Spoof Right Away
Finally, click on the “Move Here” icon in the popup box, and your GPS will be located at that particular location. Now launch the Twitter app, and it will directly display your selected spoof location.

WPS Office Premium ( File Recovery, Photo Scanning, Convert PDF)–Yearly
 safe & secure
Part 3: FAQs About Twitter Location
- Could your location be tracked via Twitter?
Yes, you can be tracked through Twitter only when set on default settings. As per Twitter privacy, it’s required to attain your IP address, location, and other details to offer you valid trends and news that are trending within your region.
- How do I enable and disable my location on Twitter?
Choose “Settings and Privacy,” then “Privacy and Safety.” Then, under “Data sharing and off Twitter activity,” head to “Location Info.” Now, hit on “Add Location Information to your Tweets.” If that box is already ticked, your location is enabled; now, uncheck it to disable it.
- What’s the reason behind Twitter having the wrong location?
If you want your Twitter location to be accurate and precise. Firstly, you should enable the location setting from your Twitter application, then go to your mobile settings and enable location services for Twitter. Keep in mind that if one of these settings is not enabled, your location won’t be correct.
- Why does Twitter hide worldwide trends?
In 2020, Twitter changed its privacy by removing worldwide trends. Still, few global trends can be seen on the explore page, directly or indirectly connected with your location or your preference of content to offer the best experience to you. But, if you wish to explore more of these worldwide trends, you can always spoof the location.
Conclusion
Twitter is one of the most content-consuming social platforms globally. Its users are always thirsty to debate and share their opinions on various topics, which can, unfortunately, be restricted because of the limited exposure to global trends. But with the help of this detailed article, anyone can easily change Twitter location to the desired region.
safe & secure
How to Change Vivo T2 5G Location on Skout
When it comes to dating application or website, Skout has made its appearance in this regard a long way back. The app was founded in 2007 and offers a platform to help you get connected with the people. You can use Skout either on your Vivo T2 5G or an iOS device. The main function of the app is that it takes help of your device’s global positioning system (GPS) and lets you find the users in a specific radius where you are.
Since it is a location-based app, many times you might have questioned like “how can I change my location on Skout”. If yes, this article is what just you need. We will assist you how to change location on Skout on Android as well as iOS devices. Scroll down and get to know more!
Part 1: 2 Solutions to Change Skout Location on iOS
1.1 Change Skout Location on iOS using a GPS Simulator
When you are an iPhone user, the best way to change Skout location is using dr.fone – Virtual Location (iOS) . This tool performs way better than any other in the market when you want to change iOS location. With the help of this, you can easily teleport anywhere across the world. Moreover, you can fake routes and show moving from various places. It is completely safe to use and a user-friendly one. Here is how you can do Skout location change on PC using this tool.
Step 1: Get the Software
From the original website of dr.fone – Virtual Location (iOS), download it on your computer and then install it. When you do the installation process completely, you are required to launch the program. After launching, choose “Virtual Location” tab from the first page.
Step 2: Plug iPhone to PC
Take your iOS device and get the original lightening cord as well. Make a secure connection between the computer and the iPhone using it. When it gets detected by the program, click on “Get Started” button.
Step 3: Activate Teleport Mode
You will see a map window now. Here, what you firstly need to do is to find the actual location of yours. If you can’t find the accurate location, go to the icon at the lower right part which is “Center On” icon. This will bring the accurate location.


Now, from the three icons available at the upper right side of the page, click on the 3rd one. This will enable the “Teleport Mode”. Once done, enter the name of the place in the field given and hit on “Go”.
Step 4: Spoof Location
The program will no longer take time and easily understand the location. It will display a pop-up from where you need to click on the “Move Here” button. The location will be successfully changed now. You can now see the changed or spoofed location on your Vivo T2 5G easily.

Dr.Fone - Virtual Location
1-Click Location Changer for both iOS and Android
- Teleport from one location to another across the world from the comfort of your home.
- With just a few selections on your computer, you can make members of your circle believe you’re anywhere you want.
- Stimulate and imitate movement and set the speed and stops you take along the way.
- Compatible with both iOS and Android systems.
- Work with location-based apps, like Pokemon Go , Snapchat , Instagram , Facebook , etc.
3981454 people have downloaded it
1.2 Change Skout Location on iOS using Cydia
Another way to get the Skout location changed is through Cydia. Cydia is basically a platform that allows you to install the applications that are not validated by Apple. However, you will need to jailbreak your device in order to go ahead.
Limitations:
- As we have mentioned above, one of the biggest disadvantages of using this way is that you will have to get your device jailbroken. And no doubt the other limitations will also be related to this.
- While using this method, your device may end up getting bricked. So, be sure if you really wish to use this method.
- Lastly, the method can make your device vulnerable to malware and other malicious apps.
If you are still comfortable using Cydia to change Skout location, let us move on the steps.
Step by Step Guide on how to change location on Skout app
Step 1: Open CYdia in the first place and search for “FakeLocation”.
Step 2: Tap on “Modify” and get back to the Homescreen.

Step 3: Look for the FakeLocation app icon now and tap on it. Once you open it, tap on “Choose my fake location.

Step 4: Use the map to adjust at the location you want to spoof.
 Video Converter Factory Pro
Step 5: Now, you are done. Just open Skout and enjoy the new location.


Part 2: Change Skout Location on Android with a Spoofer App
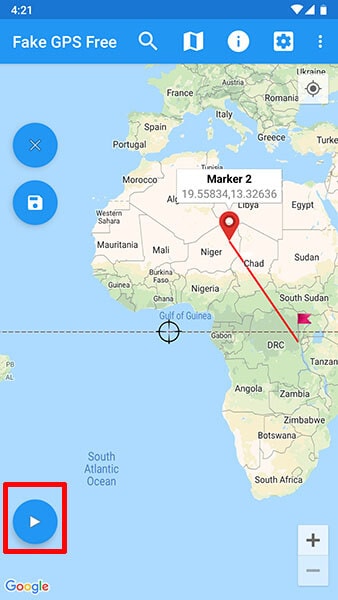
If you are an Android user and wondering how to change your location on Skout, all you need is a spoofer app. You can get a lot of options from Play Store. However, one of the popular apps that can be relied upon is Fake GPS GO Location Spoofer Free. This app doesn’t require rooting if your device is having Android version 6 and more. You can easily create routes with this app. Let us know how this works.
Step by Step Guide to change Skout location via FakeGPS Go
Step 1: Before you get the app installed it is important to turn on the developer options firstly. And to do this, all you need is to go to the “Settings” in your device and tap on “About Phone”.
Step 2: You will see a “Software Info” option. Tap on it and scroll to the build number. Tap on it 7 times and you will see the developer options getting enabled on your device.
Step 3: As we are using Android, you need to head to the Google Play Store and look for the app on it. Now, install and then open it to proceed.
Step 4: While the app is launched, tap on the “ENABLE” option located at the bottom.


Step 5: Now, you will be directed to the Developer options page. Here, choose “Select mock location app” and tap on “FakeGPS Free” subsequently.

Step 6: Now, get back to the Fake GPS app and the look for the route that you want to spoof. Press on the Play button and you are good to go. Your location will be changed on Skout.
Limitations:
- No matter spoofing is fun, but you need to be a little careful. In case it gets detected by the company, your account may get banned as this is against the policy of any app.
- The process of using the spoofer app to change Skout location can seem to be difficult and complex.
- Some apps require you to root your device in order to let you proceed with spoofing properly.
- When you spoof your location with the app too frequently, this may make your profile under suspicious activity monitoring.
Part 3: Use Tinder instead
Tinder has its own popularity among today’s generation and it has revolutionized the way of dating. If you are interested in faking location on a dating app, using Tinder will be our next suggestion. Unlike Skout, Tinder offers it own Tinder + feature in order to assist you in changing the location of your device. The condition is to subscribe the plan for Tinder +.
However, when you use Tinder +, you may feel it to be an expensive deal. On the other hand Skout is free to sign up. You need to be having a Facebook account in order to join Tinder whereas Skout doesn’t want any such requirement. Moreover, on Skout, you can have the meet tab with which you are allowed to see the photos of people and know the age.
Here are the detailed steps on how you can change location.
Step 1: Launch the Tinder in your Vivo T2 5G as the first step. Upon launching it successfully, go to your profile icon and tap on it. You will find it at the top of the screen.
Step 2: Look for the “Settings” option now and then choose “Get Tinder Plus” or “Tinder Gold”. You can now subscribe a plan and then Tinder + will be yours.
Step 3: Now, again open the Tinder app followed by tapping on the profile icon.
Step 4: Choose “Settings” and hit on “Swiping in” option. Next, tap on “Add a new location” and then you know what to do.

- Title: Why Your WhatsApp Live Location is Not Updating and How to Fix on your Vivo T2 5G | Dr.fone
- Author: Abigail
- Created at : 2024-07-24 19:34:30
- Updated at : 2024-07-25 19:34:30
- Link: https://location-social.techidaily.com/why-your-whatsapp-live-location-is-not-updating-and-how-to-fix-on-your-vivo-t2-5g-drfone-by-drfone-virtual-android/
- License: This work is licensed under CC BY-NC-SA 4.0.